Hidden Frame Rail Cracks: The Defect a Used Hook Lift Truck Buyer Cannot See
On a used hook lift truck, the defect most likely to cost you money is usually one you cannot see from the ground. Frame rail cracks sit underneath the mounted swap body and stay out of view until the container is lifted off. Most buyers never get that far.
A typical pre-purchase inspection covers what is visible and reachable. Buyers start the engine, test the cab, cycle the lift cylinder, and trace every hydraulic line for leaks. They photograph the hook, the subframe, and the body. What they skip is the chassis under the mounted body, where flexing, overloading, and rough roads concentrate stress in the steel. A truck can look road-ready at eye level and still be compromised two feet lower. Subframe and lift cylinder checks belong on any checklist, but those checks alone will not expose a cracked rail.
A swap body hides structural damage because it rests directly on the rails, over the exact area where cracks form. Load and vibration keep the metal pressed together, and the gap opens only when the weight comes off. The crack is real the whole time, just out of sight.
The Mechanics Behind Hook Lift Truck Frame Cracking
Swap body work loads a hook lift truck frame differently from general freight. Instead of steady rolling loads, the chassis frame rails take high, repeated stress through a few concentrated contact points. That cycle is what a buyer or technician needs to understand before servicing a used unit.
Point loads and torsional flex
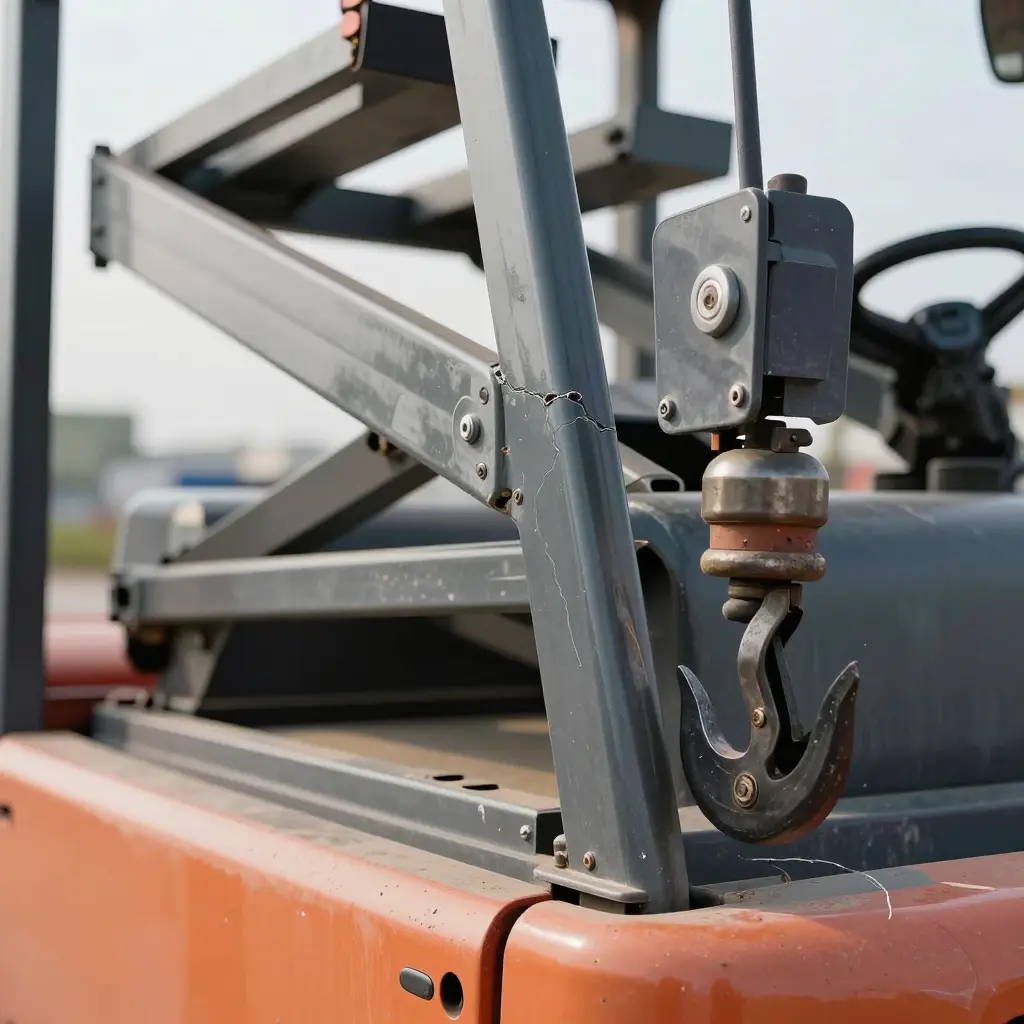
Concentrated point loads do the damage. The hook and the subframe mounts push the full weight of a loaded bin into small areas of the rail. Bolt holes, welded brackets, and crossmember junctions act as stress risers where bending and shear forces cluster. Every engagement and disengagement flexes those zones, and the steel does not fully spring back. Mechanics can learn to spot wear in the subframe and lift cylinder before cracks spread.
Torsional flex compounds the problem. On uneven ground one rail lifts while the other drops, twisting the ladder frame along its length. Overloading pushes stress past the section’s design limits, amplifying both bending and torsion, and cracks start at the weakest geometry along the rail.
Fatigue cracks from frequent bin swaps
Frequent bin swaps add cyclic loading. Every swap advances a fatigue cracks front by a microscopic increment, fastest at stress risers. Growth stays invisible for thousands of cycles, so damage usually turns up only after the swap body comes off and the rail is exposed. More cycles per year, heavier bins, and longer overhangs all cut the number of cycles a rail survives before it cracks.
Highest-Risk Frame Rail Crack Locations
The frame rails carry the combined load of the subframe, the swap body, and the lifting mechanism under constant cyclic stress, so treat them as the primary structural concern. Cracks do not appear at random. They cluster at stress transitions, mechanical attachments, and weld terminations, where flexing meets rigid reinforcement. Once the swap body is off and the rails are exposed, check these five places first.
- Near the hook lift subframe mounting brackets – Bolted and welded connections between the subframe and the rails create abrupt stiffness changes, so cracks start at bolt-hole edges and weld toes.
- Around crossmember joints – Crossmembers resist frame flexing, and the riveted or welded junctions concentrate shear and torsional stress that promotes cracking.
- Beside the lift cylinder anchor points – The hydraulic cylinder sends extreme localized force through its anchor, and the high tensile load fatigues the adjacent rail section.
- At frame rail flanges above the rear axle – This zone carries the sharpest bending moment and the most road-load deflection, so the flange edges are a common origin for horizontal cracks.
- Near suspension hanger attachment points – Suspension hardware transfers continuous dynamic impact and vibration into the rail, and the fastener holes act as stress risers that invite fatigue cracks.
How a Mounted Swap Body Masks Structural Defects
On a used hook lift truck, the swap body is a permanent obstruction, not just cargo equipment. The subframe sits on top of the chassis frame rails, covering the rail webs, flanges, and the area around the spring hangers and crossmembers. The bin walls and the cab shield block the diagonal sightlines an inspector needs to see the rail from the side. During a standing walkaround, most of the load-bearing structure is out of view.
Dirt, grease, and paint finish the concealment. Early cracks are subtle: a faint rust stain bleeding from a bolt hole, a hairline oil weep along a weld, cracked undercoating at a gusset. Road film, leaking hydraulic fluid, and a quick coat of chassis black hide all of it. A clean, freshly painted exterior says almost nothing about the metal underneath, which is why buyers get misled into purchasing a truck whose frame is already compromised. For a closer look at the parts that hide the most damage, see this guide to subframe and lift cylinder checks.
An accurate structural inspection therefore requires the swap body removed or lifted clear of the rails. Only then can a mechanic clean the frame, run a dye-penetrant or magnetic-particle test at high-stress zones, and measure for sag or distortion. Treat any inspection done with the body mounted as a visual overview, not a structural certification.

Where the Chassis Frame Bears the Load
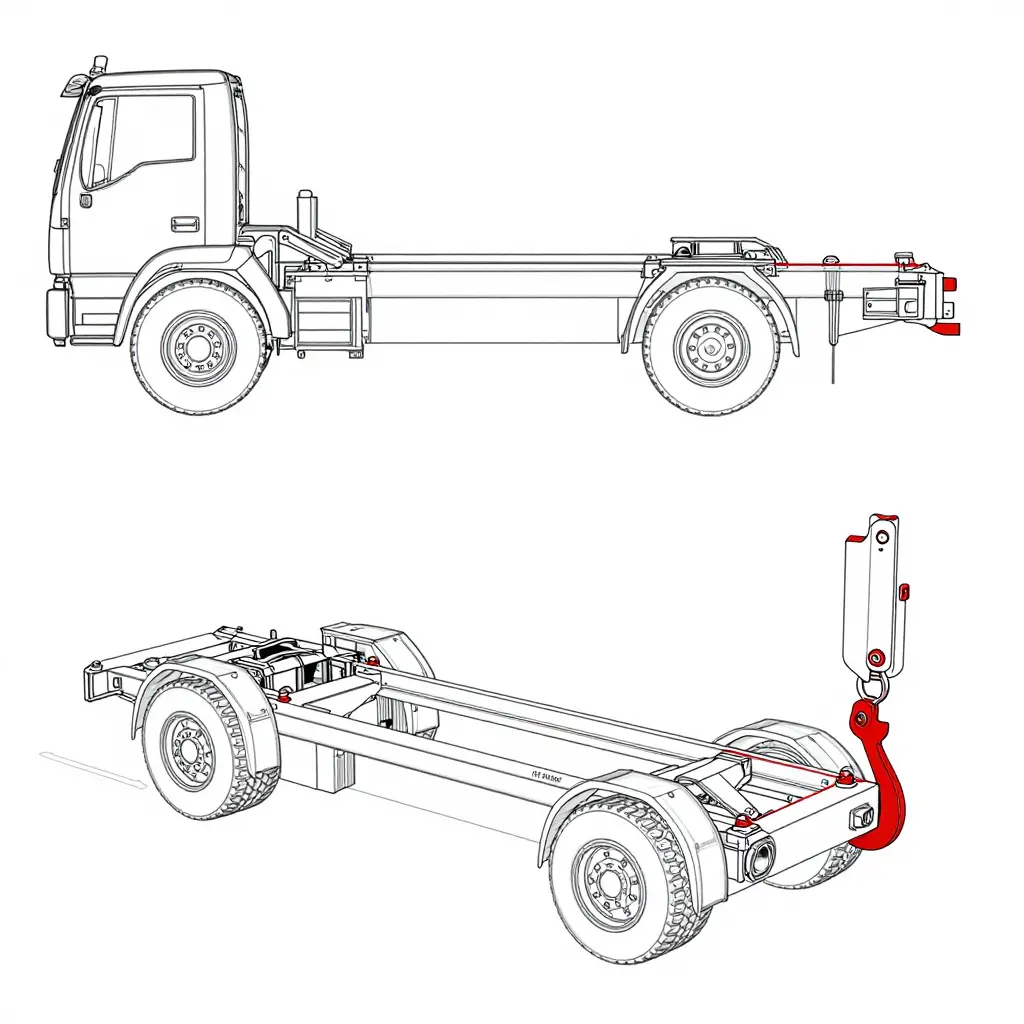
This schematic shows a hook lift truck chassis from the side, with the swap body drawn faintly and lifted away so the frame rail underneath is exposed. The red and orange zones mark the four places where fatigue usually shows up first: the subframe mounting brackets, the crossmember junctions, the lift cylinder anchor, and the rear frame tip.
Each point concentrates bending and torsional stress whenever a loaded bin is hoisted, tipped, or dropped. Because the swap body covers the frame for most of the truck’s life, these cracks stay hidden until the container comes off. Once it does, start at these four locations. For the mounting hardware, see our guide to the subframe and lift cylinder checks on a used hook lift truck.
Load Path: From the Lift Cylinder to Chassis Frame Rail Cracks
A hook lift subframe is a load-transfer structure, not just a flatbed bolted to a truck. It channels the force of a fully loaded bin into the chassis frame rails. When the lift cylinder extends, it produces vertical lift and rotational torque at once. That force enters the subframe at the cylinder anchor, spreads through the longitudinal beams and crossmembers, and reaches the mounting brackets that clamp the subframe to the rails. Mounting hardware torqued to spec keeps the load spread across the reinforced rail section where the builder intended it.
When mounting bolts lose their torque, the subframe rocks under load and force transfers through fewer fasteners. The remaining bolts elongate their holes in the rail web and flange, and once a hole is oval rather than round, the subframe shifts on every dump and pickup. That movement concentrates stress at the hole edges and the adjacent flange – the classic starting point for frame rail cracks. Cracked or elongated mounting holes are among the first things to measure with a straight edge and calipers once the swap body is off.
Cylinder anchor wear makes it worse. A wallowed anchor pin, worn bushing, or bent subframe changes the lift cylinder’s angle of attack so it pushes at an angle instead of straight. A sagging or bent subframe overloads specific rail sections, driving stress into the areas above the rear suspension hangers or the front mount. The loads are cyclical, so the rail eventually fatigues and cracks. For a step-by-step inspection sequence, read this companion guide on subframe and lift cylinder checks for a used hook lift truck.
Where Frame Rail Cracks Are Found on Used Hook Lift Trucks
Cracked frame rails do not announce themselves with a neat break. They hide behind brackets, inside weld toes, and along flanges buried under the swap body and subframe. The chart below summarizes relative crack prevalence across five chassis zones, as the percentage of inspected trucks with cracks in each area.
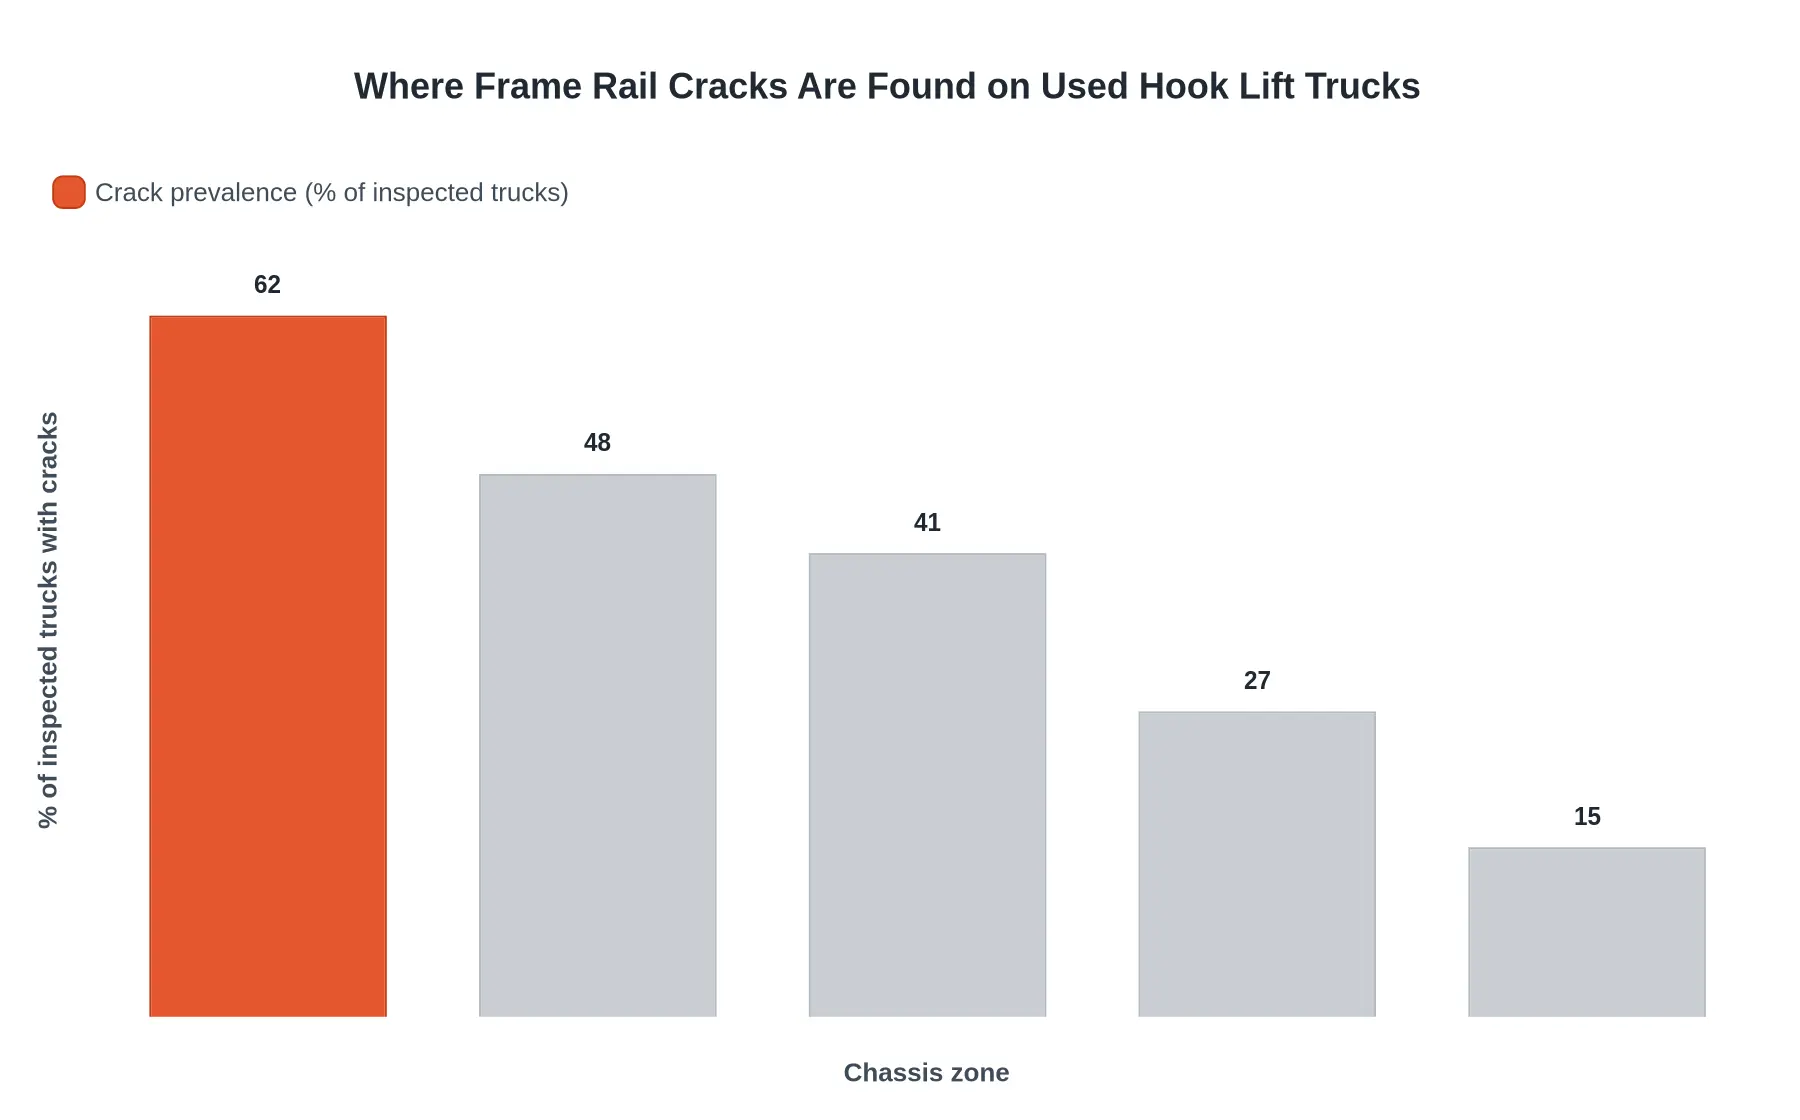
Subframe mounting brackets and crossmember junctions dominate the failures, and together they outweigh the rear frame tip by a wide margin. Those are the points where the hook lift’s concentrated loads, vibration, and repeated bin swaps transfer into the chassis. When inspecting a used truck, spend your time where the numbers point.
| Chassis Zone | Crack Prevalence (% of inspected trucks) |
|---|---|
| Subframe mount brackets | 62 |
| Crossmember junctions | 48 |
| Lift cylinder anchor area | 41 |
| Frame flange above rear axle | 27 |
| Rear frame tip | 15 |
Because the subframe and lift cylinder region tops the failure list, those components deserve a dedicated inspection routine before you commit to a purchase. Our guide to the subframe and lift cylinder checks walks through the high-risk zones.
Field Inspection Methods for Detecting Frame Rail Cracks
Once the swap body is off and the rails are exposed, the work begins. A frame rail inspection on a used hook lift truck is hands-on and methodical, not a glance from the ground. Work through these steps in order and record what you find before you negotiate price. For the components that load the rail, review these subframe and lift cylinder checks.
- Degrease and clean the frame first. Pressure-wash and solvent-wipe the rail flanges, web, and gusset areas. Grease, undercoating, and road grime hide cracks and the staining that betrays them.
- Light the rail at a low angle. Sweep a strong flashlight or LED bar nearly parallel to the steel. Raking light throws shadows across hairline cracks that flat overhead light misses.
- Tap the rail with a small hammer. A clean ring means sound steel; a dull, “dead” thud can mean a crack, delamination, or a rust-weakened section. Map those spots right away.
- Follow the rust bleed lines. Thin streaks of orange-brown rust weeping down the web or near a flange come from inside a crack and point to its location, especially near crossmember and bracket unions.
- Check bolt torque and mounting holes. Verify torque on subframe and crossmember fasteners and inspect every mounting hole for elongation, wallowing, or cracking. Loose hardware lets the rail flex and starts fractures.
- Confirm with dye penetrant or magnetic particle testing. Where equipment is available, apply dye penetrant or run a magnetic particle (MPI) check on suspect zones. These methods reveal surface-breaking cracks that visual inspection misses.
Treat every drilled hole and welded bracket as a stress riser and inspect those zones first. If you are compiling a used hook lift truck buying guide, the sequence is clean it, light it, tap it, trace it, torque it, and confirm it before money changes hands.
Post-Removal and Post-Swap Inspection Priorities
With the swap body removed or the container lifted clear, the chassis surface hidden for years is finally exposed. This is your one clear window to find damage before money changes hands, so work methodically.
Walk the full length of both frame rails, front to back. Look for rust bloom, flaking paint, and hairline cracks around the hoist mounting points, fuel-tank brackets, and the rear hinge. Treat anything that resembles a crack as one until proven otherwise. A bright flashlight and a wire brush reveal more than a casual glance.
Next, measure for sag or bend. A straightedge, taut string line, or laser along the top flange exposes gaps that signal a bent or sagging rail. Watch the crossmember rivets and welds: loose or stretched rivets, rust streaks weeping from seams, and cracked or undercut welds are red flags. Hoist geometry loads the frame differently by design, so it pays to understand how hoist type affects chassis stress when you compare hooklift vs cable hoist configurations.
Finally, check the subframe mounting plate. Look for corrosion, elongated bolt holes, and cracks where the plate meets the rail. Photograph every finding with a tape measure in frame for scale before you negotiate. Documented evidence gives you leverage and a defensible repair estimate.
Frequently Asked Questions About Frame Rail Cracks on a Used Hook Lift Truck
Can frame rail cracks be repaired safely?
Yes, but only under strict conditions and by a qualified heavy-truck shop. A correct repair means stop-drilling the crack tip to halt propagation, gouging the crack out completely, and welding a reinforcement plate of matching steel thickness across the affected section. A crack that runs through a rivet hole, a rivet line, or a bolt cluster is more serious and often means the rail is structurally compromised, not just worn.
How much does a chassis crack repair cost?
Expect roughly $500 to $1,500 per crack for a proper stop-drill, weld, and plate repair, and $2,000 or more if the rail must be spliced or a section replaced. Costs climb when the damage sits near a crossmember, the subframe mounts, or the rear of the frame, where the hook lift applies its highest torque. Get a written estimate before you commit, since hidden secondary damage can double the bill.
Do frame rail cracks make a used hook lift truck an automatic dealbreaker?
Not always, but cracks should change your price and your risk. A single, clean, accessible crack that has been professionally repaired and documented may be acceptable on a working truck. Multiple cracks, cracks at rivet holes, or any crack near a suspension or subframe mounting point are generally dealbreakers for a commercial fleet. Walk away if the seller cannot produce repair documentation or if cracks look painted over.
How often should frame rails be inspected?
Inspect the frame rails at every major service interval and always before buying a used hook lift truck. On heavily loaded hook loader trucks, a thorough inspection every 6 to 12 months makes sense, plus a closer look after any overload or hard impact. The most revealing inspection happens with the swap body removed, so you can see the full rail and the subframe mounting area; learn how to check the subframe and lift cylinder before you buy with the body off. Check the rail flanges, the web, the rivet lines, and every attachment point.
Does chassis mileage predict frame cracking?
Mileage alone is a poor predictor. A low-mileage used hook lift truck can have severe cracking if it spent years lifting overloaded containers on rough ground, while a high-mileage highway truck may have an intact frame. Duty cycle, load weight, and mounting quality matter far more than the odometer. Judge the frame by physical inspection, not the number on the dash.
The Bottom Line: Turn Inspection Findings Into Deal Terms
On a used hook lift truck, what you cannot see is what decides the deal. Insist the swap body comes off before money changes hands. Frame rail cracks, rusted flanges, and stress fractures concentrate on the underside, hidden under the subframe and body, and they stay invisible until the truck is stripped down. An immaculate cab and fresh paint prove nothing about whether the rails can carry another decade of loaded bins.
Start with the zones that take the most punishment, then work outward.
| Priority Zone | What to Verify |
|---|---|
| Frame rails (body off) | Cracks, corrosion, previous weld repairs |
| Subframe mounts | Cracks at brackets, stretched bolt holes |
| Lift cylinder pivots | Pin wear, seal leaks, bent rods |
| Rear hinge and body locks | Deformation, loose tolerances |
| Crossmembers | Bowing, cracks at welds |
Verified structural condition outranks exterior appearance. A clean-looking truck with hairline rail cracks is a money pit; a scuffed one with sound steel is a bargain. Before you commit, confirm the chassis suits your bins by reviewing the guidance on matching bin size to chassis length to avoid a costly mismatch.
CRRC builds special vehicles, and that manufacturing background is worth keeping in mind when you compare used trucks in a crowded market. Our recommendation: never buy without a stripped-down inspection, walk away from any rail cracks, and price the deal around verified structure rather than shine.