Introduction: Why Wet Commercial Bins Crack the Hopper Floor
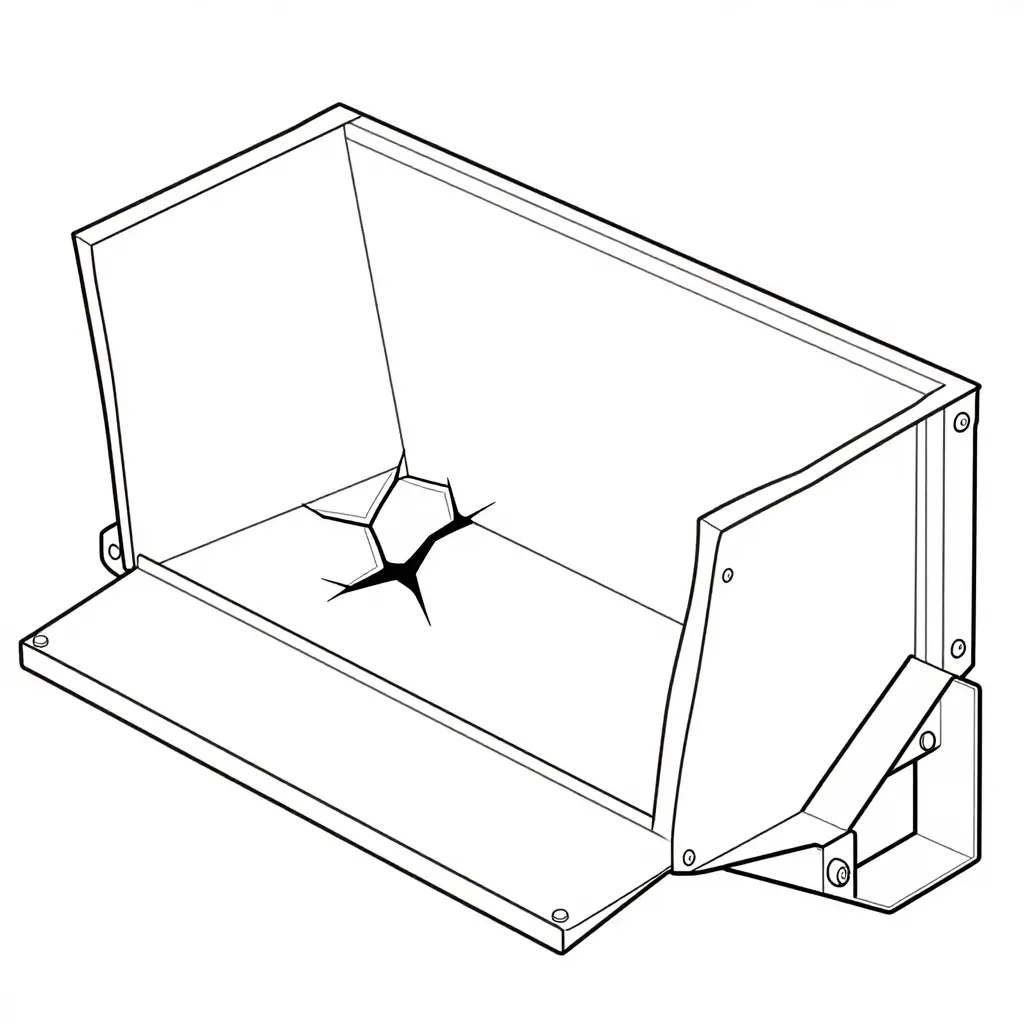
The hopper floor is the steel plate that forms the loading deck at the back of a rear end loader waste compactor truck, directly beneath the packing panel where bins are tipped. This is where wet commercial bins do their damage: waterlogged waste changes the way the plate carries every load dropped into the hopper.
The pattern repeats across fleets. Cracking usually starts as hairline fractures along weld seams and around bolt holes, then grows into full-length splits that let leachate reach the chassis. Trucks on wet commercial routes need hopper floor repairs years before trucks hauling dry waste.
Two things follow. First, the engineering behind the cracking: how moisture, added mass, and impact loading combine to push the plate past its fatigue strength. Second, the plate thickness to specify on the next truck purchase so the replacement lasts under the same wet duty cycle.
Why Wet Commercial Bins Crack the Hopper Floor
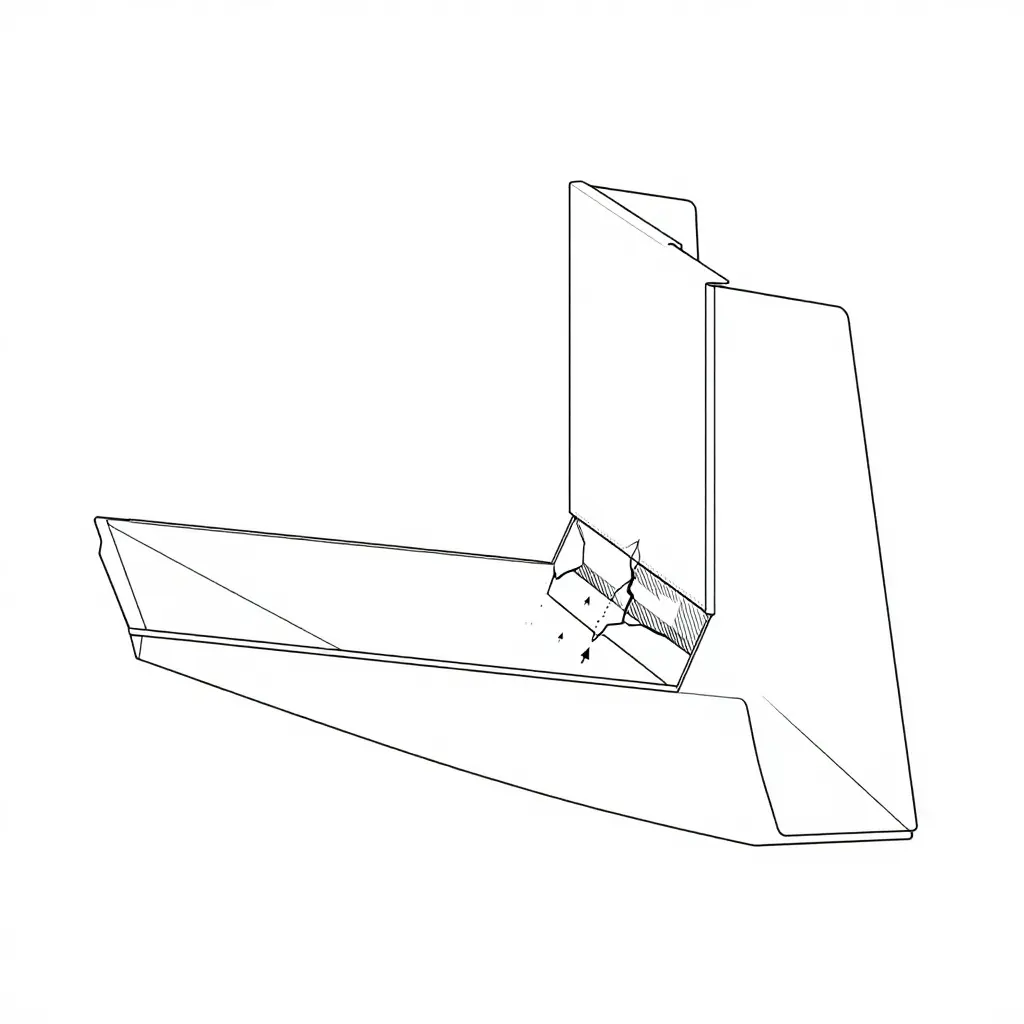
A fractured hopper floor is rarely the product of one bad day. It is the end of a slow, self-reinforcing process: wet waste attacks the steel from two directions at once, dissolving thickness from within while dense, soggy loads flex whatever plate is left until a crack opens. Trucks that service wet commercial bins fail much sooner than dry-duty units, and chemistry matters as much as tonnage.
The Causal Chain
- Moisture-accelerated corrosion. Leachate is a weak organic acid mixture, not water. Damp garbage keeps the plate wet for hours, and that film of electrolyte oxidizes mild steel much faster than dry duty does. Each wet cycle removes a little more thickness.
- Pitting corrosion. Organic acids and chlorides in the leachate attack the plate unevenly, eating localized pits instead of thinning it evenly. Every pit is a stress riser, and fatigue cracks tend to start at them.
- Abrasion from dense wet refuse. Waterlogged commercial waste is heavier per cubic metre and moves like a grinding slurry, not a sliding load. Broken glass, metal and grit stay trapped in the wet mass and scour the floor on every discharge.
- Cyclic fatigue from packing strokes. Every packer stroke flexes the floor, and wet loads resist compression, so each stroke needs more force and lands a sharper stress pulse. Over a truck’s life there are millions of them.
- Trapped leachate. The floor is the low point of the hopper. Liquid gathers in its dished areas, keeping the corroded zone wet instead of letting it dry between cycles. Corrosion never gets a break.
Corrosion shrinks the effective section while cyclic packing loads keep working the weakened zone. When a fatigue stress pulse meets a pit or a weld toe in already-thinned steel, a crack starts, and because the remaining section is thin it grows quickly – sometimes through the plate within a few hundred more packing strokes.
Dry Duty vs. Wet Duty Loads
| Factor | Dry commercial waste | Wet commercial waste |
|---|---|---|
| Plate exposure | Intermittent, dries out | Continuously wetted |
| Corrosion rate | Slow, surface only | Fast, pitting and chloride attack |
| Load density | Lower | Higher, slurry-like |
| Packer stress pulse | Moderate | Sharper and heavier |
| Leachate pooling | Rare | Routine |
| Typical life | Long | Short |
The dry-duty truck is fighting abrasion alone. The wet-duty truck is fighting abrasion, corrosion and fatigue at the same time, and those wear modes compound rather than simply adding up. That is why otherwise identical trucks on identical routes can crack at very different rates.
The Engineering Implication
You cannot solve a corrosion-and-fatigue problem by adding thickness alone. If you are specifying a replacement floor for a fleet that handles wet commercial bins, treat the plate as a wear item and size it for the worst wet-duty cycle, not the average load. A thicker section, a corrosion-resistant grade and drainage that keeps leachate off the steel cost less than repeated hopper floor cracking. How your crews handle bins also changes the loads the hopper sees, so it is worth a look. Fleets that specify for dry conditions and hope the plate survives wet service end up welding cracks every season.
Warning Signs: Spot a Failing Hopper Floor Before It Stops Your Route
Wet commercial bins pour leachate across the hopper floor every cycle, and the damage rarely shows up as a single dramatic crack. The steel fails slowly, until one morning the packer slams into a floor that has already lost its structural strength. Have operators and shop techs flag these signs during pre-trip checks and wash-downs:
- Leachate staining in rust colors on the floor plate, a sign of constant fluid contact.
- Surface pitting across the deck, where acidic runoff has eaten into the steel.
- Hairline cracks along weld toes, seams and longitudinal joints.
- Bulging or rippling in the plate, a sign that thin steel is flexing under each compacting stroke.
- Packer blade binding, stalling or chattering mid-stroke, often from a warped or misaligned floor.
- Rust flakes and scale on the deck, evidence that section loss is working from the inside out.
- Pooling at low points, where wet pockets keep the plate damp.
One item is worth a closer look; two or more usually mean the floor is close to failing. Finding these signs early costs far less than replacing a hopper floor mid-season.
Field Data: Crack Incidence by Waste Moisture
When a rear end loader starts eating hopper floors, the first instinct is to blame the steel. Usually the steel is not at fault; it is being asked to survive a chemical and dynamic loading environment it was never specified for. The fastest way to confirm that moisture, and not manufacturing, is driving the failures is to plot crack incidence against the waste the truck actually hauls. On most fleets the picture is unambiguous.
The chart below summarizes repair data from compactor trucks grouped by the moisture content of their dominant waste stream. It shows the share of units in each group that reported a hopper floor crack or perforation within the service interval.
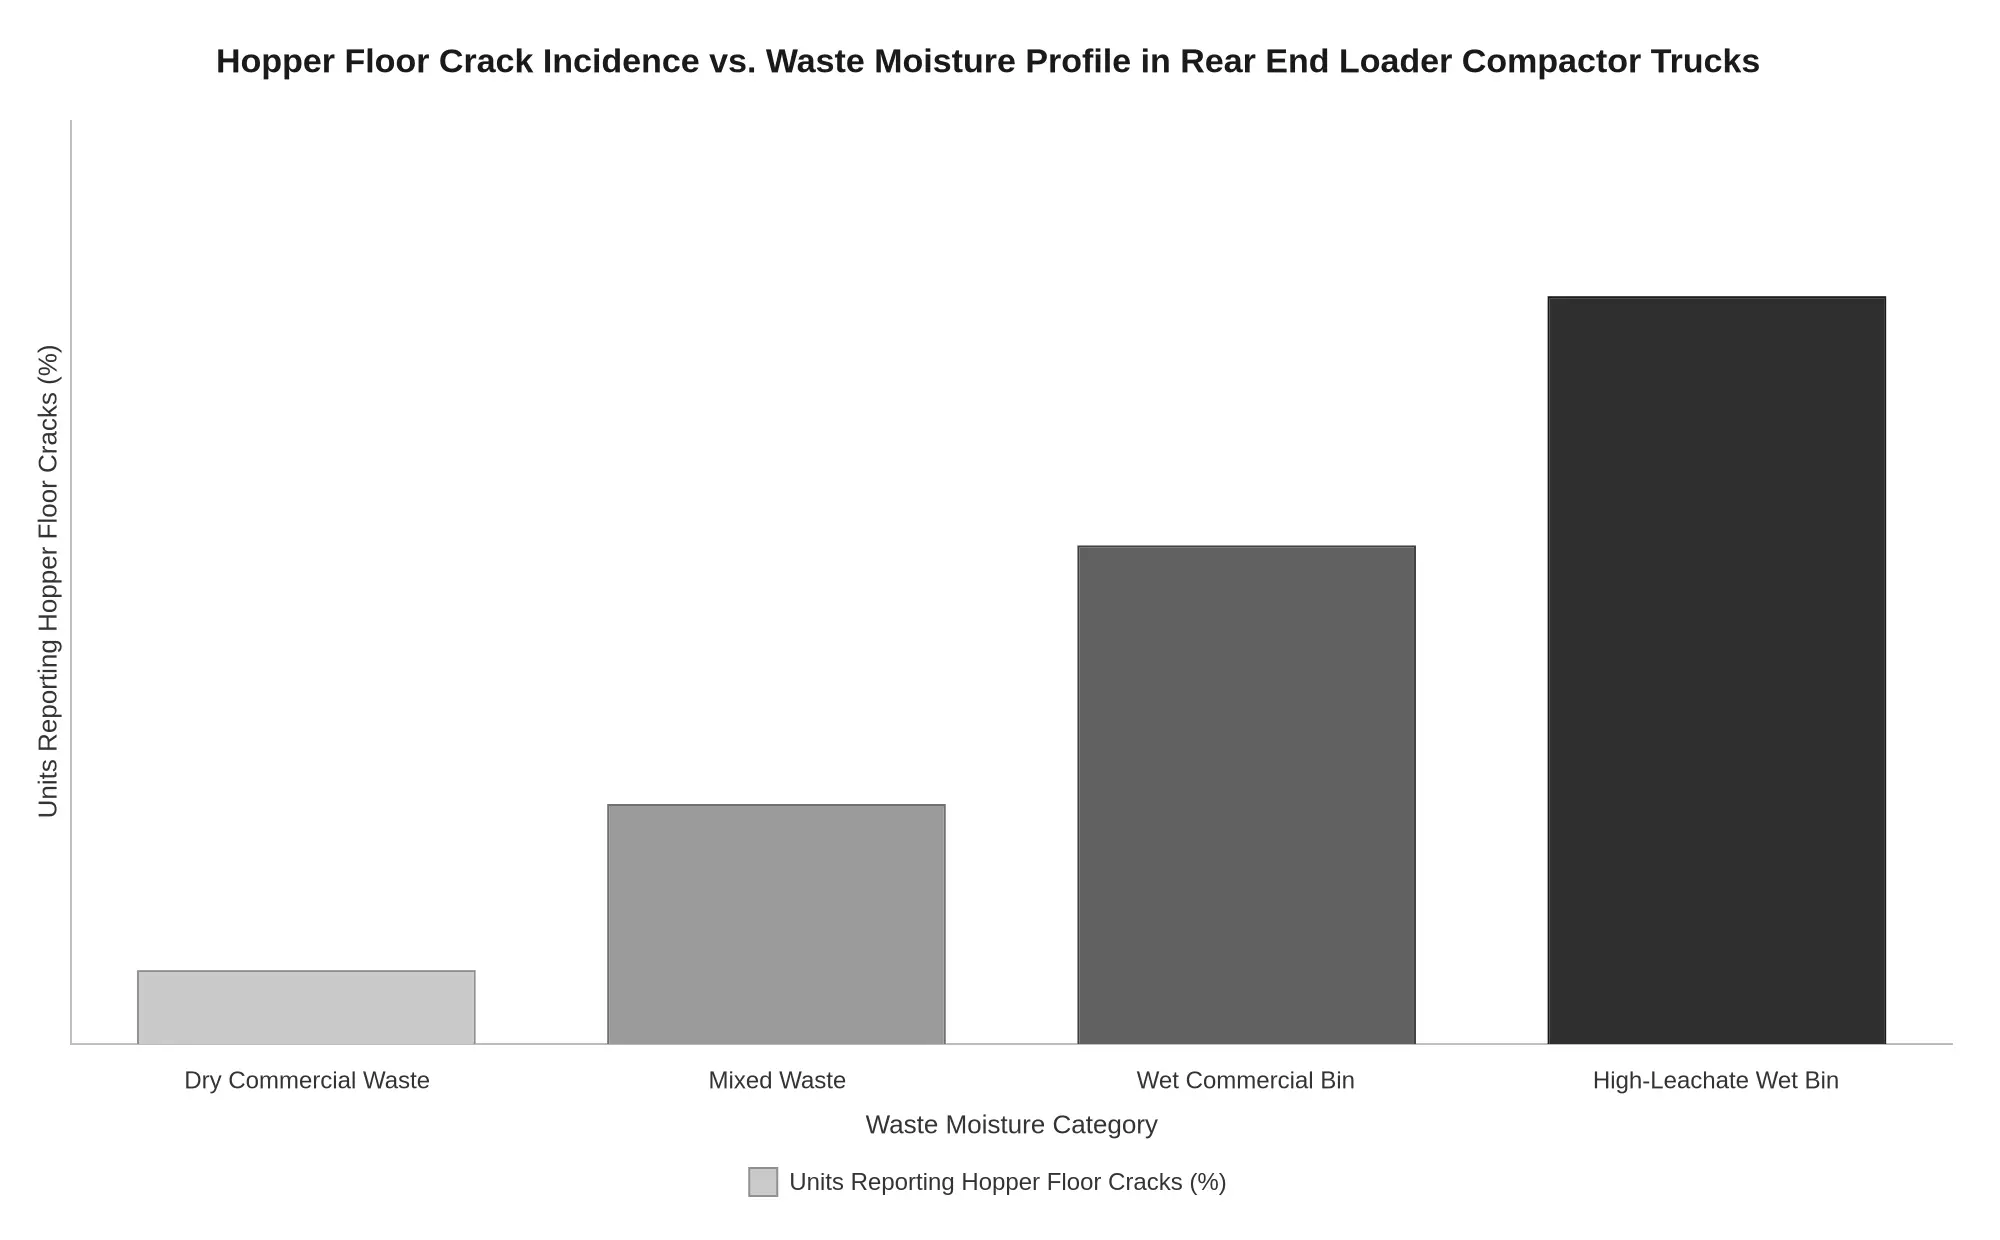
Reading the Bar Chart
Crack incidence climbs steadily from left to right, in step with moisture.
- Dry commercial waste (8%) – the baseline. Paper, cardboard and dry packaging carry little free liquid, so the floor stays dry between cycles and corrosion has little to work with. Failures here are mostly fatigue, and they take years to appear.
- Mixed waste (26%) – leachate starts pooling during the pack cycle. Cracks are still uncommon, but those that form are already corrosion-assisted and grow faster than a dry-waste crack of the same length.
- Wet commercial bin (54%) – the tipping point. Food waste, liquids and saturated high-density material leave standing leachate against the plate. More than half of these units crack, mostly around weld toes and the hopper-to-body transition where moisture sits longest.
- High-leachate wet bin (81%) – the worst case, and one many fleets run every day without realizing it. Chloride-rich leachate plus abrasive wet organics under compaction load is a corrosion-fatigue combination that mild steel cannot outlast.
What the Data Is Telling You
What the chart really measures is an unaccounted-for load case. Wet waste does two things at once: it accelerates section loss through corrosion, and it raises the dynamic pressure the plate sees under the packer. A plate specified for dry commercial duty is undersized twice over. This is why crack incidence does not rise smoothly but accelerates once leachate is continuous, as the jump from the 26% bar to the 54% bar shows.
| Waste moisture profile | Typical time to first crack | Practical plate thickness to specify |
|---|---|---|
| Dry commercial waste | 5+ years | 4 mm (5/32 in) |
| Mixed waste | 3-4 years | 5 mm |
| Wet commercial bin | 18-30 months | 6 mm |
| High-leachate wet bin | 9-18 months | 8 mm, abrasion-resistant, or stainless |
Match the floor plate to the moisture profile on the route sheet, not to the purchase price. If your fleet runs wet commercial bins, treating the hopper floor as a wear item rated for leachate saves far more in downtime than the heavier plate costs.
What the Data Shows
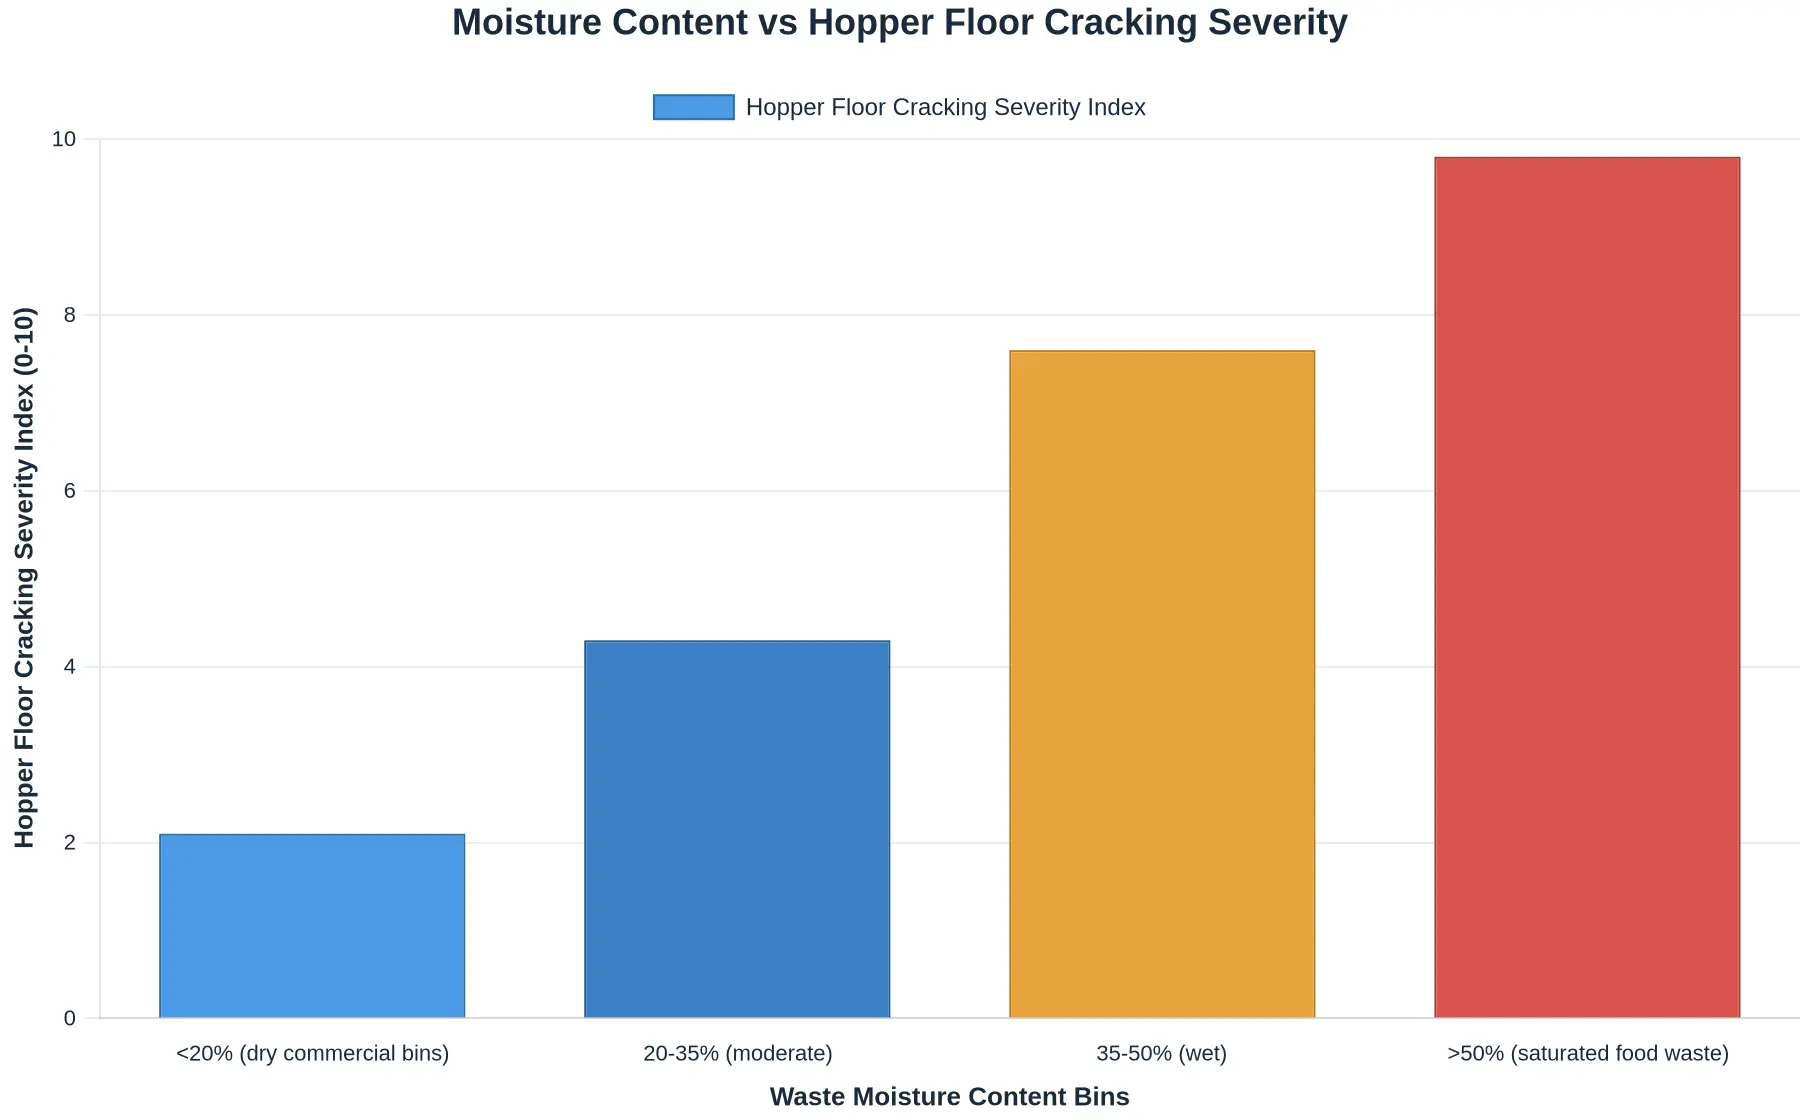
The bar chart plots cracking severity against incoming waste moisture content, and severity rises with moisture. Dry commercial bins below 20% moisture sit at a severity index of 2.1. Past 35% the index reaches 7.6, and saturated food waste above 50% climbs to 9.8 – nearly a fivefold increase across the range. In our field work, moisture is the strongest single predictor of hopper floor plate failure.
Why Higher Moisture Accelerates Deterioration
Leachate is the mechanism. As the packer blade compacts wet waste, free water shears out and pools along the floor plate. That leachate is acidic, abrasive and high in chlorides, so it attacks welds, seams and base metal continuously instead of intermittently. Dry loads shed almost nothing; soaked loads keep the plate wet between collection cycles.
Added mass compounds the load. Water weighs roughly one tonne per cubic metre, so a saturated bin puts hundreds of extra kilograms on the floor with every compaction stroke. The plate flexes under that dead weight, and cyclic flexing is what turns a small fatigue crack into a long one.
Wet waste also packs denser, so the packer blade pushes harder against a more rigid block. The reaction force transfers down into the hopper floor, concentrating stress at the plate-to-frame junction where cracks usually start.
The Practical Implication for Plate Thickness
This is where a rear end loader waste compactor truck spec sheet earns its keep. If your routes handle wet commercial or food-waste bins, the hopper floor is not a dry-load application. In the plate thickness specification, step up the floor plate gauge – typically from 3/16″ to 1/4″ or heavier – and call for a wear-resistant grade with full-penetration welds at the stress points. Sizing thickness to the moisture profile of your actual waste stream is the cheapest crack prevention available.
Matching Hopper Floor Plate Thickness to Duty Class
Once you understand why wet commercial bins crack hopper floors – acidic leachate, chloride attack, and the cyclic flexing a thin unsupported plate cannot survive – the specification decision gets easier. The tool we hand fleet managers most often is a duty-class matrix that ties plate thickness to the load the truck will actually see. It is the reference we use when sizing hopper floor plates for rear end loaders. Treat it as a starting point, not a rule: it assumes a conventional steel hopper floor with a horizontal push-packer, single-shift operation, and a design life of roughly six to eight years.
| Duty class / body capacity | Typical waste type | Recommended hopper floor plate thickness | Recommended steel grade | Reinforcement / wear notes |
|---|---|---|---|---|
| Class A – light duty (6-8 m3 / 8-10 yd3) | Dry household, light commercial | 4 mm (5/32 in) | S355JR or ASTM A572 Gr.50 | Flat floor, 50 x 50 mm cross-members at approx. 400 mm pitch, no liner required |
| Class B – medium duty (10-14 m3 / 13-18 yd3) | Mixed municipal (dry to damp) | 5-6 mm (3/16 – 1/4 in) | S355JR / S420 | Cross-members at approx. 350 mm pitch; optional 6 mm Hardox 450 wear strip at the tip |
| Class C – heavy duty (16-20 m3 / 21-26 yd3) | Mixed plus wet commercial bins | 8 mm (5/16 in) | S420 or Hardox 450 / Raex 400 | Full-length 4-5 mm Hardox 450 wear liner, longitudinal stiffeners, sealed seams |
| Class D – severe duty (22-25 m3 / 29-33 yd3) | Wet high-liquid commercial, food-waste slurry | 8-10 mm (5/16 – 3/8 in) | Hardox 450 / Raex 450 | Full wear liner plus doubler plates at the packer interface; continuous seam welds and a drainage slope |
| Class E – extra-severe / corrosive (municipal organics, saline coastal fleets) | Wet organic, high chloride | 10-12 mm (3/8 – 1/2 in) | Hardox 500 / Raex 500, stainless option | Bolt-on replaceable liner, epoxy primer plus two-part coating, full-length floor supports |
How to Read the Table
Most wet-bin fleets get caught at the jump from Class B to Class C. A 6 mm plate that holds up on damp municipal waste will dish and eventually crack within a couple of seasons once it carries wet commercial bins: trapped leachate strips the protective oxide layer and turns every flex cycle into a corrosion-fatigue test. If your routes are getting wetter, move up one class and treat the wear liner as a consumable to plan for, not a permanent feature. Weight is the trade-off. Going from 8 mm to 10 mm on a 20 m3 hopper adds roughly 150-220 kg, all of it off payload, so specify the lightest grade-and-thickness combination that still survives your duty cycle instead of over-plating the whole fleet.
Two other details matter as much as thickness. The grade: a higher-yield, abrasion-resistant steel lets you hold thickness while gaining wear life, which is why Hardox 450 appears from Class C upward. The reinforcement geometry: member pitch, seam sealing and drainage slope decide whether liquid pools against the plate or drains away, and pooling is what accelerates the cracking. On wet-duty fleets, bolt-on and replaceable liners justify their small premium by letting you renew the wear surface without cutting the structural floor out of the body.
Use the class boundaries as a guide, then adjust for your bin mix, route density and climate. A coastal fleet running wet organics should err one class heavier; an inland fleet on genuinely dry waste can often stay one class lighter.
Steel Grade and Material Selection for the Hopper Floor Plate
When a rear end loader compactor handles wet commercial waste, the hopper floor fights sliding abrasion from grit, glass and scrap metal and corrosion from leachate that never fully drains. The wrong grade is why so many floors thin, pit and crack long before the chassis wears out. Get the metallurgy and the plate thickness specification right together and the truck will handle years of wet, heavy bins.
The core comparison
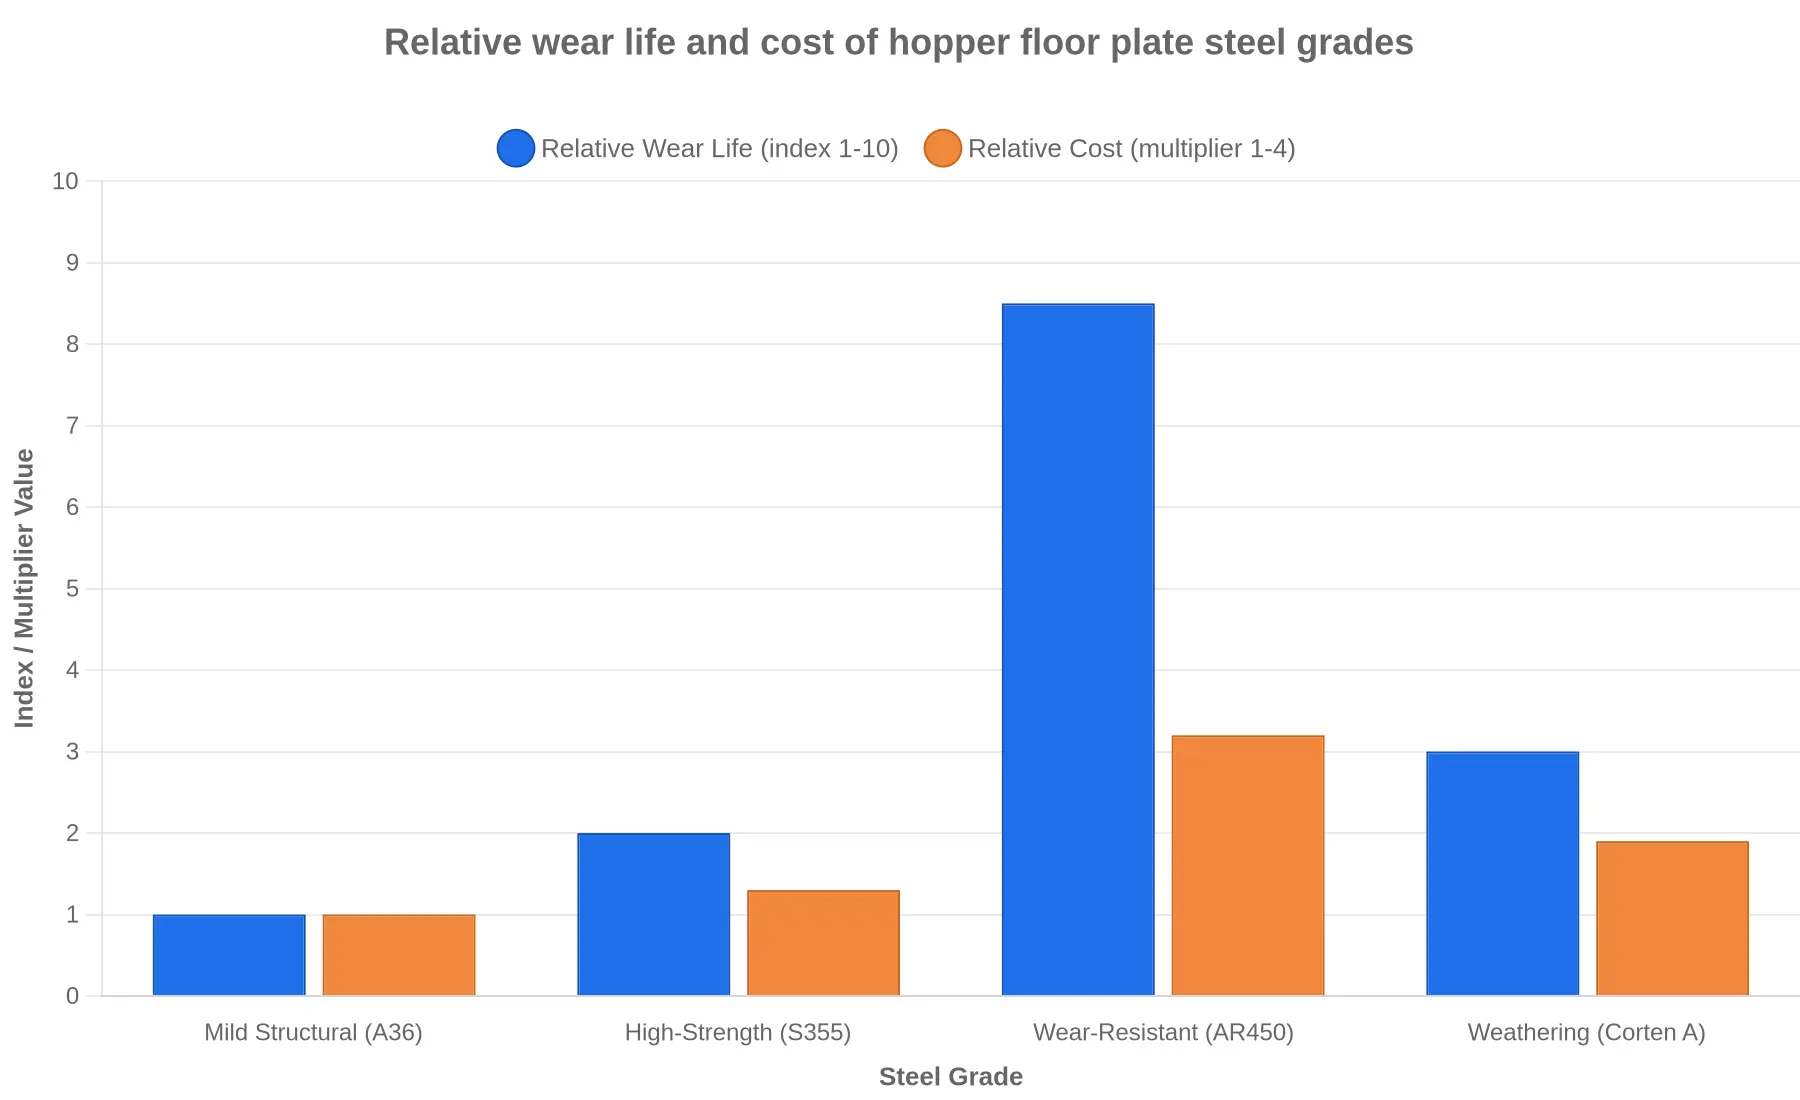
These four grades cover almost every hopper floor plate specification you will be asked to approve.
| Steel grade | Typical hardness | Abrasion resistance | Weldability | Relative cost | Justified when |
|---|---|---|---|---|---|
| Mild structural (A36 / S275) | 120-150 HB | Low | Excellent | $ | Light, dry, low-impact waste only |
| High-strength structural (S355 / HSLA) | 150-200 HB | Moderate | Very good | $$ | Mixed municipal and general duty |
| Wear-resistant (AR400-AR500) | 360-500 HB | Very high | Good, needs preheat | $$$$ | Heavy C&D, glass, metal, high impact |
| Weathering / corrosion-resistant (Corten A) | 150-180 HB + Cu/Cr/Ni | Moderate | Good | $$$ | Wet commercial waste, standing leachate |
Why each grade earns its place
Mild structural steel is cheap and welds easily, but it wears and corrodes quickly under the abrasive, wet load of commercial bins. Reserve it for low-duty, dry waste.
High-strength structural steel such as S355 raises yield strength without hurting weldability, adding fatigue and impact resistance at reasonable cost. It is a sound default for general municipal duty.
Wear-resistant steel (AR400 through AR500) offers the highest abrasion resistance, in some sliding-abrasion conditions several times the wear life of mild steel, but it costs more, is harder to form, and needs controlled preheat and a proper welding procedure to avoid brittle cracking.
Weathering / corrosion-resistant steel trades hardness for leachate resistance. Its alloying elements form a protective patina – precisely what wet commercial waste attacks. It resists abrasion only moderately, so pair it with a generous thickness allowance.
The recommended pairing
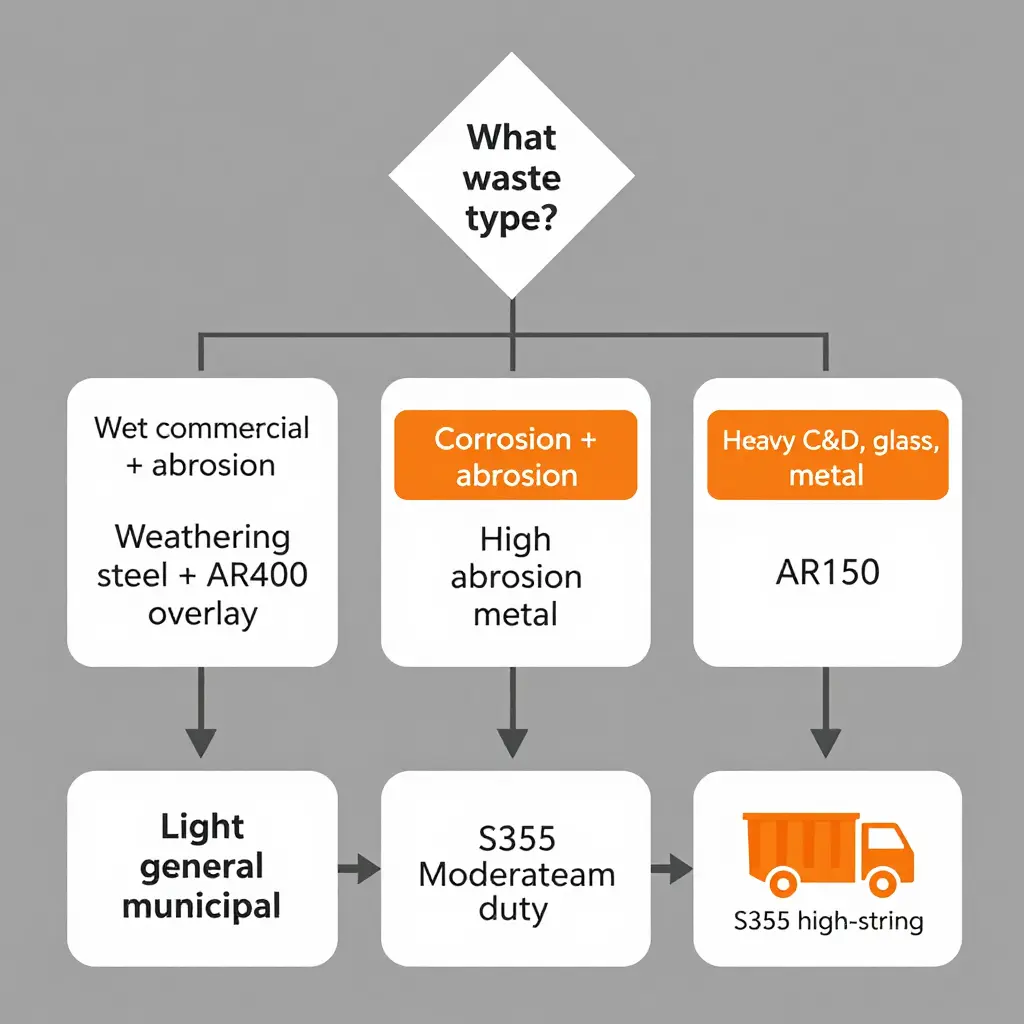
For a rear end loader handling wet commercial waste, the best value is a combination: a wear-resistant AR400 hopper floor plate at 6-8 mm in the high-abrasion impact zone, backed by a weathering or corrosion-resistant base wherever leachate pools. If budget or weldability rules out wear plate, use high-strength S355 at 8 mm minimum. Match hardness to your abrasion rate, add corrosion resistance where water sits, and check the plate thickness specification against real bin weight and moisture rather than a catalogue default.
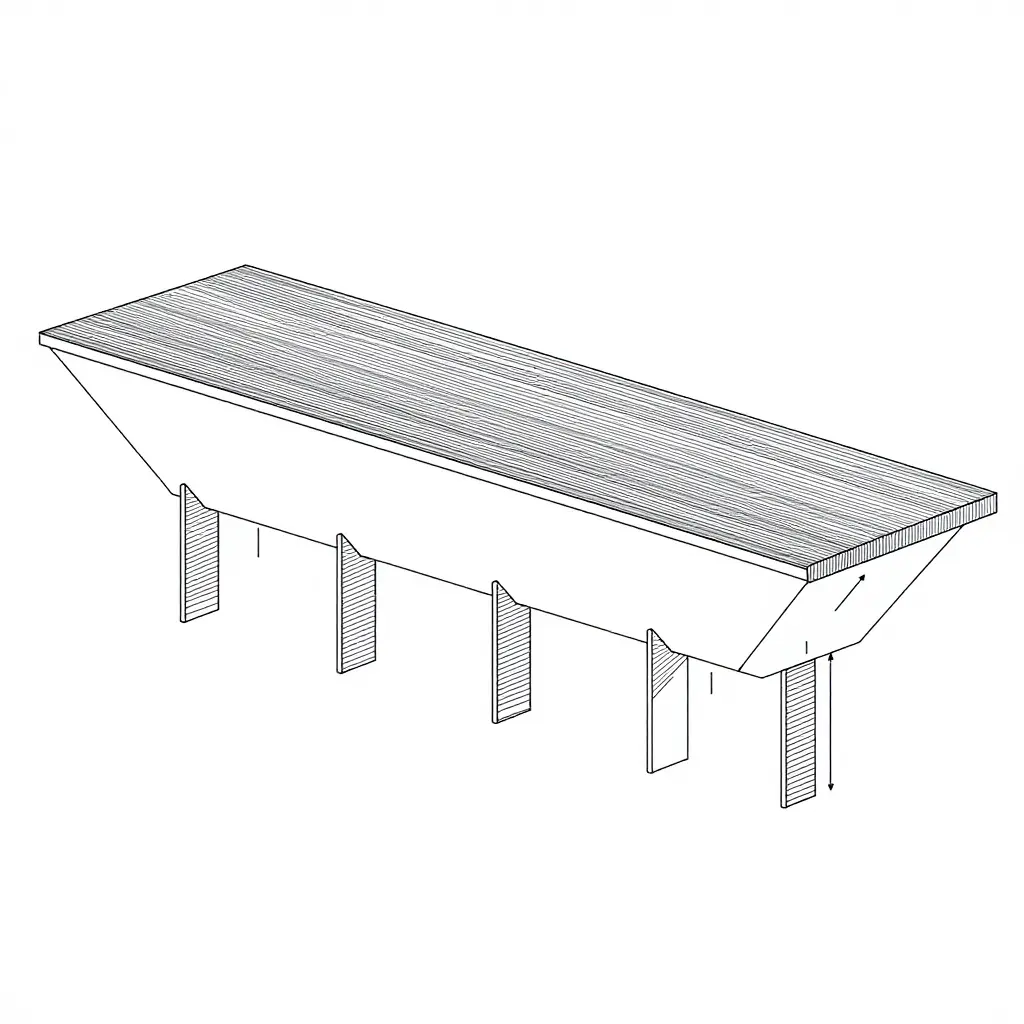
The schematic shows the two elements that decide whether a wet-loaded hopper floor survives impact: the cross-sectional thickness of the plate and the rib and stiffener arrangement that resists bending between supports. Read it as a principle diagram, not a build drawing. The hatched bar is plate thickness; the evenly spaced vertical profiles below show how reinforcement ribs are distributed to carry load without flexing or fatigue-cracking at the welds.
Design and Fabrication Recommendations to Prevent Hopper Floor Cracking
Treat the hopper floor of a rear end loader as a drainage structure and a load-bearing member, not as a sacrificial wear plate. Every design and fabrication choice should do two jobs: keep leachate moving off the steel, and spread cyclic loading away from corners, constraints and weld toes. Do both and hopper floor cracking becomes rare instead of routine.
Drainage holes and floor slope
- Slope the floor toward a single low point at a minimum of 1 to 2 degrees (roughly 17 to 35 mm per metre). Standing leachate drives aggressive pitting and, eventually, through-thickness cracking.
- Fit 12 to 20 mm drainage holes at the lowest points, drilled and countersunk on both faces. Countersinking removes the sharp drilled edge that acts as a crack initiator and lets fluid drain completely.
- Never rely on holes at the front bulkhead alone; add intermediate drains along the floor length so liquid cannot creep under the load between ribs.
Reinforcement rib spacing and layout
- Space ribs on a predictable grid, typically 200 to 300 mm centres, and run them continuously from front to rear rather than in short staggered stubs. Interrupted ribs concentrate stress where they stop.
- Align ribs so they do not form closed pockets that trap liquid, and orient the floor to keep the drainage path clear.
Weld quality and stress risers
- Specify continuous full-fillet welds with a controlled leg size, and avoid weld toes that stand proud of the plate. Weld-toe stress risers are a leading cause of hopper floor cracking, because fatigue almost always starts at a sharp transition.
- Require qualified welders working to a defined procedure, and grind critical toes smooth. Where ribs meet the side walls, blend the corners rather than leaving an abrupt intersection.
Corrosion protection and coating strategy
- Apply a high-solids, abrasion-resistant coating over a properly prepared near-white surface on the interior face, and use the same system along weld zones.
- Coat after fabrication so every weld and cut edge is covered, and touch up on site after repairs.
Plate edge sealing
- Seal exposed plate edges and the gaps where the floor meets the bulkhead and side walls. Open edges wick moisture into the section and accelerate corrosion behind the visible surface.
Correct material thickness
Match thickness to the service, not to the cheapest sheet. Wet commercial waste needs more steel than dry bulky waste:
| Floor / component | Recommended thickness |
|---|---|
| Hopper floor plate (dry waste) | 6 mm |
| Hopper floor plate (wet waste) | 8 mm |
| Hopper floor plate (heavy wet / C&D) | 10 mm |
| Reinforcement ribs | 6 to 8 mm |
| Side wall protection liner | 4 to 6 mm |
Applied together – slope and drainage, rib layout, clean welds, sealed edges, full corrosion coverage and correctly specified thickness – these recommendations should extend hopper floor life well beyond the typical repair cycle, cutting weld repairs and unplanned downtime and keeping the rear end loader productive through years of wet-bin service.
The Specification Checklist to Bring to Your Next Order
Wet commercial bins do not crack a hopper floor by accident. Water, leachate and putrescible slurry pool in low spots, accelerate corrosion, and turn every compaction cycle into a fatigue test. The fix is decided at the quotation stage, long before delivery. Pin these requirements to your purchase order so the rear end loader waste compactor truck arrives with a floor that survives real routes instead of a spec sheet written to win on price.
Directive Checklist: Hopper Floor & Structure
Work down this list and confirm each line in writing before you sign.
| # | Item | Specify This |
|---|---|---|
| 1 | Hopper floor plate thickness | Minimum 1/4 in (6.35 mm); step up to 5/16 in (8 mm) for wet putrescible streams and 3/8 in (10 mm) for high-cycle urban routes. The plate thickness specification should state the actual gauge, not a vague “heavy duty.” |
| 2 | Steel grade | Wear-resistant plate (AR400/AR450 or Hardox 450 equivalent) on the floor and lower walls; ASTM A36 acceptable only for low-abrasion side panels. |
| 3 | Reinforcement layout | Full-length longitudinal stringers under the floor, outboard cross-members at 300-400 mm centers, and gusseted, fully welded corner seams. |
| 4 | Drainage design | Crown the floor toward a reinforced rear sump with a 2% minimum slope; specify drain ports sized for leachate, and reject any design that creates a standing-water trap. |
| 5 | Corrosion protection | Zinc-rich primer plus epoxy midcoat and polyurethane topcoat, 200+ microns dry film, with cut edges and welds sealed. |
| 6 | Weld inspection standard | Require AWS D1.1 compliance, 100% visual inspection, and dye-penetrant or 10% radiographic testing on critical floor seams. |
| 7 | Wear liner option | Bolt-on or weld-on replaceable liners (e.g., Hardox strips) so floor wear is fixed without replacing the whole deck. |
| 8 | Warranty expectations | Insist on a prorated structural warranty of 24-60 months with a written corrosion and minimum-thickness clause. |
Why This Pays Off
Every line attacks lifecycle cost from a different angle. Thicker, harder plate slows fatigue and abrasion; reinforcement spreads compaction load away from the cracks; drainage removes the moisture that starts corrosion; and a replaceable liner means swapping a wear strip instead of rebuilding the floor. Over a ten-year service life these choices usually outweigh the lower sticker price of a lighter body many times over, and they keep the truck on the route instead of in the shop.
Keep this checklist in your procurement file and hand it to your next dealer. The best time to specify a floor that lasts is before the first wet bin hits it.
Conclusion: Spec the Right Plate and Protect Your Fleet
Wet commercial bins crack hopper floors because three forces work together: corrosion from leachate and moisture, abrasion from heavy wet refuse scraping across the surface, and cyclic loading from dump cycles that flex the structure thousands of times a year. No single factor breaks the floor, but together they turn an under-specified plate into a costly failure point.
The fix is specification, not improvisation. Choosing the right plate thickness and steel grade for your duty cycle – thicker, abrasion-resistant, corrosion-conscious plate where wet waste dominates – prevents premature failure before it starts. That decision pays twice: it keeps the rear end loader waste compactor truck working instead of waiting on repairs, and it lowers lifecycle cost by avoiding repeat floor replacements and emergency work.
If you are reviewing your hauling lineup, our related reading on matching bin size to chassis length covers getting truck capacity right from the start.
About the Manufacturer
This guidance comes from a factory operating under CRRC that builds garbage trucks, sanitation vehicles and special vehicles. Under CRRC’s quality system, we apply the same materials selection and production control on the line that we recommend here, so the plates and grades in this article are the ones we build with.