Garbage Truck Compactor Rear Loader: Why the Tailgate Drops on One Side on Uneven Alley Routes
A compactor tailgate that starts to sag or drop on one side after months on sloped, rutted, or crowned alley routes is not a random failure, and it is not a design defect. It is what happens when worn hinge pins and bushings see uneven loading while the body twists on uneven pavement.
A rear loader tailgate is a heavy hinged structure carried on two hinge pins, one at each side of the body. On level ground the load splits roughly evenly. On uneven routes the frame flexes, weight shifts to a single hinge point, and that side wears faster. The pin, the bushing, and the surrounding boss all lose material. Clearance grows, the tailgate loses alignment, and one side rides lower than the other.
What This Guide Covers
- The mechanical cause of single-side tailgate sag and drop
- How uneven alley routes create asymmetric hinge loading
- Step-by-step hinge pin wear measurement guidance
- How to read your measurements and decide whether to adjust, re-bush, or replace
This is written for fleet maintenance managers, technicians, and sanitation departments who service rear-loader compactors daily. The objective is practical: quantify the wear with real measurements before a sagging tailgate becomes a safety hazard and a source of unplanned downtime.
Who This Is For
This assumes you already know the machine. It explains why the tailgate leans, then gives you a repeatable inspection sequence you can run in the shop yard with basic hand tools and a set of calipers. Work through the cause, then the measurement, and the repair decision follows from the numbers.
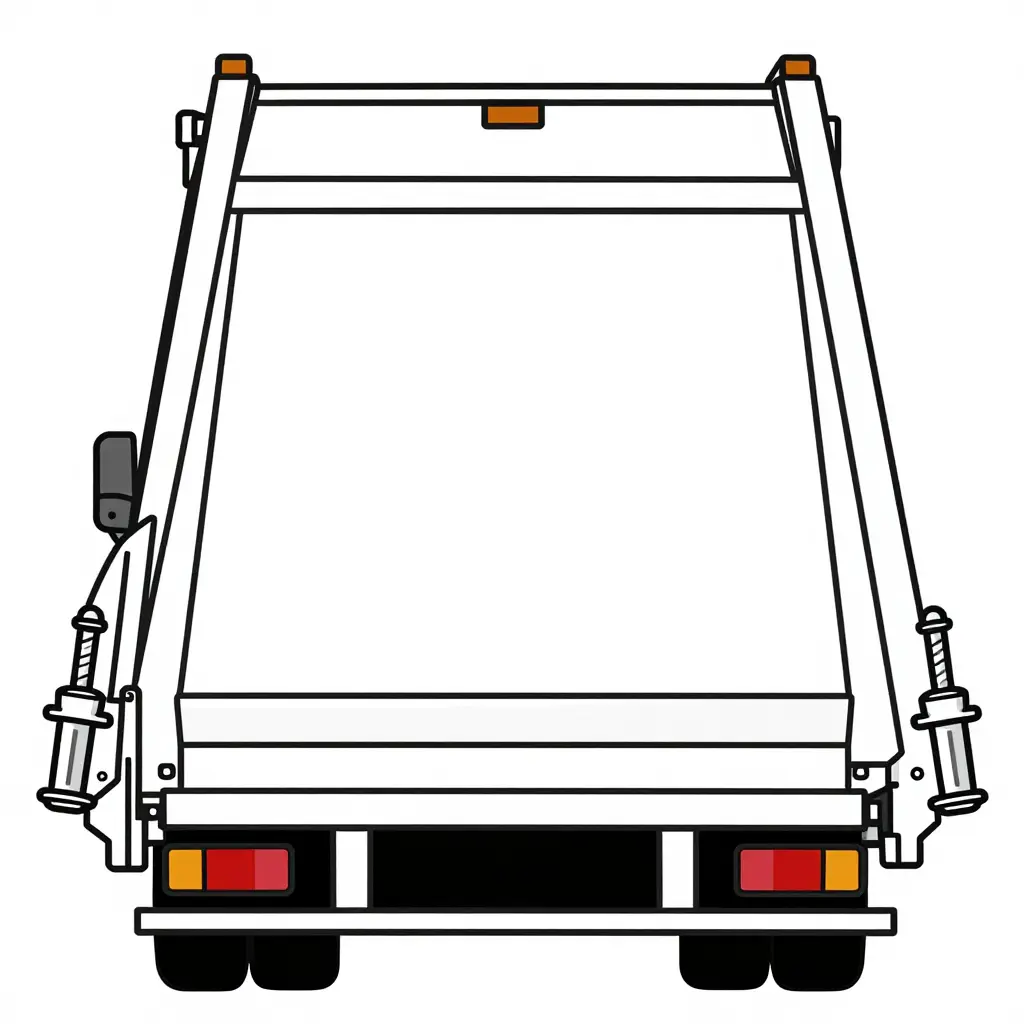
Figure 1. Simplified 2D schematic of a rear-loader compactor tailgate hinge assembly. Each side of the tailgate pivots on a hinge pin that passes through a bushing seated in the welded mounting ear on the body. When the pin or bushing wears on one side only, the tailgate can sag or drop unevenly, which is the condition we measure below. Locate the two hinge pins and their bushings on this diagram before you begin.
Why the Tailgate Drops on One Side: The Mechanics of Uneven Alleys
A rear loader tailgate is a heavy, rigid weldment hung on two hinges at the top rear corners of the body. On paper, both hinges share the load evenly. In a real alley route – crowned pavement, broken curbs, sunken trash pads – they don’t.
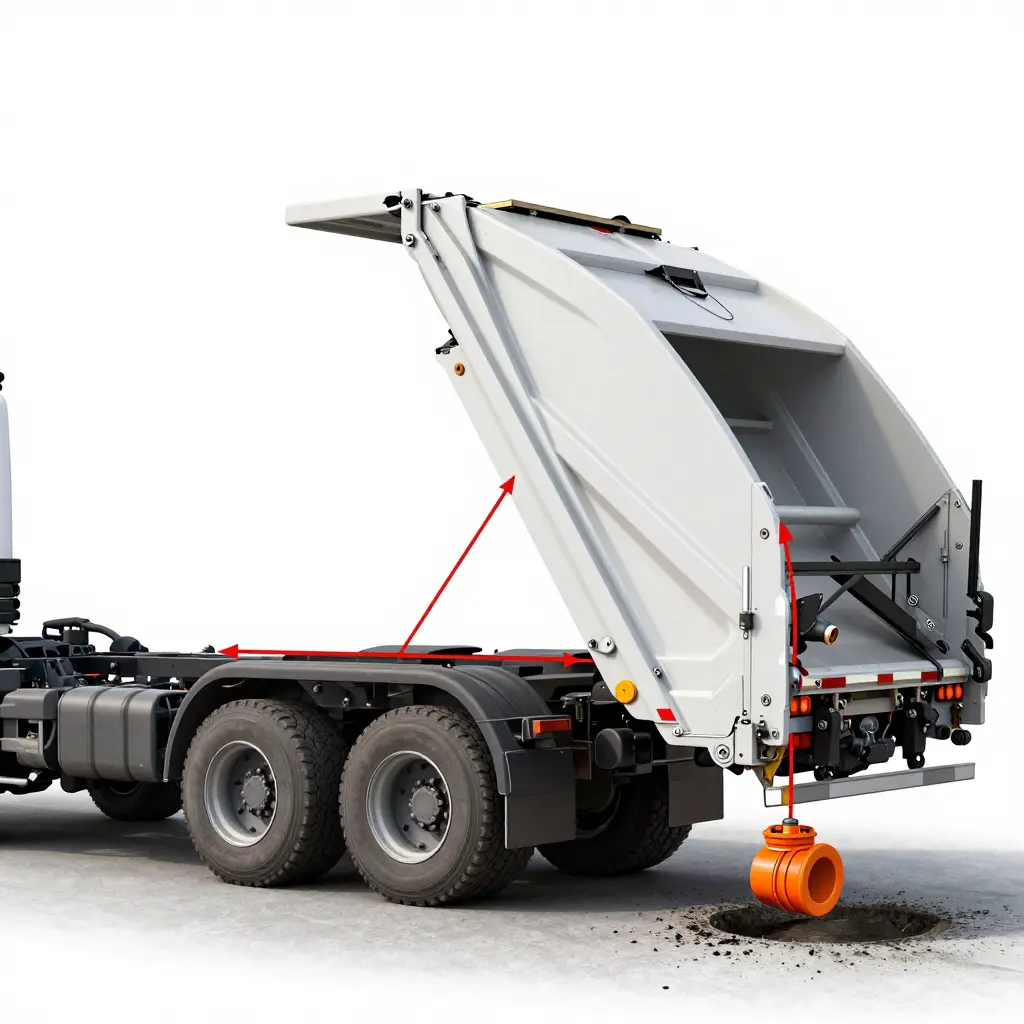
Uneven Ground Flexes the Chassis and Body
When one rear wheel climbs a curb while the opposite side drops into a pothole, the frame rails are forced into a twist. The chassis behaves like a stiff beam spanning two unequally supported points, so the body bolted above it flexes with the frame instead of staying flat. The twisting runs the full length of the packer body and ends at the hinge line.
How Twist Becomes a Hinge Load
Once the body twists, one hinge rises and rotates relative to the other. The gate resists that rotation, so the two pins no longer carry equal vertical shear. The load migrates toward the hinge on the high, compressed side, where the pin and bushing must now carry the combined gate weight plus a rising torsional reaction. That one pin and bushing pair ends up bearing most of the load.
One Pin and Bushing Pair Takes the Hit
The overloaded hinge absorbs far more than its design share. The bushing crushes, the pin wears oval, and internal clearance opens up. Once clearance grows, the gate loses its tight alignment and shifts downward on that side – the classic single-side drop.
Repetitive Loading Accelerates the Wear
A single flex event does almost nothing. Thousands of them do. Every alley pass adds another asymmetric cycle, so hinge pin wear on the loaded side steadily outpaces the opposite hinge. Measuring the wear gap across both hinges usually exposes the imbalance and confirms which side has been carrying the torsion.
Table 1. Rear-loader tailgate hinge wear tolerances, allowables, and pass/fail thresholds for heavy-duty refuse compactors.
| Measurement Point | Nominal Diameter/Spec | Maximum Allowable Wear | Replace or Repair Threshold | Notes |
|---|---|---|---|---|
| Hinge pin diameter | 2.000 in (50.80 mm) | 0.015 in (0.38 mm) | Replace pin below 1.985 in (50.42 mm) | Micrometer at three points 90 degrees apart along the bushing contact zone |
| Hinge bushing inner diameter | 2.008-2.012 in (51.00-51.10 mm) | 0.020 in (0.51 mm) | Replace bushing above 2.030 in (51.56 mm) | Press-fit; inspect for scoring, galling, and ovality |
| Hinge ear bore | 2.250 in (57.15 mm) bushing seat | 0.010 in (0.25 mm) | Repair above 2.260 in (57.40 mm) or out-of-round over 0.008 in | Line-bore and sleeve, or build up and re-machine |
| Pin-to-bushing clearance | 0.008-0.014 in (0.20-0.36 mm) | 0.030 in (0.76 mm) | Replace when clearance exceeds 0.040 in (1.02 mm) | Combined clearance across both ears drives one-sided tailgate drop |
All figures reflect typical heavy-duty rear-loader hinge assemblies; confirm actual limits against your OEM service manual before condemning parts.
Hinge Pin Wear vs. Service Hours: Maintained vs. Neglected
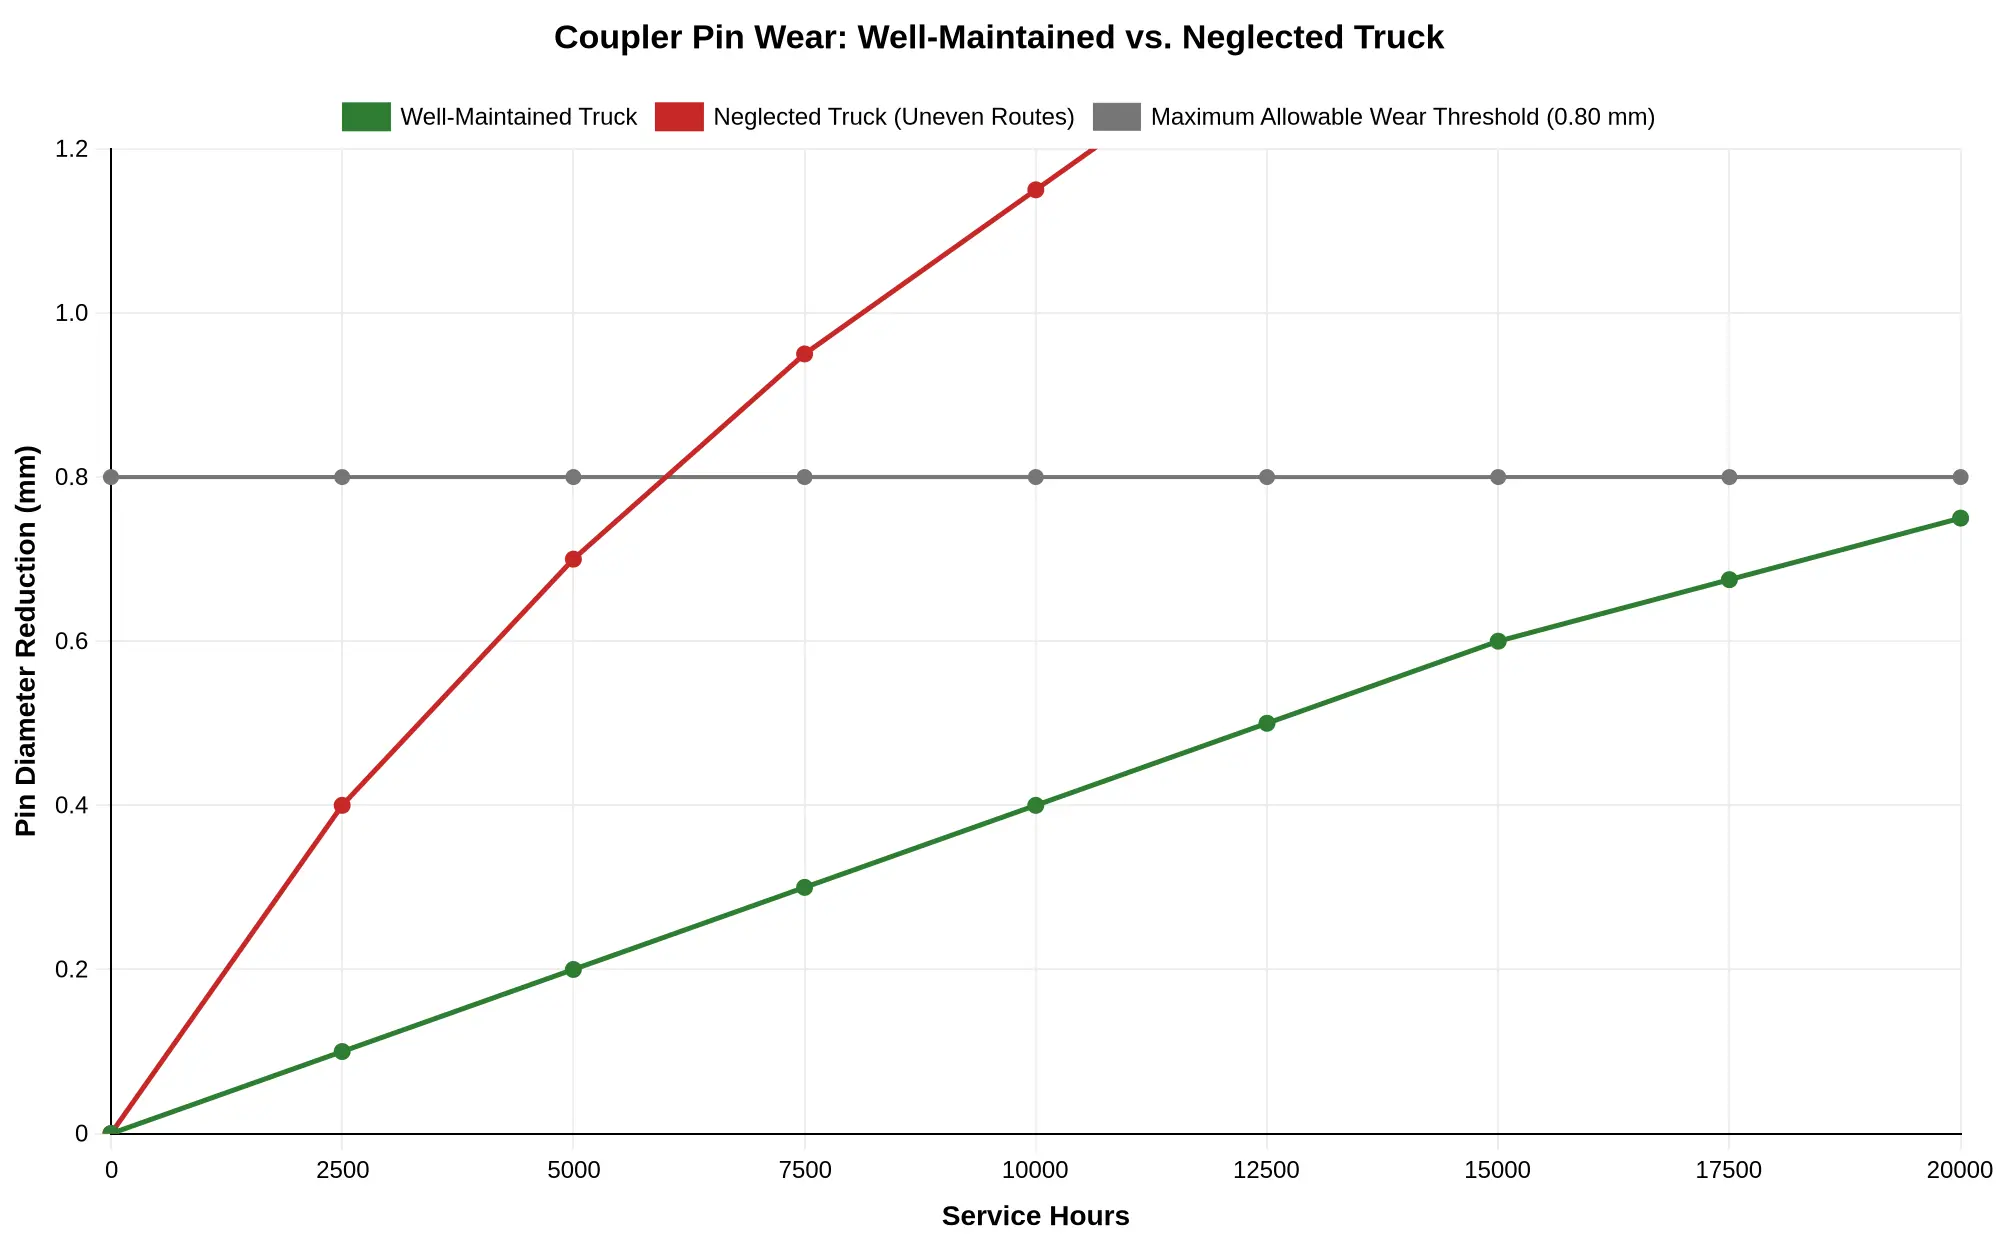
Figure 2. Pin diameter reduction (mm) plotted against service hours. The green line represents a truck on a disciplined grease-and-inspection schedule; the red line tracks a neglected tailgate hinge run hard on uneven alley routes. The dashed grey line marks the 0.80 mm wear limit the chart is built around.
The gap between the two curves is the point. A well-maintained truck creeps toward the wear ceiling gradually, giving you thousands of hours of warning before the tailgate starts sagging. The neglected truck, pounded by twist and shock on crowned, rutted alley surfaces, crosses the same threshold in roughly a quarter of the service hours. Once a pin passes that dashed line, the pin-to-bushing clearance is wide enough for the tailgate to shift laterally and drop on the loaded side. If you are planning fleet renewal or chassis swaps, apply the same due diligence you would use when inspecting a used hook lift truck for sale: the hardware tolerances tell you far more than the paint does.
Reading the Curve
| Service Hours | Well-Maintained (mm) | Neglected / Uneven Routes (mm) | Status vs. 0.80 mm Threshold |
|---|---|---|---|
| 0 | 0.00 | 0.00 | New – in spec |
| 2,500 | 0.10 | 0.40 | Both in spec |
| 5,000 | 0.20 | 0.70 | Neglected approaching limit |
| 7,500 | 0.30 | 0.95 | Neglected past threshold – replace/re-bush |
| 10,000 | 0.40 | 1.15 | Neglected critically worn |
| 15,000 | 0.60 | 1.55 | Maintained still in spec |
| 20,000 | 0.75 | 1.95 | Maintained nearing limit |
Treat this curve as a scheduling tool, not a forecast. Measure actual pin diameter with a caliper at every PM interval and log the reduction rather than trusting hours alone.
Step-by-Step Inspection and Measurement Guide for Rear Loader Tailgate Hinge Pin Wear
A one-sided drop means uneven alley routes are loading the hinge asymmetrically, so the pin usually wears faster on the loaded side than the bushing, though the reverse happens too. There is no way to know whether the joint is still serviceable without measuring it. Work through the following procedure in order for an accurate hinge pin wear measurement on every truck in your fleet.
- Park the truck on a level, hard surface and set the parking brake. Chock the wheels, disengage the PTO, and let hydraulic pressure bleed down before you touch the tailgate structure.
- Lower the tailgate to its fully closed rest position. Operate the control smoothly and watch both hinge points as it descends; uneven travel signals a worn pin before you measure anything.
- Secure the tailgate with rated props or blocking. Never trust hydraulics alone. Place a jack stand or steel prop under the tailgate so it cannot fall while you work near the hinge.
- Clean the hinge area thoroughly. Wire-brush and wipe away packed refuse, old grease, and rust from the pin, ears, bushing, and grease fitting so your readings reflect metal, not debris.
- Expose the pin end and remove retaining hardware. Back out the keeper bolt, lock plate, or snap ring so the full pin diameter is accessible on both sides.
- Measure the pin diameter at multiple points with calipers or an outside micrometer. Take readings at the top, middle, and bottom of the wear zone, and at 0 degrees and 90 degrees around the pin. Record the smallest reading, because it defines the true wear.
- Measure the bushing bore. Use a telescoping gauge set plus a micrometer, or a dedicated bore gauge. Read the inner diameter at the top, middle, and bottom of the bushing and at both 0 degrees and 90 degrees.
- Calculate the radial clearance. Subtract the smallest pin diameter from the largest bushing bore: clearance = bushing bore minus pin diameter.
- Check for ovalization. Compare the largest and smallest readings taken at the same depth. Out-of-round equals the max reading minus the min reading for either the pin or the bore.
- Check pin-to-ear movement. Leave the pin in place or refit it lightly, then use a dial indicator or a pry bar to measure free play between the pin and the hinge ears, plus side-to-side rock.
- Compare every result against the tolerance table below. Flag any dimension at or beyond the service limit as a replacement candidate.
- Record the values, part numbers, and date, then decide. Replace the pin only, the bushing only, or both, and log the reading so you can trend wear at the next PM interval.
Reference Tolerance Table (Verify Against OEM Spec)
| Component | Dimension checked | New / spec value | Service limit (replace) |
|---|---|---|---|
| Hinge pin | Pin diameter | 38.00 mm (1.496 in) | 37.60 mm (1.480 in) |
| Bushing | Bore diameter | 38.10 mm (1.500 in) | 38.50 mm (1.516 in) |
| Joint | Radial clearance | 0.05-0.15 mm (0.002-0.006 in) | 0.40 mm (0.016 in) |
| Pin | Ovality | under 0.05 mm (0.002 in) | 0.10 mm (0.004 in) |
| Joint | Axial / ear play | under 0.30 mm (0.012 in) | 0.80 mm (0.031 in) |
The figures above are representative examples for illustration. Always cross-check the OEM service manual for the exact model and pin size on your rear loader.
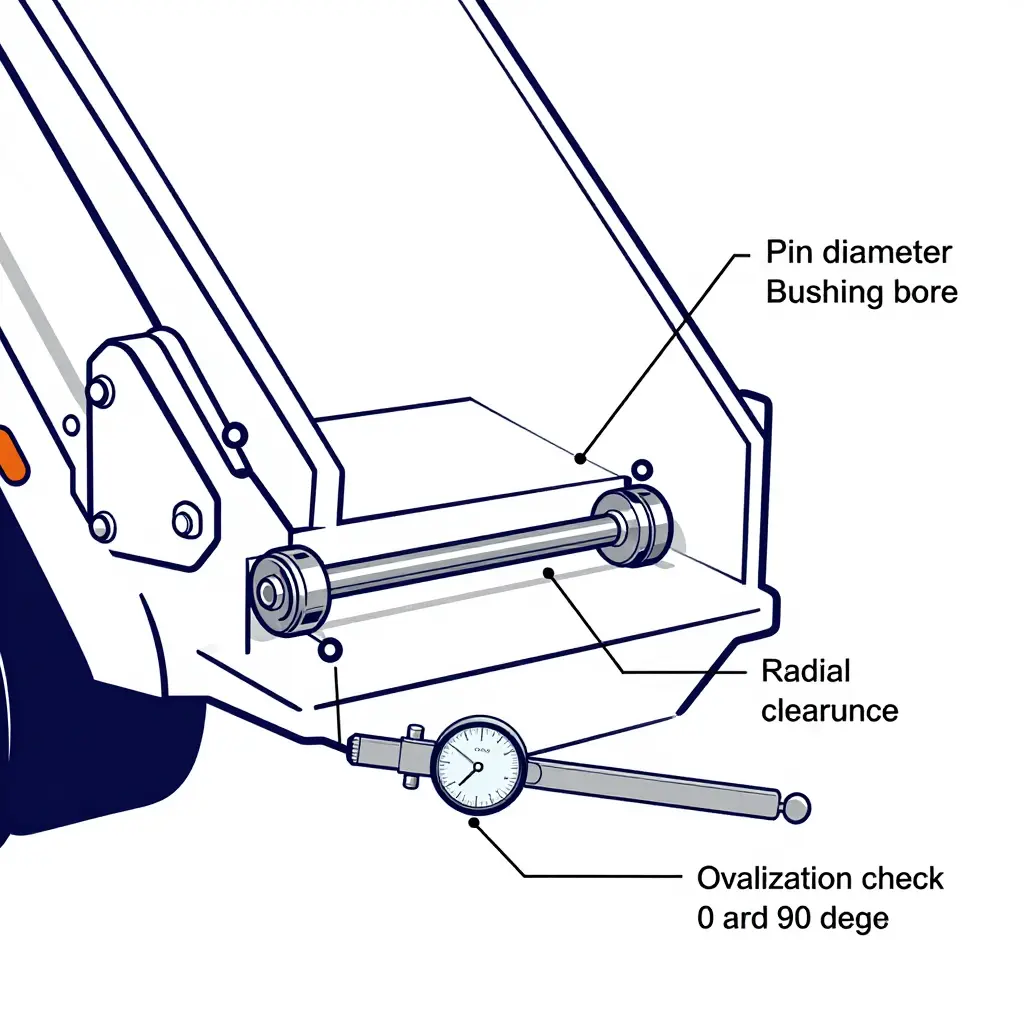
Why the Measurements Matter
Once clearance passes spec, the tailgate can shift laterally under off-camber loading, which is exactly what makes it drop on one side on tight, uneven alley routes. Replacing the pin at the service limit, or reaming and rebushing the ears, restores a tight joint and keeps the tailgate from hammering itself loose. The same discipline applies to preventive checks on other hydraulic truck body equipment, where hidden wear on subframes and cylinders causes equally expensive failures.
Measure, log, and act on the numbers rather than on guesswork, and your tailgates will stay square longer between rebuilds.
Field Symptoms and Required Tools for Hinge Wear Inspection
Start with the operator’s complaint, which usually points straight at the hinge. A tailgate that drops on one side on uneven alley routes leaves physical clues at the pin. Work through this checklist to confirm the fault and decide whether the hinge pin needs measuring or replacing.
Field Symptoms to Confirm One-Sided Tailgate Drop and Hinge Wear
- Uneven tailgate drop: the gate settles or hangs lower on one side when the body is level.
- Unusual noise: a sharp clunk, creak, or metallic slap from a single hinge during open/close cycles.
- Tailgate misalignment: visible racking, a tilted gap line, or the gate binding against the body on one corner.
- Seal gaps: light showing through the tailgate-to-body seal on the affected side.
- Uneven pin heat or scoring: one pin running hot after operation, plus scoring, galling, or fretting at a single hinge eye.
- Lopsided seal crush or worn paint witness marks concentrated on one hinge bracket.
Tools and Gauges Required for Inspection
- Dial or digital calipers for pin and bushing diameter checks.
- Pin/bore gauges and telescoping gauges to read hinge-eye diameter.
- Feeler gauges to measure hinge clearance and seal gaps.
- Magnetic-base dial indicator to read lateral pin play.
- Infrared thermometer to compare pin temperatures side to side.
- Torque wrench and pry bar for checking fastener tightness and bracket movement.
- Flashlight, mirror, and a PPE kit (gloves, eye protection) for safe access.
Once you move past the hinge to related lift and subframe hardware, the same approach applies; see our notes on checking the subframe and lift cylinder on hook-lift platforms. Log every reading against spec. A small discrepancy that stays on one side is the earliest sign of a pin slipping out of tolerance.
FAQ: Rear Loader Compactor Tailgate Hinge Pin Wear
Why does the compactor tailgate drop on one side on uneven alley routes?
On crowned or rutted alleys the chassis rocks diagonally, so one hinge carries a disproportionate share of the load. As the rear loader compactor tailgate pivots, the loaded-side hinge pin absorbs the full shear while the opposite side unloads. Any existing hinge pin wear turns that unequal loading into visible sag, letting the tailgate settle lower on the downhill side first.
How often should hinge pins be measured?
Measure hinge pin diameter and hinge bore at every scheduled PM, and no less than quarterly. High-cycle rear loaders running rough collection routes should be checked monthly, and always after any reported tailgate misalignment, hard opening, or latching complaint.
Can a worn hinge pin be welded, or must it be replaced?
Light scoring on the pin itself can sometimes be dressed, but a pin that is undersized, oval, or cracked must be replaced. Welding build-up onto a hinge pin is not a durable repair: the heat distorts the pin, ruins the bore fit, and can weaken the hinge lug. Rebuild the bore with a bushing or fit an oversized pin instead.
Does an uneven route really cause more wear?
Yes. Uneven routes impose cyclic torsion and shock loads that level routes do not. The compactor tailgate rocks on its hinges with every rut, and that repeated motion drives accelerated hinge pin wear, especially when lubrication is neglected.
What clearance is too much?
As a working rule, more than 0.030-0.040 in (0.75-1.0 mm) of diametral clearance between pin and bore is excessive, though some OEMs specify tighter limits. If you can move the tailgate before the hinge engages, or measure free play over roughly 1/16 in, plan pin and bushing replacement.
Conclusion and Preventive Maintenance Takeaway
A single-side tailgate drop on uneven alley routes is rarely a hydraulic fault. As the chassis rolls over the crown in a rutted lane, one hinge pin carries more than its share of the tailgate load. If that pin or its bushing has worn, the hinge can no longer hold the gate square, and the unloaded side sags first. That is why operators blame the cylinder when the real culprit is a loose, oval hinge joint.
Routine hinge pin wear measurement is your cheapest early warning. Measuring pin and bushing diameters at every scheduled service exposes ovality and clearance growth before the gate misaligns and before a mechanic chases the wrong system.
Preventive maintenance recommendation:
- Lubricate hinge pins and bushings every 250 operating hours or weekly, whichever comes first.
- Measure pin and bushing wear every 90 days or 1,000 operating hours, recording clearance trends over time.
- Replace worn pins and bushings promptly once clearance exceeds OEM limits, rather than shimming or tightening around the problem.
Rear loader refuse compactors hold up well when their hinge assemblies are measured, greased, and serviced on schedule; the failures come from skipping those steps.
A rear-loader compactor is built to absorb punishment, but the tailgate is one of the few assemblies where a small amount of wear produces a big, obvious symptom: the gate hanging low on one corner, binding as it swings, or refusing to seat evenly against the body seal. Fixing it starts with understanding where the movement comes from and what to measure.
Why the tailgate drops on one side
The tailgate pivots on a pair of hinge pins mounted at the rear of the body. Those pins and their bushings are designed to carry the gate’s full weight as it swings open and closed. When a truck works tight city blocks and alleys all day, the body twists repeatedly across crowned pavement, curb cuts, and off-camber driveways. That constant frame flexing transfers uneven load into the hinge pins, and the bushing on the loaded side wears faster than its partner. The result is a gate that settles lower on that corner and swings out of alignment.
Measuring hinge pin wear
Wear is confirmed with a dial caliper, not a visual guess. Park on level ground, chock the wheels, and block the raised tailgate. Measure the pin diameter at the clean, unworn journals and again across the bushing contact zone, then compare against the manufacturer’s original specification. As a general rule, replace the pin and bushing once radial clearance exceeds roughly 0.030 in (0.75 mm), and treat any visible step, ovality, or fretting as grounds for replacement regardless of the reading.
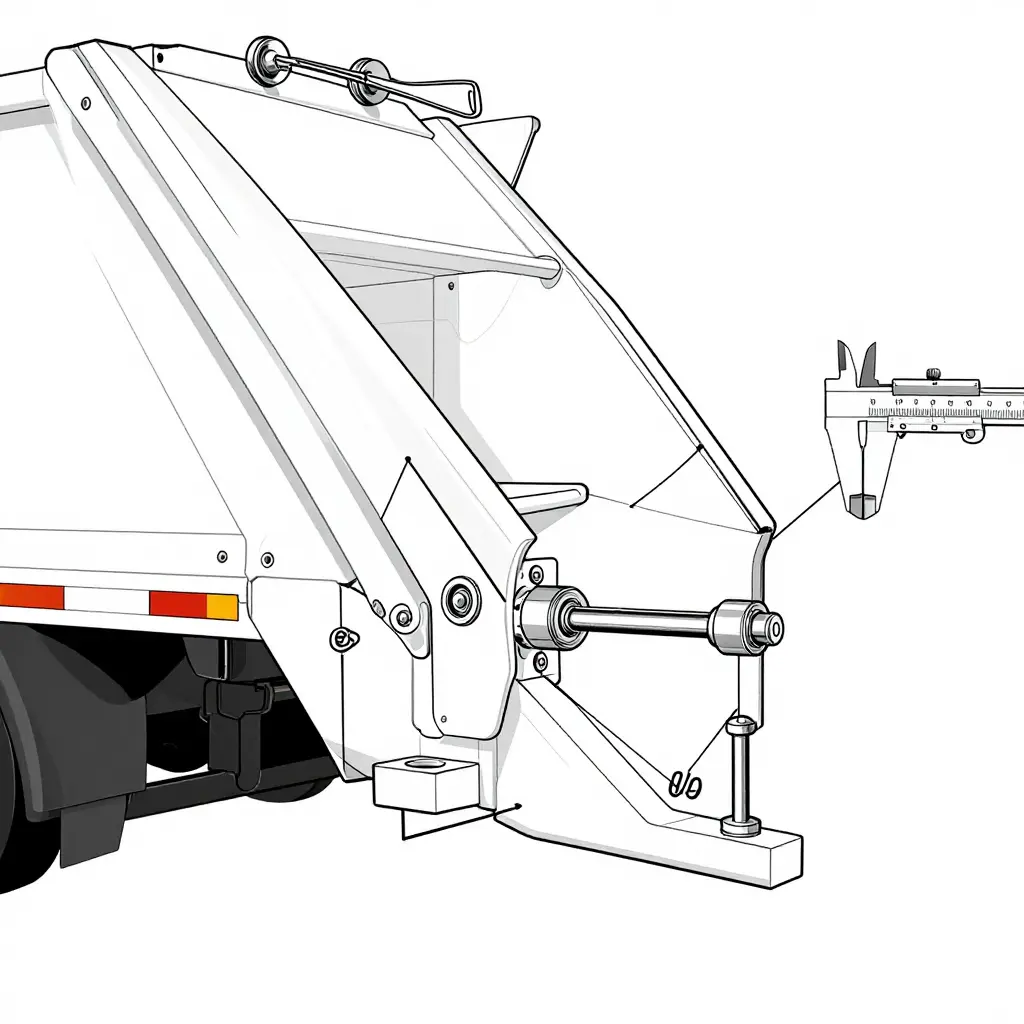
Check the foundation before the hinge
A worn hinge pin is often a symptom, not the root cause. If the body is shifting because its mounts are loose or the frame rails are cracked, new pins will simply wear out again. A careful subframe and mounting inspection will reveal cracked welds, elongated bolt holes, and deteriorated isolators long before they turn into a sagging gate. Remember that body geometry also depends on the original build: matching chassis length to body fit correctly keeps load centered and reduces the flex that accelerates this wear in the first place.