Why the Floor Rusts Through First Beneath the Packer
On a rear loaded garbage compactor truck, the floor panel directly beneath the packer is the first structural part to perforate, ahead of the side sheets, the tailgate, and the headboard.
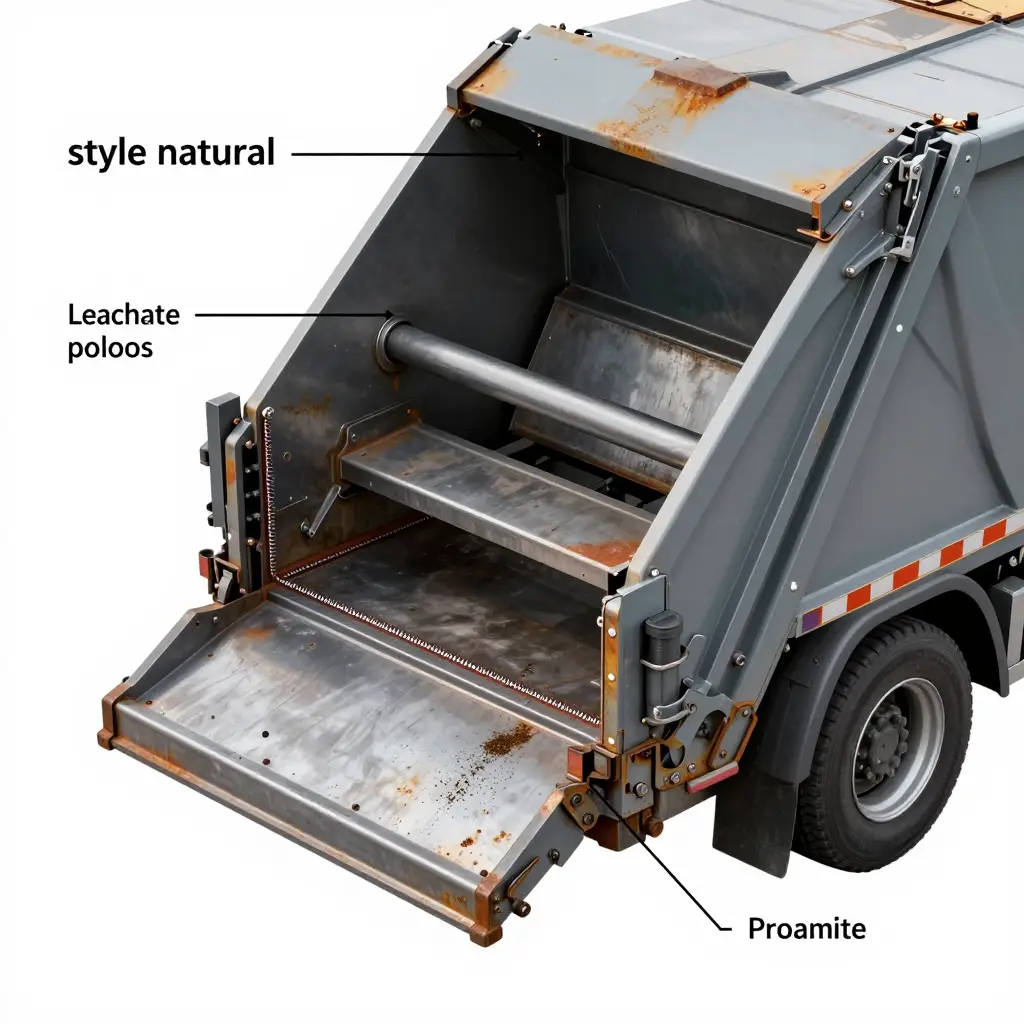
The packer sweeps rearward and downward on every compaction stroke, driving leachate, grit, and organic slurry into the floor-to-side-sheet corner. Liquid pools there and has nowhere to drain.
That corner is where three problems meet. The steel stays wet with trapped leachate, compacted waste slides across the plate on every cycle, and the loaded floor flexes under full packer force. Rust starts on the top surface and works through the plate; by the time it is visible from underneath, the section has usually lost most of its load-bearing capacity.
The decisive joint is the longitudinal weld that ties the floor plate to the body side sheet directly under the packer travel. That seam takes the repeated load and the corrosion attack at the same point. When it is sound, a used rear loaded garbage compactor truck is still a viable trade-in. When it is not, the same truck becomes a structural liability, and the repair is body-off fabrication rather than patch plates.
What Happens to the Steel Under the Packer
The floor plate beneath the packer blade perforates before the side walls, the tailgate, or the headboard because four processes attack the same few square feet of steel at once. Knowing where they overlap lets a maintenance crew predict body floor rust before a weep turns into a structural weld repair.
1. Leachate generation and pooling
- Each packing stroke compresses mixed municipal waste at high face pressure and squeezes free liquid out of the load.
- The floor beneath the packer is the lowest, flattest part of the hopper, so instead of draining rearward, the liquid gathers and stands.
- What stands there is not clean water. Organic acids, sulfides, chlorides, and dissolved salts concentrate into one persistent leachate puddle.
2. Continuous coating abrasion
- The packer panel and its wear shoes slide across the same floor path on every cycle, working like a slow abrasive lap.
- Paint, e-coat, and even galvanizing are ground away in the swept band, exposing bare carbon steel that can no longer passivate.
- The loss is cumulative and happens on an internal surface, so it stays invisible from outside.
3. Geometry that traps moisture and residue
- Floor-to-side-wall fillets, stiffener welds, and recessed drainage channels create dead corners where packed refuse and liquid cannot flush out.
- Those pockets hold a permanent wet film of organic residue against the steel, sustaining an oxygen-depleted micro-climate.
- Trapped grit keeps grinding under the packer, so the same geometry that holds moisture also renews the abrasion.
4. Wet-dry and acidic exposure to perforation
- As the puddle floods and evaporates, dissolved chlorides and acids concentrate into an aggressive brine that attacks the steel directly.
- Localized attack finds coating holidays and forms deep pits rather than even surface loss.
- Once a pit tunnels through the remaining plate, it becomes through-wall perforation, and the fix is to cut out and re-plate the section. For fleets planning to trade in, reviewing structural checklists like these subframe and lift cylinder inspection points helps benchmark how far floor deterioration should be allowed to progress.
Pooling, abrasion, trapped residue, and acidic wet-dry cycling all work on one small area, which is why the floor under the packer goes first. Put that zone on a fixed inspection schedule instead of checking the whole body at random.
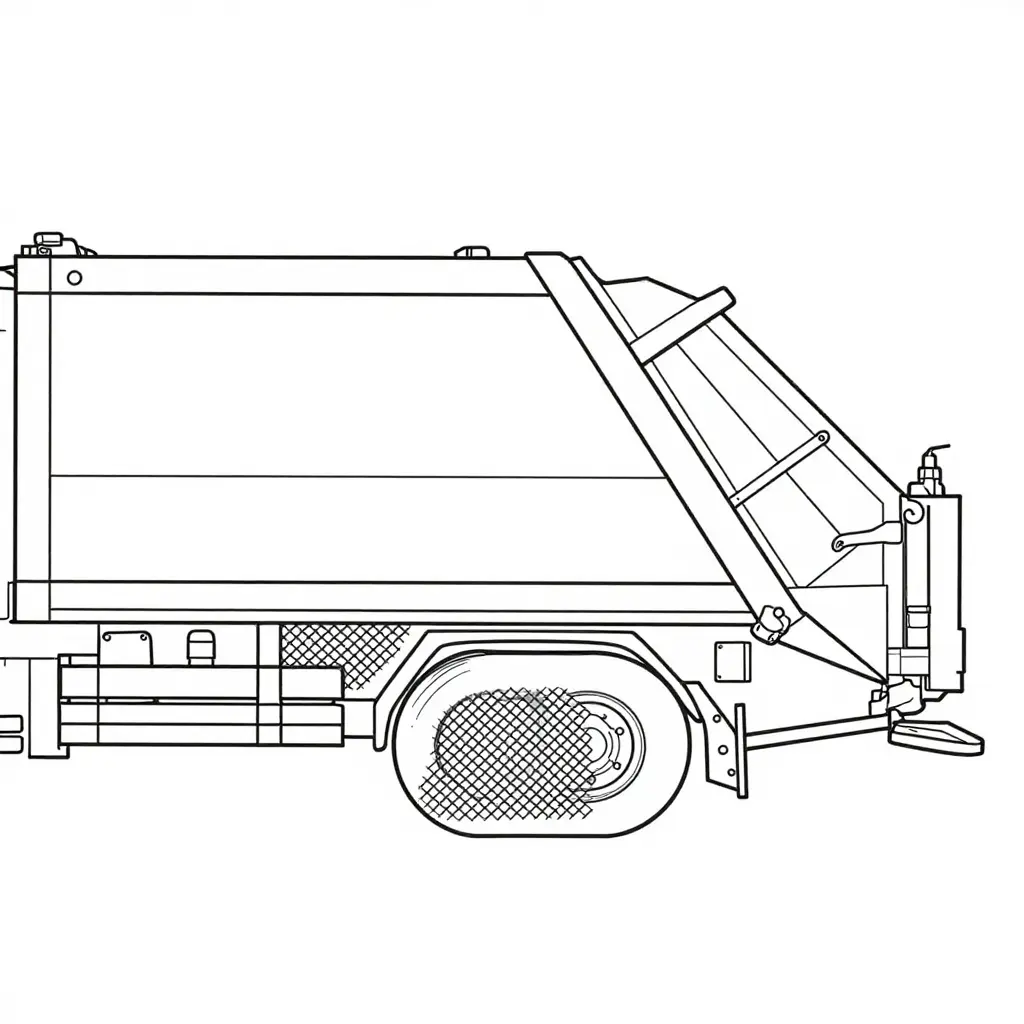
Figure 1. Cross-section of a rear-loaded compactor body – the shaded zone marks where leachate sits and corrosion begins.
What the Diagram Tells You
The cross-section reduces a rear-loader to its four load-bearing elements, and the shaded block at the bottom is where the damage starts. Read it from right to left and you can follow where refuse, and the water it carries, travels.
The hopper and the packer blade
The hopper is the curved funnel at the rear. Waste is thrown into the open mouth and gravity feeds it toward the bottom of the opening. The packer blade is the angled panel that swings or slides through that space and sweeps the load forward into the body. The blade wipes material forward across the floor; it does not reliably clear what has seeped underneath it.
The body floor panel
The body floor panel is the horizontal steel plate the packer blade rides on. It takes the full scraping load of every cycle, thousands of them over a truck’s life, but abrasion is not its main enemy. Water that never leaves is.
The shaded leachate pooling zone
The shaded area sits in the seam between the bottom of the packer blade and the floor panel, at the lowest point of the hopper. It is a designed-in puddle, not a random rust spot:
- The blade sits low enough to trap a film of liquid but not tight enough to wipe it away.
- The floor here is usually the lowest point in the body, so moisture that drains backward collects here.
- Every load of municipal waste carries leachate, a mildly acidic, chloride-rich, bacteria-heavy liquid that eats mild steel faster than road spray.
Every pickup on every shift refreshes it.
Why the corrosion starts here and not somewhere easier
Consider the duty cycle. Rain, food waste, yard trimmings, and wash-down water all go in. The packer compresses the load and squeezes liquid out, and that liquid runs down to the floor. The blade passes over the top of it. The truck rattles to the next stop. Nothing drains it away. Overnight in the yard, the puddle keeps working through warm days, cool nights, and condensation.
That is why the first through-rust on a rear-loader usually appears on the floor under the packer rather than on the more exposed side walls. The side walls dry out in the sun; this pit does not.
What this means for your inspection
When you crawl under a truck, the shaded zone is where the flashlight and pick hammer belong first:
- Find the low point under the blade, the seam between blade bottom and floor plate.
- Look for paint blistering and scale in a defined patch rather than scattered surface rust.
- Probe for soft steel; a pick skips off sound plate and digs into compromised plate.
- Check the weld seam that ties the floor panel to the hopper wall at the same low corner. It is the structural joint discussed below and far more expensive to repair than flat plate.
That shaded pocket, refreshed by leachate on every route, is the most reliable early warning that a rear-loader body is nearing the end of its economic life.
Pre-Trade-In Inspection Checklist for a Rear Loaded Garbage Compactor Truck
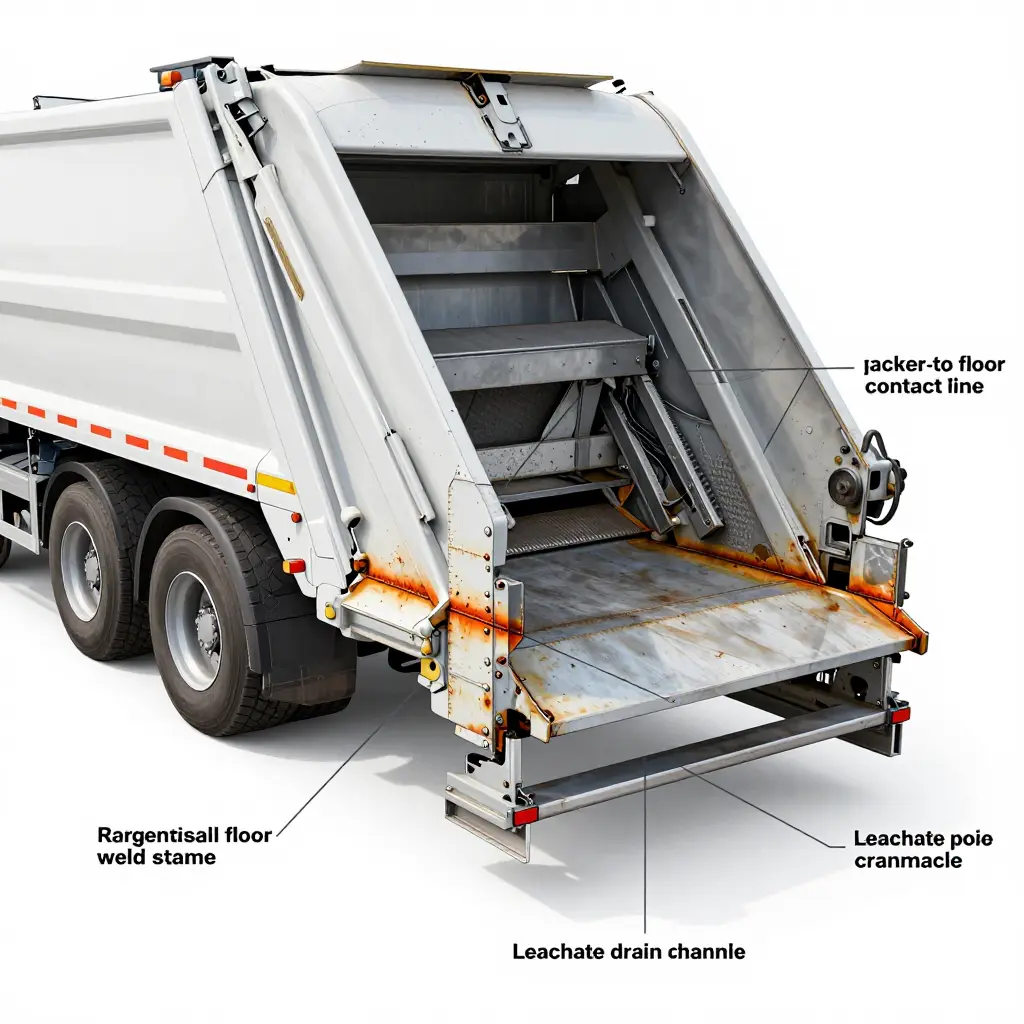
Before you agree on a trade-in value for a rear loaded garbage compactor truck, get under the body with a light, a scratch awl, and an ultrasonic gauge. Fresh paint hides the corrosion that kills these trucks, so the checks below target the hidden zones where compaction force, leachate, and chloride brine meet bare steel. Much of the same structural logic applies to other heavy bodies, as outlined in these subframe and lift cylinder checks.
- Probe the floor-to-sidewall weld seam with an awl and a light hammer. A crisp ring means solid steel; a dull thud or crumbling scale signals hidden section loss where brine pools against the seam.
- Check floor plate thickness with an ultrasonic gauge at five points along the packer stroke. Original plate runs roughly 3/16 to 1/4 inch (4.8-6.4 mm); readings below about half the original spec mean the panel is close to perforation.
- Confirm the leachate drain channels flow freely. Standing liquid keeps the floor wet year-round, and a blocked or flat channel is a corrosion accelerant, not a minor nuisance.
- Inspect the packer-to-floor contact line for gouges, galling, and pitting. This is the highest-load zone on the body; deep scoring exposes bare metal and lets leachate eat into the plate.
- Run the packer through a full cycle and watch the floor for flex or oil-canning. Visible movement or scraping means the plate has lost stiffness and will crack under load.
- Check the cross-members and longitudinal sills beneath the floor for scale and delamination. Once the floor leaks, rust wicks into the frame, and frame repair costs far more than a floor panel.
- Photograph every suspect weld seam and floor measurement before you negotiate. Documented defects give you ground to adjust the trade-in number instead of arguing after the deal.
Corrosion-Prone Zones on a Rear Loaded Garbage Compactor Truck Body
Corrosion on a rear loader follows the compaction load path. The floor panel beneath the packer carries the most constant pressure and the most trapped leachate, so it rusts through before any other panel. From there the attack spreads along the welded joints – the floor-to-side-wall seam and the joint under the packer bearing line. Those are the most decisive points to inspect before a trade-in, because a failing seam hides deep metal loss behind sound-looking paint. The table lists the zones in the order they typically deteriorate.
| Zone | Exposure Cause | Typical Failure Mode | Inspection Priority (High/Medium/Low) |
|---|---|---|---|
| Body floor under the packer | Continuous compaction pressure plus trapped leachate | Pinholes scaling into through-wall perforation | High |
| Packer-to-floor weld seam | Repeated flexing under load with crevice moisture | Stress-corrosion cracking at the weld toe | High |
| Rear hopper lip | Splash, grit, and debris impact at the loading edge | Edge erosion and undercut corrosion | Medium |
| Leachate drain channel | Acidic leachate pooling with settled solids | Slot blockage followed by aggressive pitting | Medium |
| Side-wall lower seam | Runoff collecting at the floor junction | Fillet weld thinning and seam separation | Medium |
Read the priority order as a sequence of deterioration: the floor under the packer leads, and the weld seam decides whether the whole body is worth saving.
The Weld Seam That Decides a Rear Loader’s Trade-In Value
When a used rear loaded garbage compactor truck rolls onto the lot, buyers shine a light on the floor, the packer blade, and the hydraulic rams. That is the wrong starting point. The most revealing inspection point on the body is a weld seam, and specifically two of them.
Where the water and the load collide
Two structural seams matter more than any other on a compactor body:
- The longitudinal weld seam where the floor panel meets the side wall – a continuous run spanning the full length of the hopper and body.
- The structural seam under the packer bearing line – the transverse weld where the packer’s bearing and slide track transmit force into the parent steel.
Both are fabricated seams, and both sit in the wettest, hardest-worked part of the truck.
Why the seam becomes the failure initiation point
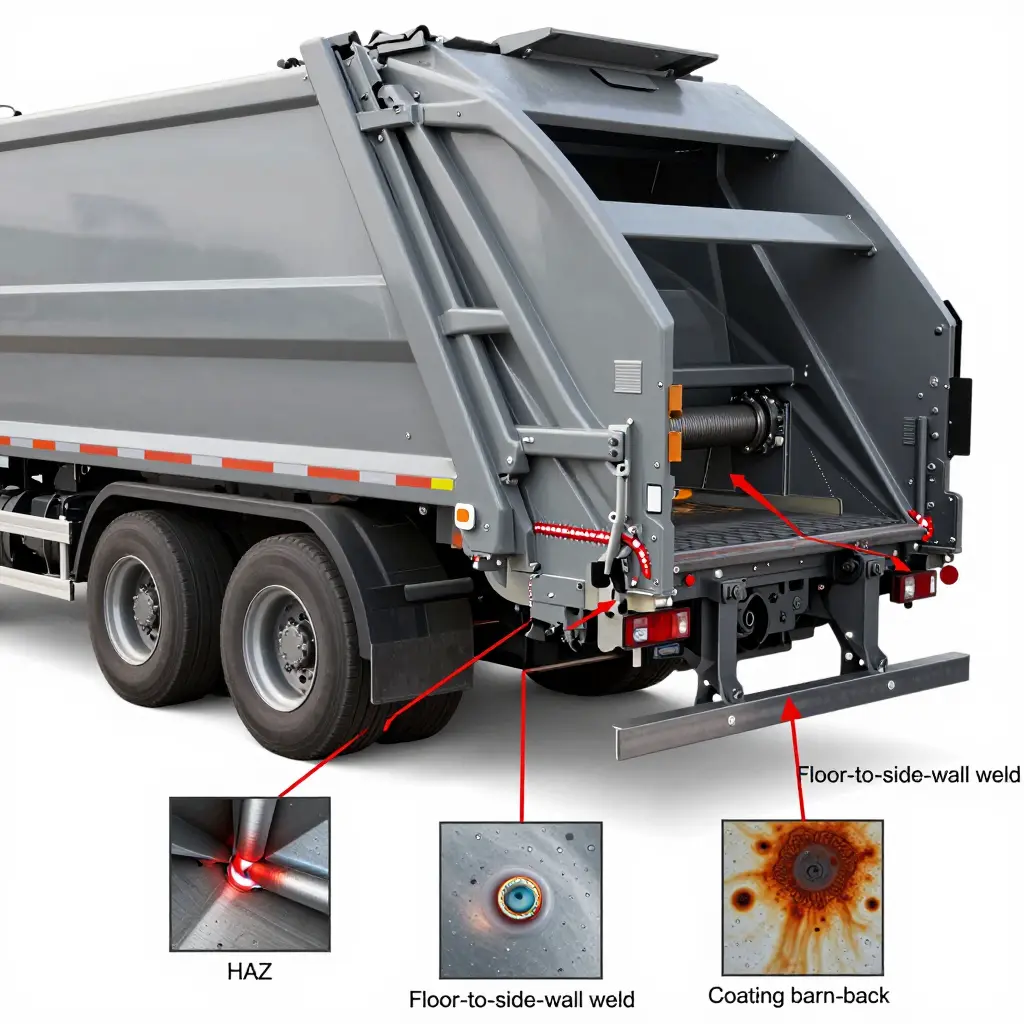
- Heat-affected zone (HAZ) embrittlement. Welding coarsens the grain structure beside the fusion line. The HAZ is harder and less ductile than the parent plate, so it cracks before the plate yields.
- Trapped moisture in the weld root. Leachate, wash water, and condensation wick into any unfused root gap and stay there – hidden, oxygen-starved, and hard to find.
- Coating burn-back during fabrication. The weld burns paint and galvanizing back from the joint. The bare ring of steel left behind is unprotected from day one and is not restored at the factory.
- Stress concentration under cyclic packing loads. Every packer stroke flexes the floor-to-wall joint. The geometric notch at the weld toe concentrates that cyclic stress until a fatigue crack starts.
What a failing seam looks like
Inspect from early to terminal:
- Surface rust bloom – a fine orange halo bleeding out of the seam line.
- Bubbling or lifting paint – coating pushed off by corrosion products underneath.
- Seam opening – a visible gap or crack travelling along the fusion line.
- Weld metal loss – the bead itself thinned, pitted, or missing.
Testing the seam
Tap the seam with a chipping hammer and probe it. If the sound is hollow, the paint tents up, or a gap opens, the repair cost will exceed any trade-in credit. Checking this weld seam before you sign takes five minutes and is the cheapest part of the deal. For a deeper look at pre-purchase structural and weld checks on used trucks, review this guide on subframe and lift cylinder inspections before you commit.
Floor Thickness Loss Over Time: Why the Packer Zone Fails First
The chart below plots remaining floor steel thickness over the service life of a rear-loaded compactor and compares a floor with intact coatings against one where the coating has broken down beneath the packer. Both start at the same 6 mm plate, but the unprotected surface loses steel several times faster. The two lines diverge, and the compromised floor drops through the 2.0 mm minimum safe threshold around year 8 in this example, well before the intact floor is a concern.
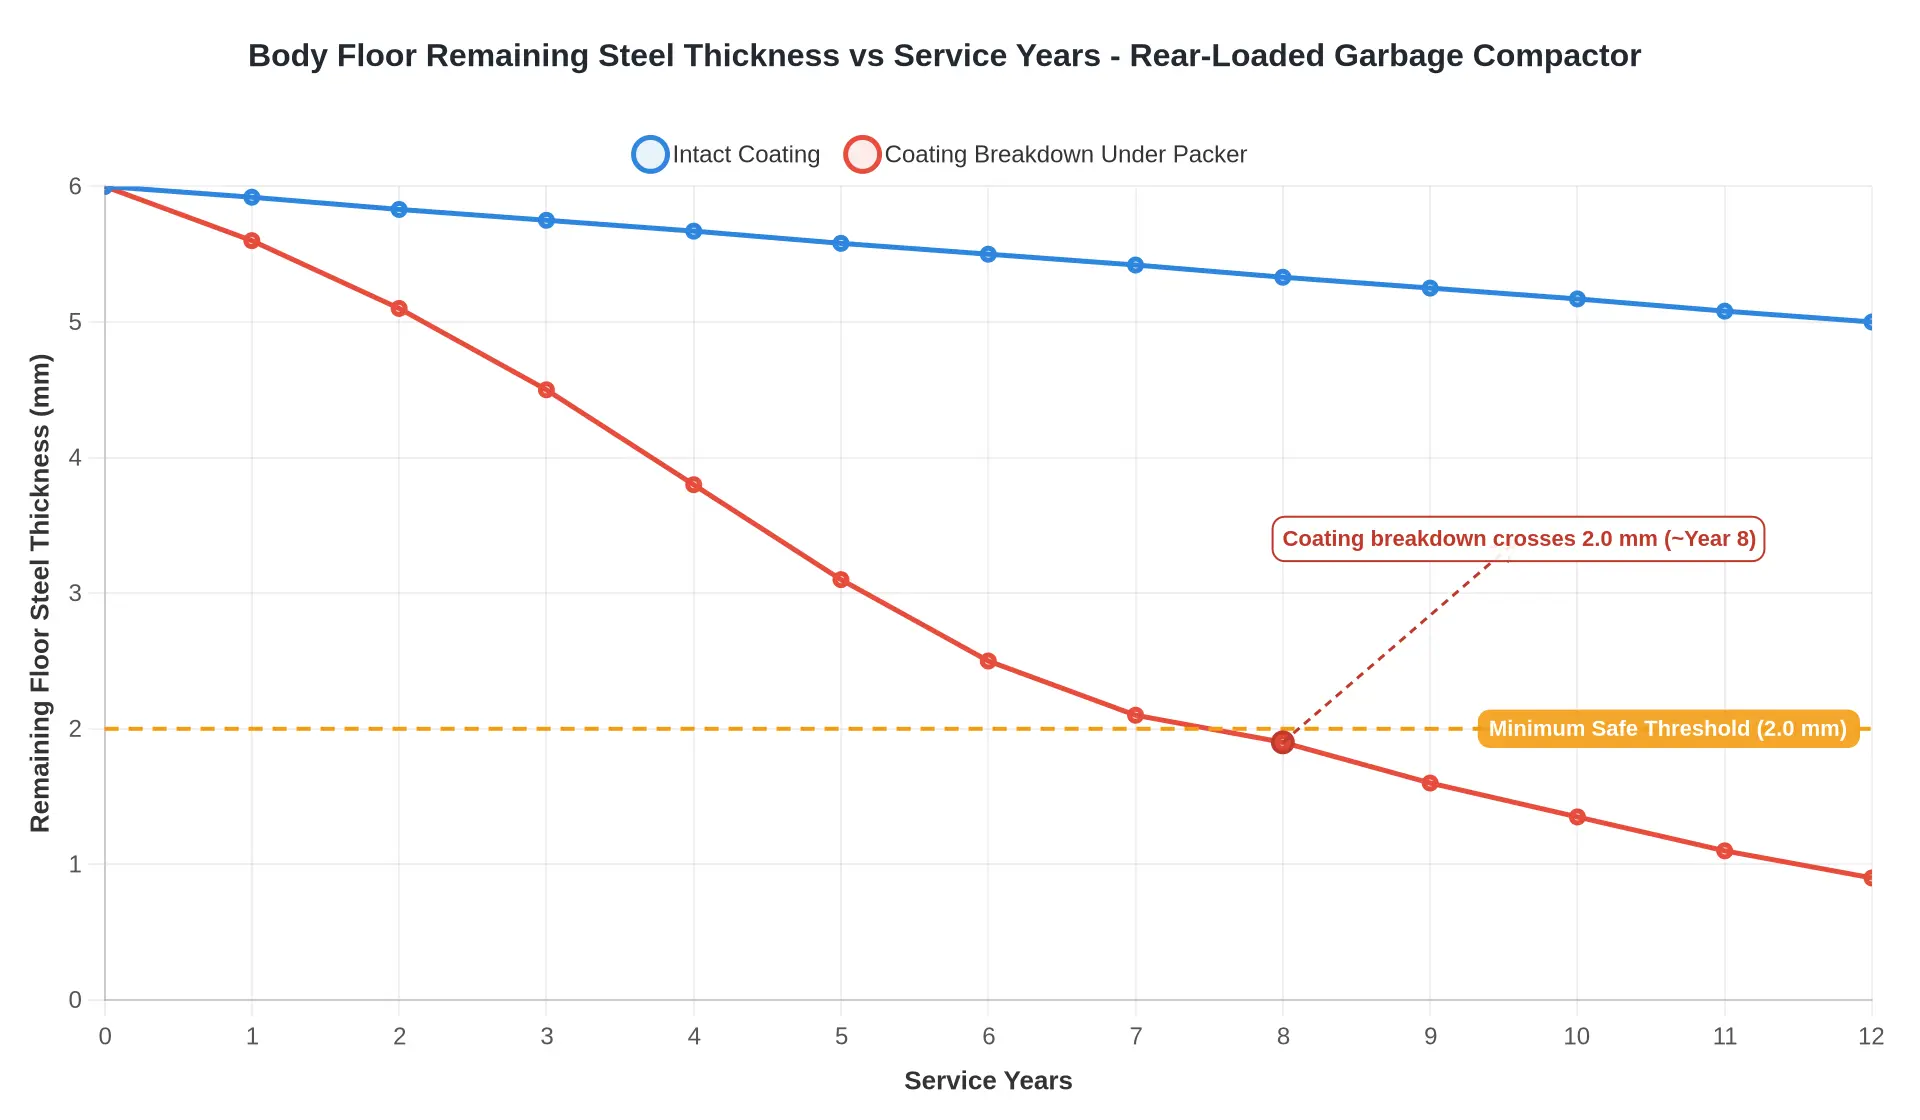
How to read it: the blue line is a floor whose protective coating stays intact, so corrosion creeps along slowly. The red line is a floor where the coating has failed under the packer, where the blade, packer panel, and wet refuse shear and abrade hardest. Once the coating is gone, moisture and leachate sit against bare steel and the loss accelerates. The dashed orange line marks the 2.0 mm minimum safe threshold, and the arrow pins the crossing point: the moment the breakdown floor stops being a repair candidate and becomes a structural liability.
This is why the packer zone is the first place to check before a trade-in, and why an under-floor structural inspection routine should treat coating integrity as seriously as bare-metal thickness. The chart puts a timeline on “these floors rust fast” and turns a hunch into a go/no-go decision.
Inspection Tools and Thickness-Measurement Methods for the Compactor Floor and Weld Seams
Before you hand over a rear loader on trade-in, the packer floor and its weld seams determine the truck’s real value. The floor is where body floor rust starts, hidden under packed refuse and leachate, and it is the first place a sharp buyer will look. A disciplined inspection turns guesswork into numbers you can put on paper.
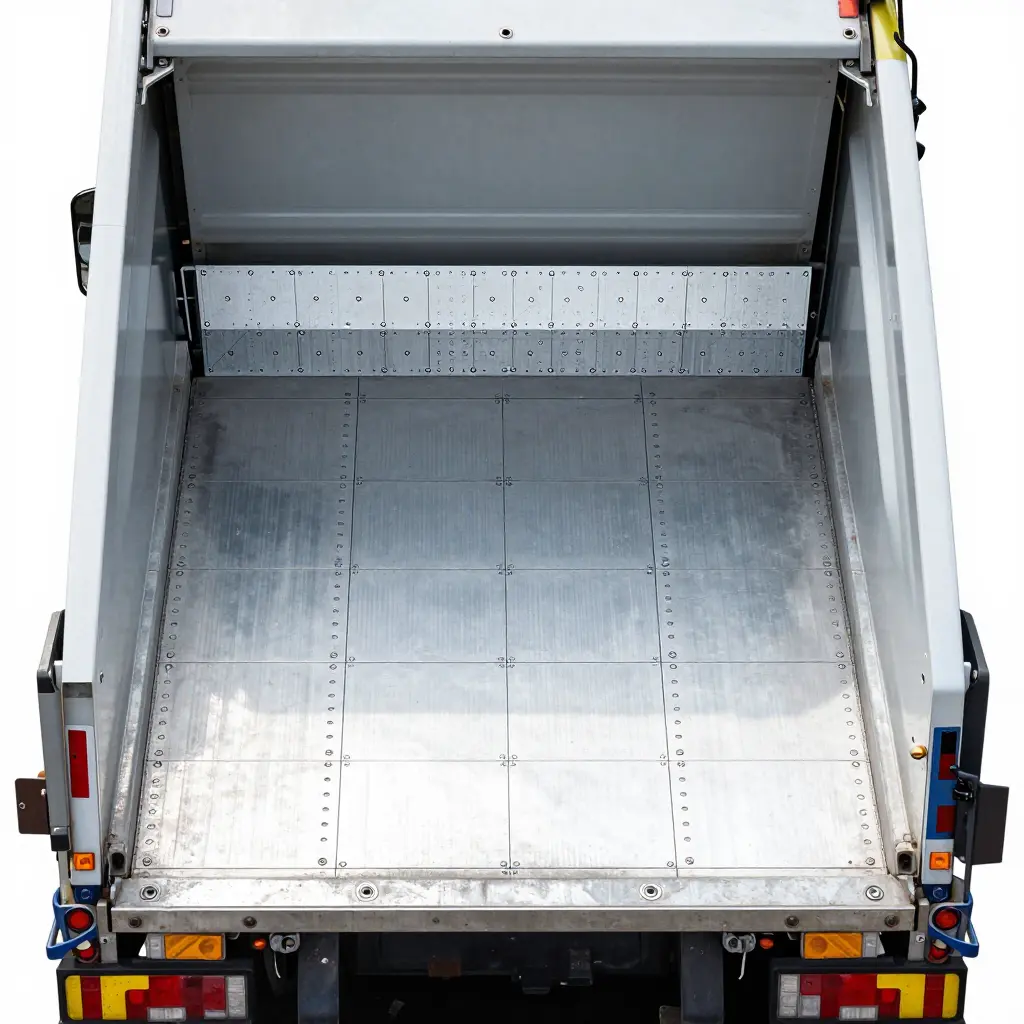
Map the Floor Before You Measure
Don’t chase random spots. Lay out a measurement grid across the floor deck and record every reading on a sketch to build a corrosion map:
- Four to six transverse lines from the front bulkhead to the tailgate.
- Three longitudinal lines: left rail, center, right rail.
- Densest sampling in the packer sweep zone, usually the rear third, where abrasion and moisture overlap.
- Treat each weld seam and floor-to-sidewall joint as its own measured line.
Ultrasonic Thickness Gauges
The ultrasonic thickness gauge is the primary instrument. Use a dual-element transducer with coupling gel, calibrate on a known step block, and zero the probe on parent metal before every session.
- Grind pits to bare metal and remove scale or loose rust.
- Take three to five readings per grid point and keep the lowest.
- Compare remaining thickness against the original plate spec, commonly 3/16 in / 4.75 mm.
Tap Testing
A ball-peen hammer or heavy washer tapped across suspect areas reveals delamination quickly. A crisp ring means sound plate; a dull thud signals corroded or separated layers. Use it to bracket where gauge readings need to be densest.
Visual Seam Inspection
Inspect weld seams at the packer cylinder mounts, the discharge end, and the floor-to-sidewall fillets. Look for hairline cracks, undercut or porosity, rust bleed along the weld toe, and leachate staining that points to pinholes. For a broader look at structural pre-sale checks, see these subframe and lift cylinder inspection points.
Wet-Dry Surface Probing
Clean the seam, dry it fully, then wet the area and watch for weeping. A crack or pinhole pulls water in when dry and pushes moisture back out as the surface wets and dries, leaving tell-tale tracks. Wet-dry probing catches defects the eye misses.
Setting the Minimum Acceptable Remaining Thickness
Set a threshold before you negotiate, not after. A common engineering rule is to reject or heavily discount a floor below 50% of original plate thickness; for load-bearing floors, 60-70% is safer. Under that threshold, a patch is a temporary fix that will fail again under the packer.
| Tool / Method | What It Detects | Best Use |
|---|---|---|
| Ultrasonic thickness gauge | Remaining plate thickness | Quantitative corrosion map |
| Tap testing | Delamination, thin zones | Fast screening |
| Visual seam inspection | Cracks, undercut, rust bleed | Weld integrity |
| Wet-dry probing | Pinholes, through-cracks | Seam sealing assessment |
Turning Inspection Findings into a Trade-In Decision
The measurement sheet only matters once it drives a number. On a rear loaded garbage compactor truck, the trade-in conversation comes down to two structural realities – floor thickness loss and weld seam condition – because everything else can be swapped with a wrench and a parts budget. The body decides the deal.
Reading floor thickness loss
Compare your measured floor plate against the original nominal spec, not against what the metal looks like. With 50 to 70 percent of the plate remaining, the truck is usable but you should price a floor overlay into the deal. At 30 to 50 percent remaining, repair is justified only if the hydraulics and service records are strong. Below 30 percent remaining, the honest answer is usually to walk away, because the replacement floor alone can exceed the residual value of the chassis.
Judging the weld seam
The weld seam tying the floor to the side wall and packer frame is the load-path spine of the body. Surface oxidation is cosmetic; a crack, an undercut, or a seam pulled away from the parent metal is not. A single clean crack can be re-welded and re-inspected economically, but multiple cracked seams or distortion around the packer mount usually mean the whole structure is fatigued. Benchmark it the same way you would subframe and lift cylinder checks on any body you compare against.
How this stacks against records and hydraulics
Service records and hydraulic condition matter, but they are recoverable costs. A tired cylinder or missing paperwork costs money; a rusted-through floor costs the truck. Weight the structural checks first, then let hydraulic condition and maintenance history refine the price rather than make the decision. If you are also weighing body styles for a fleet swap, understand hooklift versus cable hoist configurations before assuming the compactor body is the only variable.
The decision at a glance
| Floor remaining | Weld seam | Recommended action |
|---|---|---|
| >70% | Intact | Buy / accept trade-in at full value |
| 50-70% | Surface corrosion only | Negotiate, budget overlay within a year |
| 30-50% | One clean crack | Repair justified if hydraulics and records are strong |
| <30% | Through-crack or distortion | Walk away |
When walk-away is the right call
Walk away when the repair cost plus the trade-in allowance exceeds the price of a comparable, sound unit, and be honest about the resale value of a truck with a compromised body. A rear loaded garbage compactor truck with a corroded floor under the packer is not a bargain; it is a scheduled expense. When the floor is thin and the weld seam is cracked, the smart move is no deal at all.
Conclusion: On a Rear Loaded Garbage Compactor Truck, the Body Floor Fails First
On a rear loaded garbage compactor truck, body floor rust develops before any other major structural failure, driven by forces that reinforce each other. Leachate pools in the low, flat section beneath the packer where slope and drainage never fully clear the fluid. Abrasion from wet, gritty refuse scrapes away the protective coating with each compaction cycle. And the geometry of that area, boxed in by the hopper walls and packer panel, traps moisture and debris against bare steel for hours at a time. Together they make the floor the first component to perforate, long before rust reaches the side shells or the upper body.
The practical response is routine care. Rinse and neutralize the floor after every shift, keep drain ports clear, and re-coat scuffed areas before corrosion establishes a foothold. Keep the packer panel and hopper seals in good order so fluid is expelled rather than retained, and check floor thickness at fixed intervals. These steps slow the process; they do not eliminate it, so pair them with honest inspection.
Before any trade-in, inspect the weld seam first. The floor-to-shell weld seam is where corrosion concentrates and where hidden thinning reveals the true condition of the body. If the seam is sound and the floor above it is intact, the truck still has service life; if it is pitted, cracked, or weeping rust, the unit is closer to structural failure than its appearance suggests. The same logic of matching equipment to work applies across a fleet – whether you are reconfiguring container handling and need to understand how to match hook lift truck bin size to chassis length, or simply retiring a worn unit, the weld seam remains the decisive inspection point.
Make the floor-to-shell weld seam and the floor beneath the packer the standing first check on every rear loaded garbage compactor truck, and treat their condition as the primary factor in any trade-in decision.