From Cradle Pad Wear to a Bent Loading Arm
The cradle pad on a cart tipper has one job: keep the bin lip off the steel cradle and take the contact load of every lift while it does. Pads are cheap consumables. Loading arms are not. The chain that ends in a bent arm starts with a few thousandths of pad thickness coming off at a time. Nothing looks broken, so nothing gets written up, and by then the lift geometry has already changed.
As the pad thins, the lip sinks deeper into the saddle. It no longer seats on the reference surface the loading arm was timed against. It sits low and rocks instead of locking, and that play adds vertical travel and side load to every pick-up. Rubbing surfaces belong on an inspection sheet, the way the plate and blade contact points do in this guide to rear load compactor packer blade issues.
From there it is all load path. The arm lifts the bin through a programmed arc, but the bin starts lower and moves loosely, so the arm reaches the intended dump angle while the bin is still short of full inversion, and the sequence keeps commanding travel. The arm overshoots the dump height and the bin mass swings past it. That overshoot reaches the arm and pivot pin as a shock load on a longer moment arm than the design case allowed for. Do it often enough and the arm takes a permanent set. Once it bends, the repair is no longer a pad swap, so replace pads on an interval tied to lift count rather than to visible damage.
Cradle Pad, Bin Lip and Seating Geometry
In a cart tipper, the cradle saddle is usually a formed V or a radiused channel cut to a nominal radius that matches the rolled profile of the bin lip. The pad is bonded or bolted into that saddle and stands roughly 15 to 30 mm proud of the steel when new, depending on pad grade and tipper class. The bin lip, typically a 10 to 20 mm wall rolled into a lip 40 to 70 mm deep, rests on the pad face rather than on bare steel. Designers leave 3 to 8 mm of lateral clearance so the bin can self-align as it is pushed home, and set the contact angle at roughly 15 to 30 degrees from horizontal in the nested position, which lets the lip settle into the saddle instead of hanging on its leading edge.
The interface itself is a three-body abrasive system. Road grit, sand, glass fines and compacted putrescible residue migrate between the lip and the pad face on every tip, and once embedded in the pad they behave like lapping compound. Road salt adds a chemical dimension: it is hygroscopic, holds moisture against the lip, accelerates corrosion of the rolled edge and can harden or soften the pad compound depending on formulation. Layer on the vertical loading, with several hundred kilograms of bin and payload dropping into the saddle each cycle, and the pad sees cyclic compression, fretting and compression set at the same time. The lip wears thin and polishes; the pad wears concave.
A thinner pad drops the lip deeper into the saddle, and because the saddle is curved, a deeper seat presents a smaller effective cradle radius and a steeper contact angle. The geometry the loading arm was designed around no longer describes the bin’s travel: the lift profile runs ahead of the bin, the bin rides over the high dump point and drops back hard, and the shock goes straight into the arm and pivot pins. Measuring pad thickness and lip depth at every service interval, and replacing pads at the wear limit instead of at failure, costs far less than straightening a bent arm. It also pays to check rear-loader hinge and pin wear at the same time, since both faults hide until they suddenly don’t.

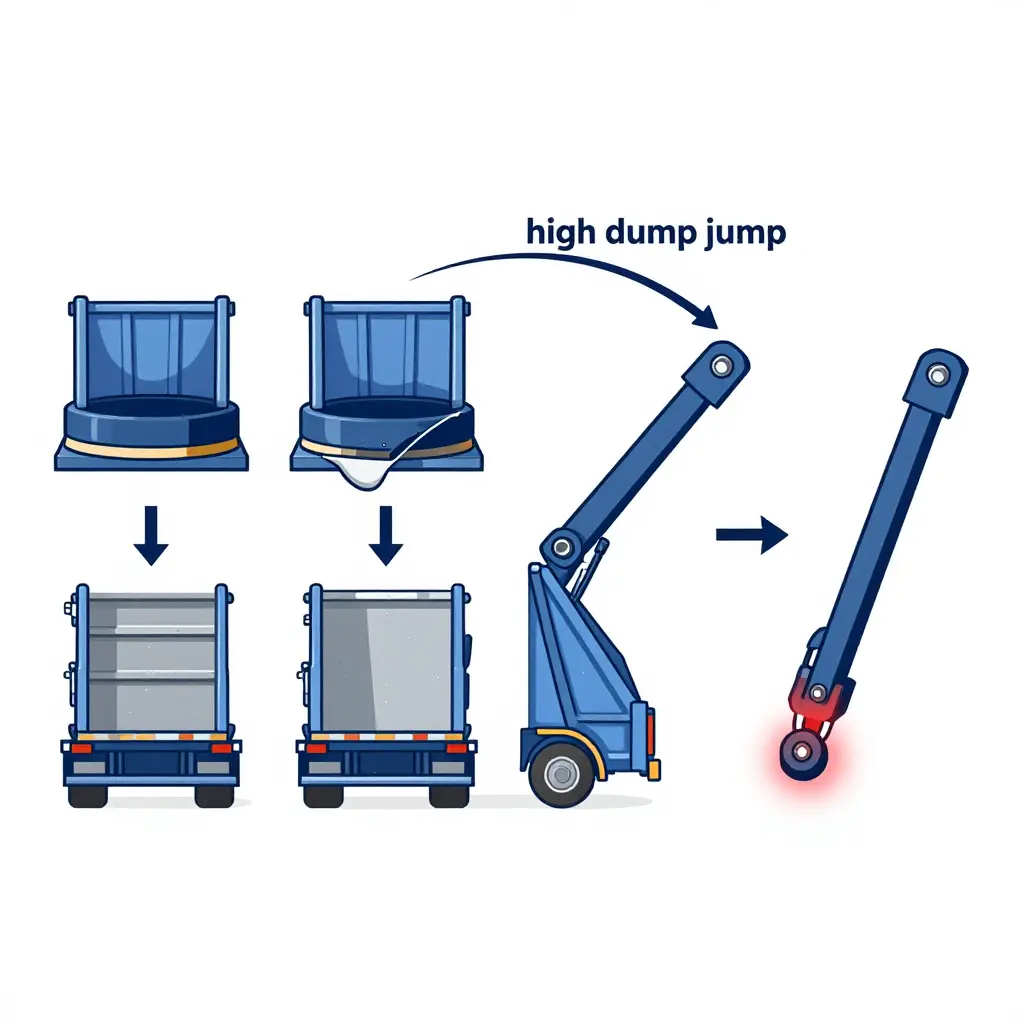
Two states of the same joint, drawn to the same scale: left, an intact sacrificial pad holding the bin lip at design height; right, a worn pad letting the lip sink and dragging the contact line out toward the pad edge.
Field Symptoms: When Pad Wear Already Produces a High Dump Jump
Operators rarely notice a worn cradle pad until the geometry has already changed. On a cart tipper, that wear lets the bin ride upward during the lift, and the result is a high dump jump: the bin clears the hopper sill, dumps early and lands off target with impact. The symptoms below mean the pad is gone and the loading arm is carrying loads it was never designed for. They follow the same pattern of secondary damage as hinge pin wear on refuse bodies, where a small wear surface passes stress into structure.
- The bin lifts noticeably higher than the hopper sill before tipping, a sign that cradle support is gone.
- A sharp snap or slap at the top of the lift, from pad contact loss.
- The bin lip rocks or clunks in the cradle at pick-up, confirming clearance at the worn pad.
- The arm hesitates or stalls near full extension as the bin rides past its intended stop.
- Paint cracks or fresh deformation marks on the arm where overload stress concentrates.
- Witness marks on the bin lip that cover only part of the pad face.
Any two of these together justify pulling the unit from service and measuring pad thickness against spec.
Cradle Pad Wear Threshold and Action Table
Use the grid below as the field decision tool. Measure pad thickness loss against a new pad, and lip free play with the arm parked and the bin seated. Each step down the table turns a measurement into an instruction, so nobody has to guess whether a jump is cosmetic or structural.
| Pad Condition at the Cradle | Bin Lip Free Play | Observed Dump Behaviour | Arm Load Risk | Required Action |
|---|---|---|---|---|
| New pad, 0-1 mm thickness loss | 0-1 mm | Bin seats flush, no jump | Negligible | Inspect and log pad thickness |
| Light wear, 1-3 mm thickness loss | 1-3 mm | Slight lift, faint rattle at dump | Low, within design envelope | Re-shim cradle gap, recheck monthly |
| Measurable wear, 3-6 mm thickness loss | 3-6 mm | Visible hop, bin rides up on tip | Moderate, arm deflection growing | Re-shim, recheck every service, plan replacement |
| Heavy wear, 6-10 mm thickness loss | 6-10 mm | Sharp high dump jump, loud return slam | High, bending moment climbing fast | Replace pad, inspect cradle for cracks |
| Pad at half thickness or less, 10 mm loss or more, worn through, missing or loose | 10-20 mm and rising | Violent jump, bin slips off cradle | Severe, arm deformation likely | Replace pad, check the saddle for scoring, stop using the station |
Half thickness is the practical cut-off. Past it, free play lets the lip drop into the cradle pocket and the arm absorbs the impact the pad used to take. If your shop is building a wider wear-inspection routine, the same logic applies to hinge pin and pivot wear checks on refuse bodies. Keep a caliper at the tipper, and take a station out of service when a pad is missing.
How the High Dump Jump Loads and Bends the Loading Arm
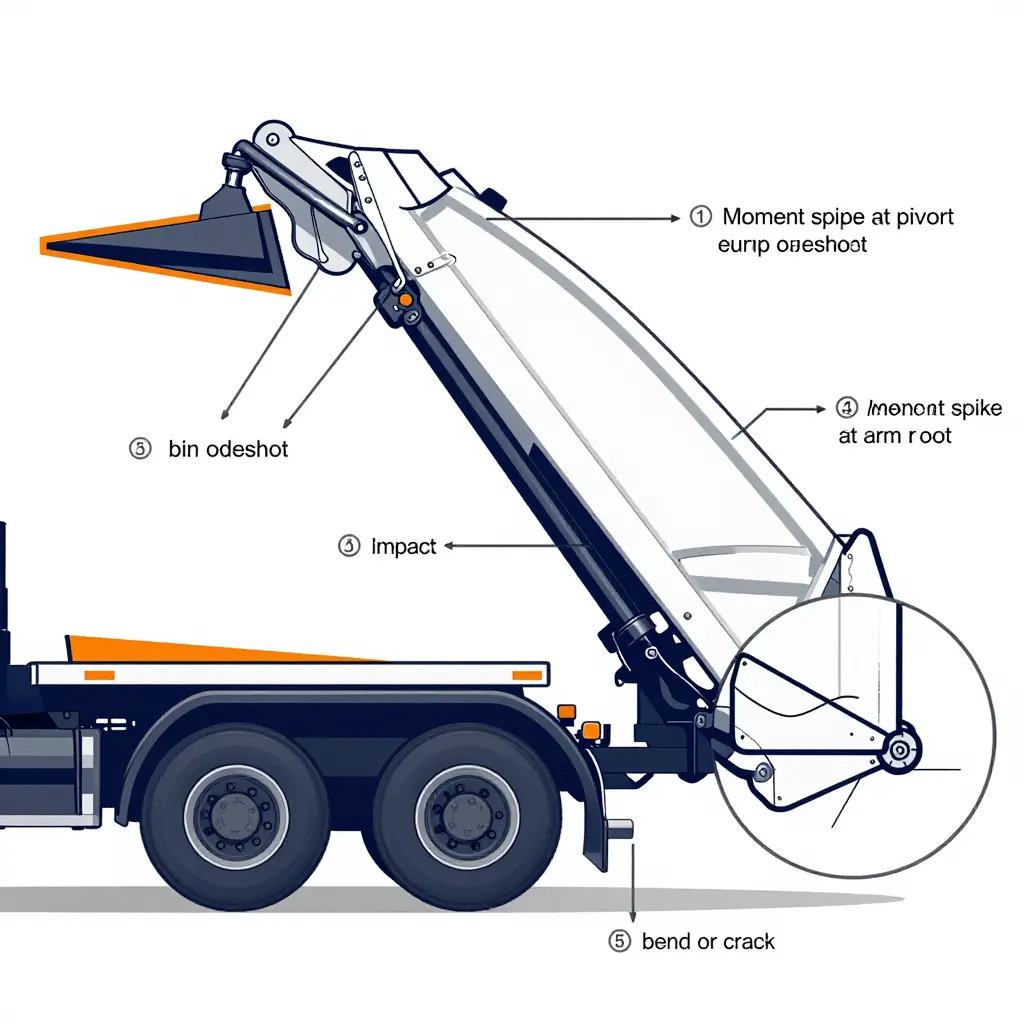
A cart tipper is a chain of rated links, and the rating only holds while the geometry does. The lift cylinder and its linkage are rated for a defined bin weight at a defined dump angle, which assumes the lip seats flat on the pads and stalls cleanly against the rotation stop. Pad wear breaks that assumption: a thin pad lets the bin sit lower and ride further, so part of the cylinder stroke that should have been holding the bin is spent accelerating it. The bin reaches the rotation stop still moving, and the stop becomes a hinge for dump height overshoot instead of a wall the load leans on. The rest of the sequence is short: clearance opens, the bin overshoots the stop, the arm takes the impact, the moment at the pivot and arm root climbs, and distortion shows up first as a bend in the arm web or a cracked weld at the gusset.
The arm bend is a consequence, not a cause. The loading arm did not fail on its own; it was handed a shock load it was never rated for, applied further out along a longer lever. That is why cart tipper maintenance has to be measured rather than eyeballed. Check pad thickness against spec at every service interval, and treat any new clunk, hesitation or bounce at full dump as a reason to inspect the cradle rather than an arm problem to weld up later.
If you are comparing rated lift hardware and want to see how angle and geometry shift real capacity, our breakdown of capacity derating at sling angle limits follows the same logic.
Where the Jump Comes From: Wear Depth vs. Dump Cycles
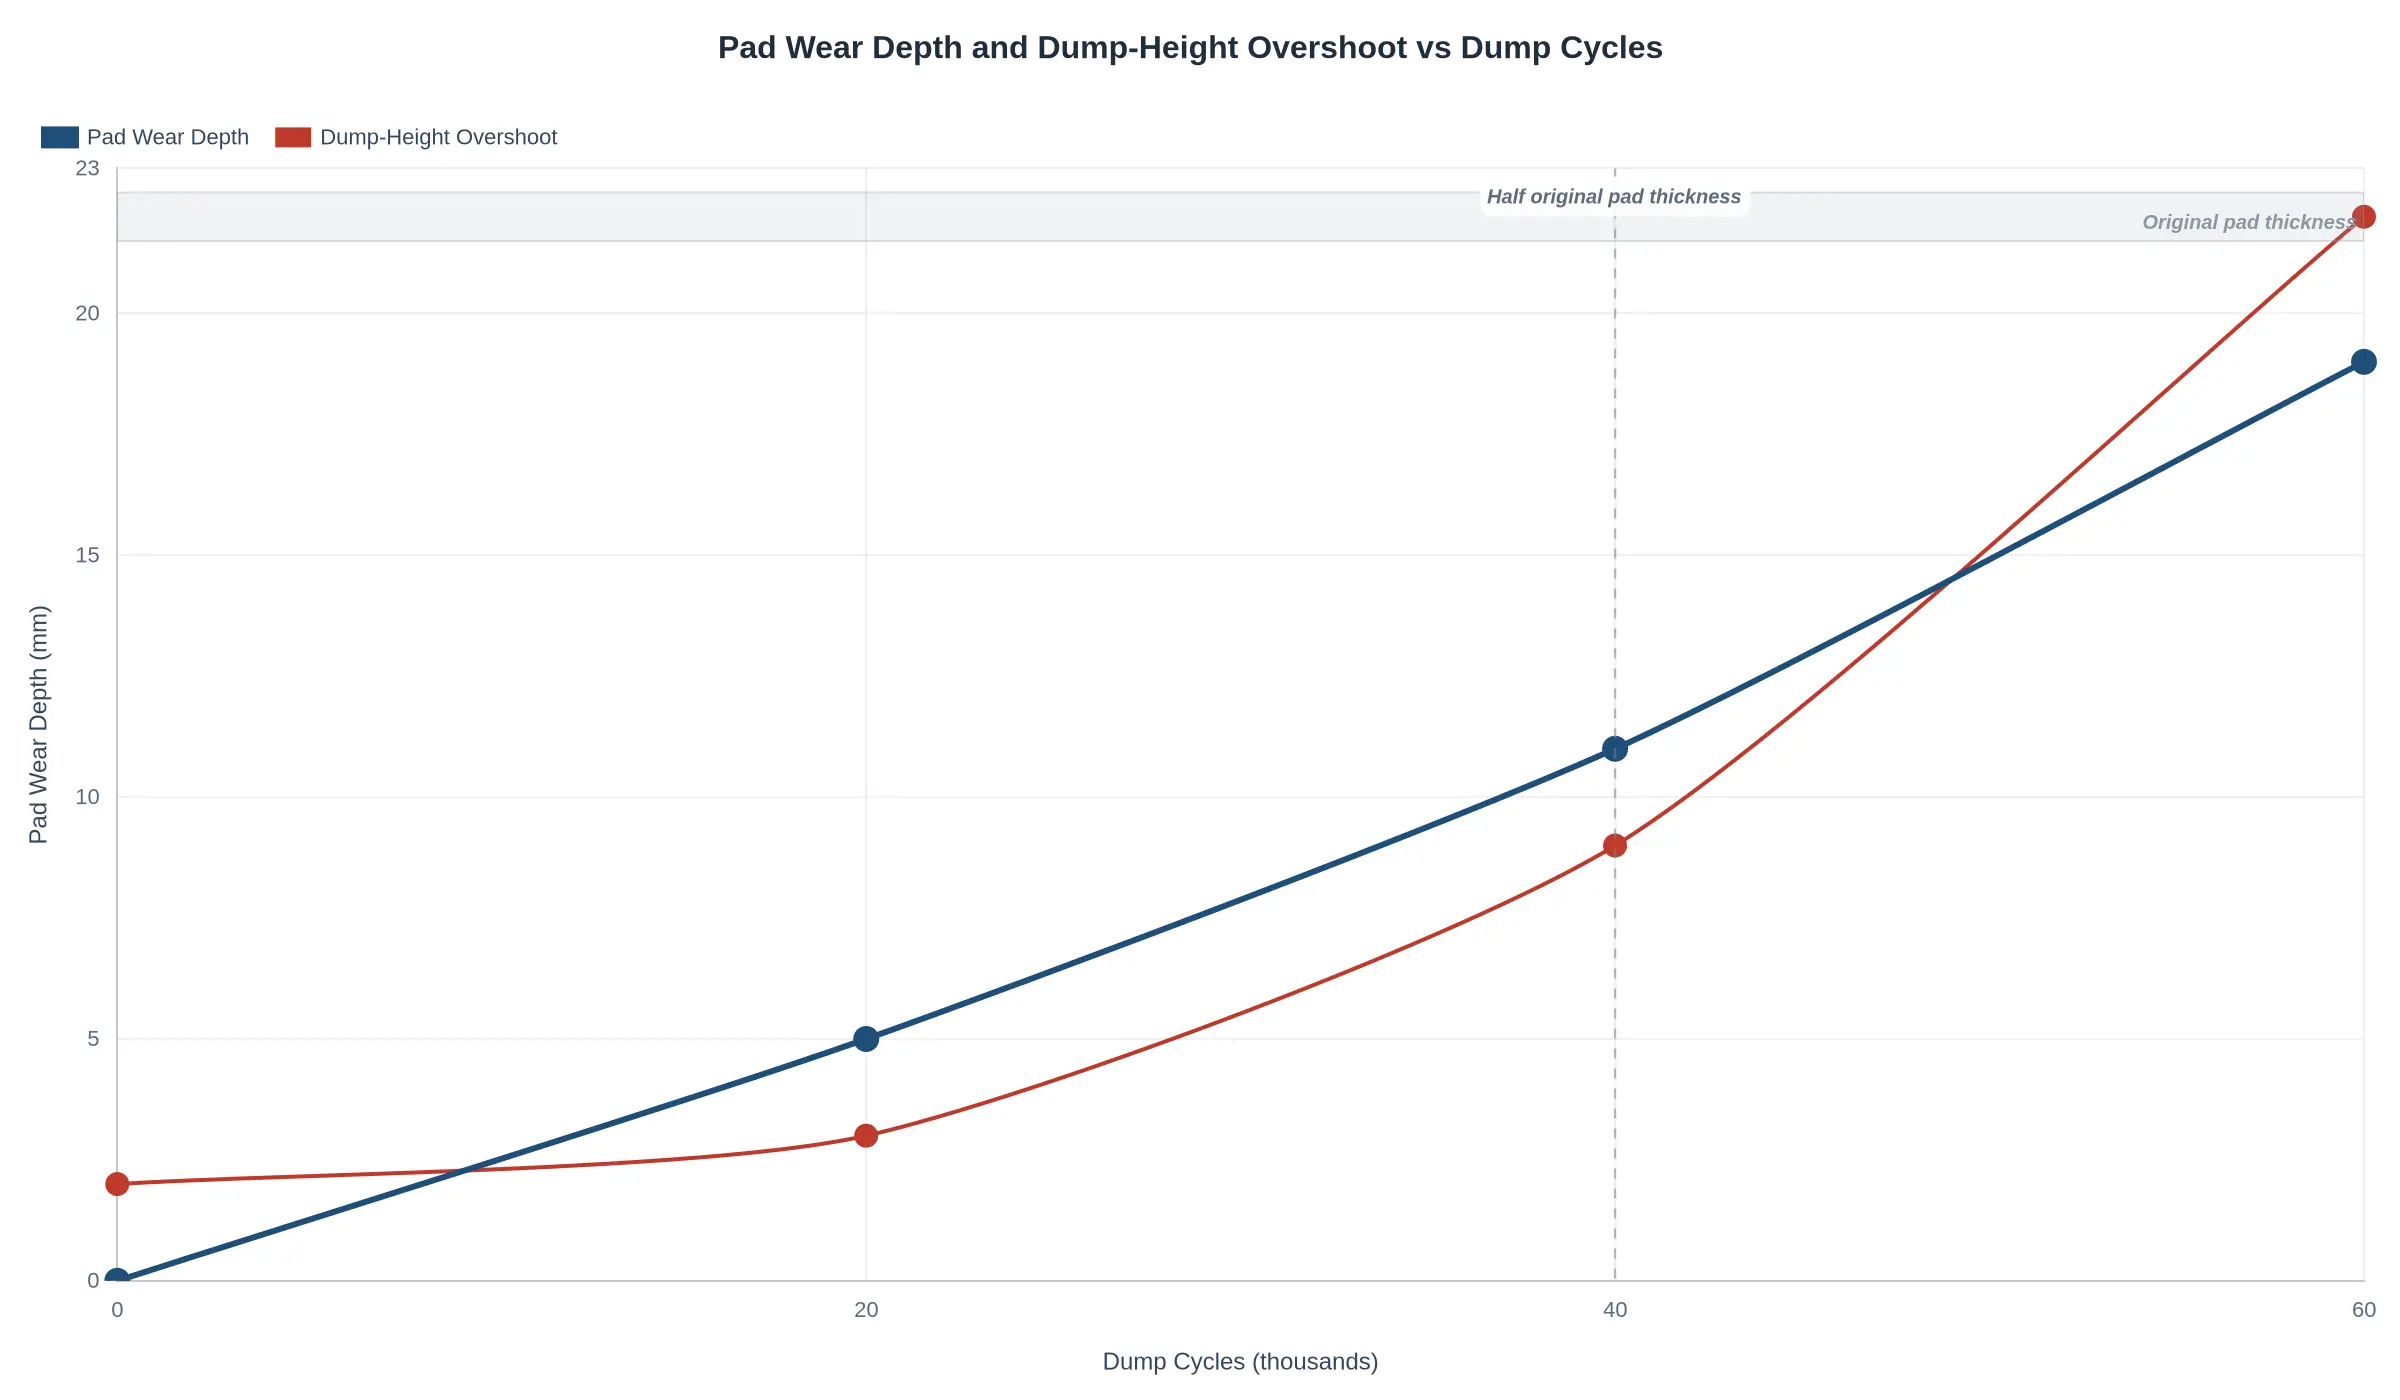
Pad wear depth and dump-height overshoot sit on the same axis in the chart below. The solid line is the pad thinning; the dashed line is how far the lip rides past the intended dump point. The dashed line looks almost innocent for the first half of the pad’s life, then breaks upward around the point where half the pad material is gone.
Two things are worth reading off it:
- Overshoot is not linear in wear. A pad that has lost 5 mm still looks serviceable in the yard but has already moved the dump point a little; at 19 mm, with the pad nearly used up, overshoot is roughly double what it was at 5 mm.
- Half thickness is the practical trigger point. Past 40,000 cycles on this curve, the system stops absorbing the error and starts translating it into arm deflection, cradle stress and the high dump jump operators complain about. Replace inside that band, not at end of life.
Treat the numbers as a shape rather than a spec. Your own cycle counts and pad thickness will shift with load weight, abrasive grit and how often the arm bottoms out, but the knee in the dashed curve shows up on any cart tipper that runs long enough.
Build a Cart Tipper Inspection That Produces Numbers
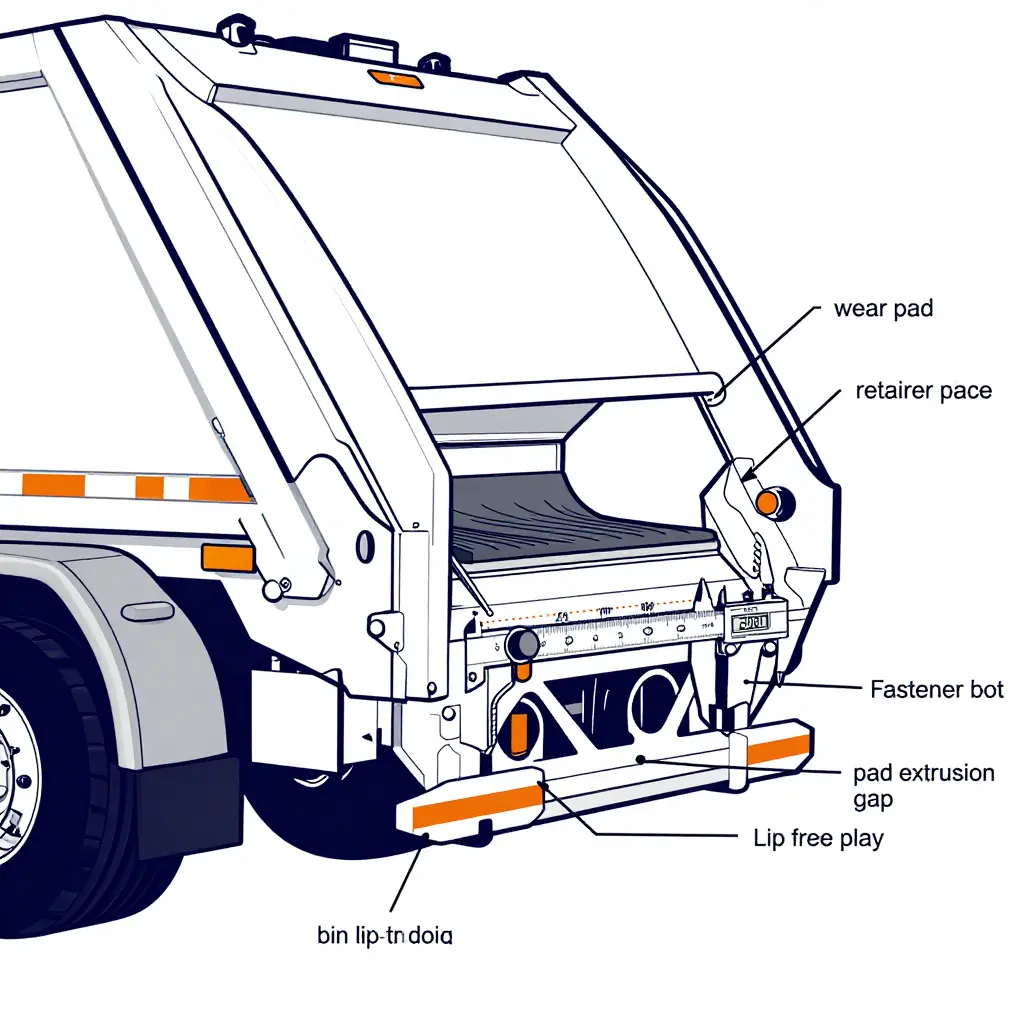
A repeatable cart tipper inspection starts with the arm parked, the PTO disengaged and the lockout engaged. Slide the cradle pad out where you can reach it and measure remaining pad thickness with a caliper or depth gauge at the same three points every time (left, centre and right), holding the gauge square to the pad face. Record the lowest of the three.
Then hand-check lip free play with a cart seated in the cradle: grab the bin lip and rock it fore and aft. More than 3 mm (1/8 in) of discernible rock, or a visible gap opening at the pad, means the interface has already loosened. Repeat the rock test after one full lift cycle. Free play that grows during the cycle tells you the pad is compressing or extruding, not just worn.
Walk the cradle and look for pad extrusion past the retainer plate edge, cracked or chunked pad corners, and missing, backed-out or loose fasteners, which you re-torque to the manufacturer’s figure before the unit goes back on route. Run a gloved thumb along the bin lip where it lands on the pad: a square edge that has gone rounded, or a bright peened witness mark rolled over the corner, is the earliest visible sign of the wear that turns into a high dump jump.
Log every reading per lift station: truck number, station or route ID, date, odometer or hour meter, lift count, and thickness at each of the three points. Then bin lip wear and pad loss become a curve in millimetres per 1,000 lifts rather than a memory of “it looked thin last time.”
Inspection Intervals by Duty Cycle, and the Measurement That Stops the Truck
Set the inspection interval from duty cycle intensity, not from one company-wide number. A pad that lasts a year on a rural route can be gone in months on a dense commercial block. Adjust the schedule whenever route density changes, and inspect immediately after a reported hard hit, a dropped cart, or any operator complaint about the bin jumping at the top of the stroke.
| Duty cycle intensity | Typical lifts per day | Inspection interval | Action threshold |
|---|---|---|---|
| Heavy: commercial dumpsters, multi-shift, abrasive or frozen loads | 600+ | Every 40 hours or weekly, whichever comes first | Measure and record at every service |
| Standard: dense residential, curbside carts | 300-600 | Every 100 hours or monthly | Trend pad loss per 1,000 lifts |
| Light: rural, low-setout routes | Under 300 | Every 250 hours or quarterly | Trend pad loss per 1,000 lifts |
Replace the pad when the lowest of the three measurements falls to 10 mm, roughly half of the 20 mm to 22 mm new thickness, or when free play at the lip exceeds 3 mm, the lip has developed a wear step deeper than 2 mm, or the pad is extruded, chunked or has a fastener hole pulled out. Do not shim a worn pad or stretch the interval to the next scheduled service. A pad at the limit loads the cradle and arm unevenly, and the arm bends long before the pad wears through. Cutting preventive maintenance to a thickness trigger and a lift-count trend keeps replacements cheap, planned, and off the side of the road.
Pad Replacement Sequence at a Glance
A worn pad at the cradle is what turns a normal tip into a high dump jump, so the swap matters more than it looks. The diagram below maps a five-step job order, from isolating the arm through the final cycle test.

- Box 1: Lower the arm and isolate it before any wrench goes near the cradle.
- Box 2: Unbolt the worn pad and pull it clear, keeping the hardware together.
- Box 3: Clean the cradle and inspect the bin lip for wear, gouging or a rolled edge.
- Box 4: Seat the new pad and torque it to the manufacturer’s spec in a cross pattern.
- Box 5: Cycle-test the dump height dry, then with a loaded cart, and confirm the tip is smooth.
Taped inside the toolbox lid, the sheet keeps the sequence the same across shifts and drivers.
Pad Specification and Correct Installation
Treat a replacement pad as an engineered wear part, not a flat plate cut to fit. Specify wear pad material by grade rather than price: a quenched and tempered abrasion-resistant plate around 400 HB (AR400 type) gives the sliding wear resistance a bin lip demands while keeping enough impact toughness to survive a mis-aimed set-down. Mild steel or a soft stainless shim will groove out in weeks. Thickness is not whatever fits. It has to restore the design cradle radius, so measure the worn pad at its lowest point, or the saddle chord across the cradle, and order stock that puts the seating face back at nominal. A pad running 6 mm thin lets the lip ride low, which is the geometry that keeps the arm lifting after the bin should have seated and produces the high dump jump. Match the bolt pattern and countersink to the OEM drawing so the fasteners sit flush and the pad face stays continuous, and match hardness to the lip material: a pad harder than a steel lip shaves the lip, while a soft pad on a plastic bin simply deforms.
Getting all four right is also the cheapest loading arm protection you can buy, because a correctly seated pad keeps the load path in the saddle instead of in the arm pins and torque tube. Follow this sequence for cart tipper pad replacement that does not come back:
- Clean both mating faces. Strip the old pad, wire-brush or grind the saddle and pad backing to bare, flat metal, and degrease. Trapped grit and scale are what crush a new pad loose and back the bolts off.
- Fit the correct fastener grade and torque. Use the OEM-specified grade (typically Grade 8 or Class 10.9) with hardened washers, apply thread locker, and torque to spec in a cross pattern. Undersized hardware stretches and the pad walks on the saddle.
- Do not shim the pad to raise the lip. Shims that lift the lip above the design line change the dump angle, load the cradle edge, and bring the jump straight back. Correct the radius with the right pad thickness instead.
- Run a dump-height check after the first twenty cycles. Measure the dump height and watch the bin at seat-off. Anything above the recorded baseline means the pad, radius or alignment is still out and has to be corrected before the arm takes the load.
How Bending Stress Tracks Dump Overshoot
Worn pads shift the point where the cradle releases the bin, and the arm keeps travelling after the stop has done its job. The chart below maps that extra travel against a relative bending stress index at the arm root, with 1.00 standing for the design limit.

A small overshoot is survivable: at 2% to 5% of the designed lift height the index only creeps from 1.00 to 1.15, which is why a worn pad can go unnoticed for months. The curve is not a straight line, though. Once the bin clears the stop by roughly a tenth of the lift height, the index nearly doubles to 1.95, and by 15% it reaches 3.10, three times the design bending moment at a joint that was never sized for it.
That non-linearity is the failure story. Wear does not degrade the arm gradually; it moves the arm into a range where stress climbs faster than anyone watching the bin can perceive the jump. By the time a spotter notices the bin lifting off the cradle, the arm root is already cycling well above its limit.
Anything beyond a few percent of overshoot is a stop-work condition, not a scheduling note. If your tippers share hydraulic architecture with other lifting equipment on site, the same margin discipline applies when you match bin size to chassis length on mixed fleets.
The Real Cost of Deferring Pad Replacement
The pad is the cheapest part in the lift cycle, which is exactly why deferring it costs so much. A technician can swap one in well under a shift, often in the same service window as a routine grease and inspection. Arm replacement belongs to a different cost order: fabrication time in the shop or a complete new loading arm assembly, the vehicle lifted and safely blocked, hydraulic lines disconnected and reconnected, the arm realigned to the cradle, and the dump height recalibrated before the truck goes back on a route. A pad change is an hour or two of shop time. Arm damage is days off the road and a parts bill an order of magnitude higher. Spend the small money early, or spend the large money plus downtime later.
The secondary damage widens the gap. A worn pad lets the bin lip ride metal on metal, so the cradle distorts, customer cart lips get chewed and split, and the pivot bushings take loads they were never designed for, the kind of pivot and hinge pin wear that forces a full teardown once it starts. Each of those failures adds its own labour hours to fleet maintenance and its own reason for the vehicle to sit idle while carts go uncollected. A neglected pad becomes a cascade of repairs, cart replacements and lost route hours, all of it avoidable with one inexpensive consumable changed on schedule.
FAQ: Cart Tipper Pad Wear and Loading Arm Damage
Short answers to the questions that come up when a bin starts riding low in the cradle.
How often should cart tipper pads be checked and replaced?
Inspect the cart tipper cradle pad at every PM service and after any high dump jump, then replace it once the lowest measurement is down to about half the new thickness, around 10 mm, or sooner if free play at the lip passes 3 mm. Busy residential routes typically need a new pad every 6 to 12 months.
Can a worn pad alone bend the loading arm?
Not on its own, and not in one lift. The pad starts the chain: bin lip wear lets the bin sit lower, the arm over-travels, and the high dump jump slams it into its stop. Repeated shock is what bends arms, the same way it does with rear loader hinge pin wear.
Should I replace the bin lip or the pad first when both are worn?
Replace the pad first. It is the sacrificial part and the cheaper of the two, and fitting a fresh cradle pad lets you judge the true depth of bin lip wear before you commit to weld repair or bin replacement.
How do I verify dump height is back in specification after fitting a new pad?
Confirm dump height with a tape measure at the discharge point after fitting the new pad, then recheck after ten loaded dumps. A steady reading and no high dump jump mean the geometry is restored. If height still drifts, the bin lip is worn.
One Rule to Schedule Around
The rule is simple: the cradle pad is a scheduled wear item, not a part you replace after it has already failed. Build the interval from duty rather than calendar time. Count dump cycles per station, weight the stops where the arm strokes twice in a row, and set a pad inspection every few thousand lifts so the schedule follows the work the truck actually does. Route density moves that number the same way compaction ratio sets body volume, which is why two identical tippers on different routes never wear pads at the same rate.
Replace at the measured threshold (pad thickness or lip drop against the OEM spec), not at the first visible crack or the first jump a driver reports. The pad is the sacrificial surface, and wear concentrates there long before it reaches the arm, just as corrosion eats a hopper floor well before the frame feels it, the pattern behind why a body floor rusts through first. Verify dump height on every pad change, because a fresh pad working against a worn bin lip will read wrong until the geometry is re-confirmed, the same discipline that applies to rear axle load and jib angle checks on soft ground. Pad wear starts the failure; the bent arm is only what makes it expensive.