Where the Drip Actually Comes From
A leachate drip running off the tailgate of a tipper at the transfer station is a tipper tailgate seal gap symptom, not a body-wash problem and not a weather problem. Rain and wash-down water change how much liquid is available to escape; neither opens the path it escapes through. On a garbage truck tailgate, that path is mechanical, it moves in millimetres, and a feeler gauge can measure it.
Three faults account for most recurring drips:
- Loss of seal lip compression (seal gap widening). The lip or bulb takes a permanent set, the retaining channel corrodes or deforms, and the gap between gate and sill opens. Compression falls, contact pressure falls with it, and liquid passes at the point of least resistance: almost always a bottom corner.
- Hinge pin and latch wear. Worn pins, ovalised eyes and slack latches let the gate sit out of square. The gate still closes, so nobody flags it, but the seal is now loaded unevenly: one corner crushes while the opposite corner lifts. The lifted corner is where the drip appears first. Our notes on hinge pin wear on rear-load compactor tailgates cover the inspection points worth checking.
- Blocked or undersized drain paths. When drain holes, channels or weep ports above the sill line are plugged with debris, or were specified too small for the volume, liquid pools against the seal and stays there. A seal that holds on a dry run will leak once it is standing in leachate.
These faults rarely occur alone. A worn pin opens a gap, leachate collects in it, the corrosion accelerates compression loss, and the drip returns within weeks of a re-seal. Fixing one cause in isolation is how a truck ends up back on the bay.
How Leachate Reaches the Tailgate Joint
Leachate reaches the tailgate because it is pushed there: by compaction upstream, by the truck’s motion, and by the head that builds wherever the rear floor plate meets the tailgate. Once you can follow that sequence, a wet drip at the station stops being an annoyance and becomes a reading of the tipper body seal and the rest of the leachate control strategy.
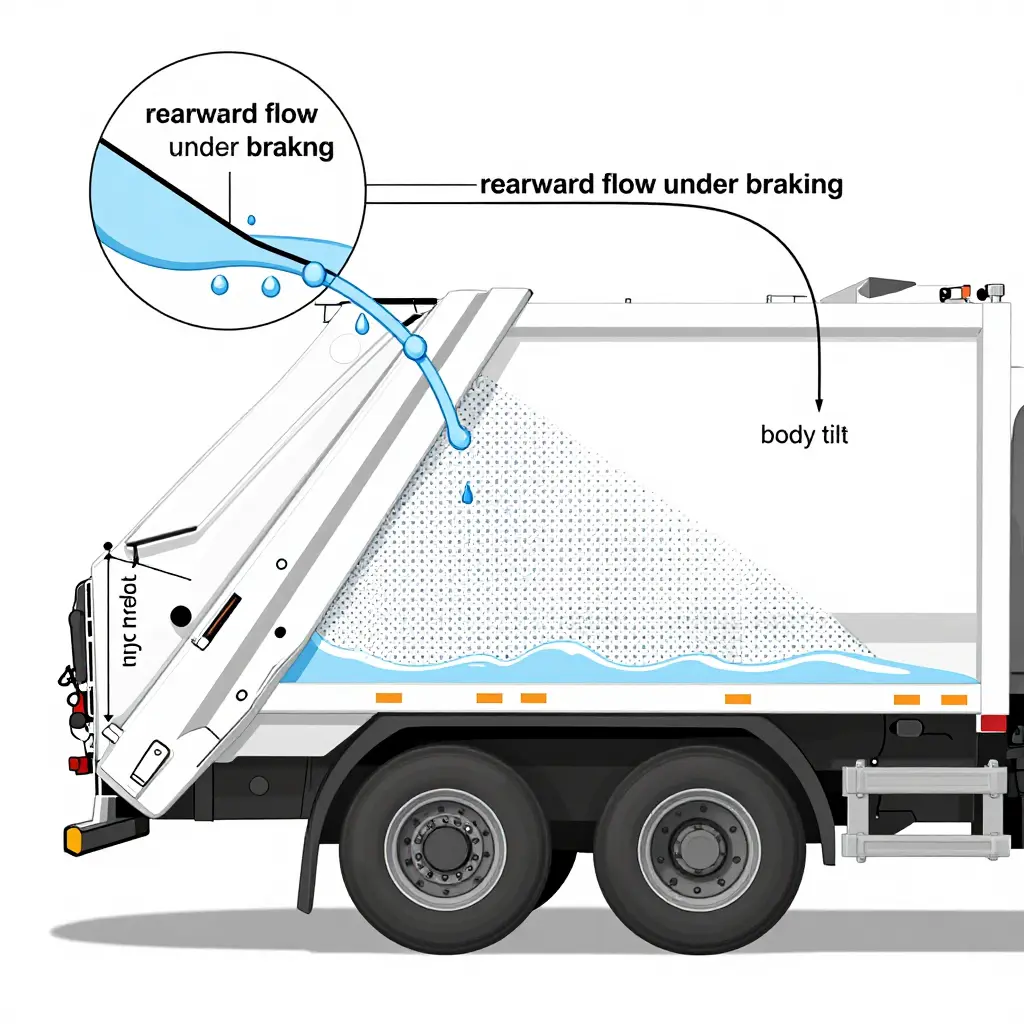
The pressure path, step by step
- Consolidation under compaction. Waste arrives already squeezed. A rear-loader’s packer, or the station compactor, presses the pore space out of putrescible waste, and moisture once held between particles becomes free liquid. Higher compaction ratios leave more liquid available to move – the same mechanism behind wet commercial loads that punish the hopper floor.
- Rearward migration of free liquid. The free fraction travels along the floor plate, not through the mass. Braking throws it forward and pulling away sends it back; over a route the net movement is rearward, toward the open end rather than the sealed front wall.
- Body tilt concentrates the pool. When the body is raised, the rear floor becomes the low point, and gravity redirects the entire floor’s residual drainage toward the tailgate.
- Head builds against the lowest point. Liquid trapped behind the closed tailgate forms a shallow reservoir. Depth multiplied by density gives the hydraulic head acting on the tailgate-to-sill interface, usually the least supported seam on the body.
- The gap becomes the flow path. Head divided by the joint’s flow resistance sets the leak rate. Worn hinge bushes, compressed or perished rubber, and a bowed door bottom all enlarge the open area, and the drip rate climbs with it.
Why a single-digit-millimetre gap passes liquid, not solids
The gap at the tailgate-to-sill interface is usually measured in single-digit millimetres – a tired seal, a dropped hinge, a distorted door edge. Liquid moves through it easily because its viscosity is orders of magnitude lower than that of the slurry it came from, and because a 3 mm slot is a wide channel relative to the sub-millimetre fines that would have to bridge it. Solids fail to pass for a different reason: particles approaching the gap dimension arch across the opening and build a filter cake, so the joint self-seals against refuse while still weeping liquid. Every flex cycle of the body – tipping, potholes, uneven loading – cracks that arch and resets the process.
Why the drip rate rises when tipped or parked nose-down
Tipping shifts the wetted centroid rearward and increases depth at the tailgate, so head rises and flow rises with it. Parking nose-down does the same more quietly: where the apron falls toward the bay, the tailgate sits at the low end and the floor’s residual liquid drains to the joint overnight, with no brake-induced sloshing needed. A body that looks dry at the end of a route can leave a puddle by morning.
Consequence for the transfer station floor
The end result lands on the slab: contaminated runoff carrying high organic load, ammonia and suspended solids, plus a genuine slip risk for spotters, drivers and pedestrians working around the bay. That runoff and that slip hazard must be contained – bunded or drained collection points, drip trays under the tailgate, absorbent on standby, controlled wash-down water, and a maintenance trigger tied to a measured seal gap rather than to how bad the puddle looks.
 What the curve is telling you
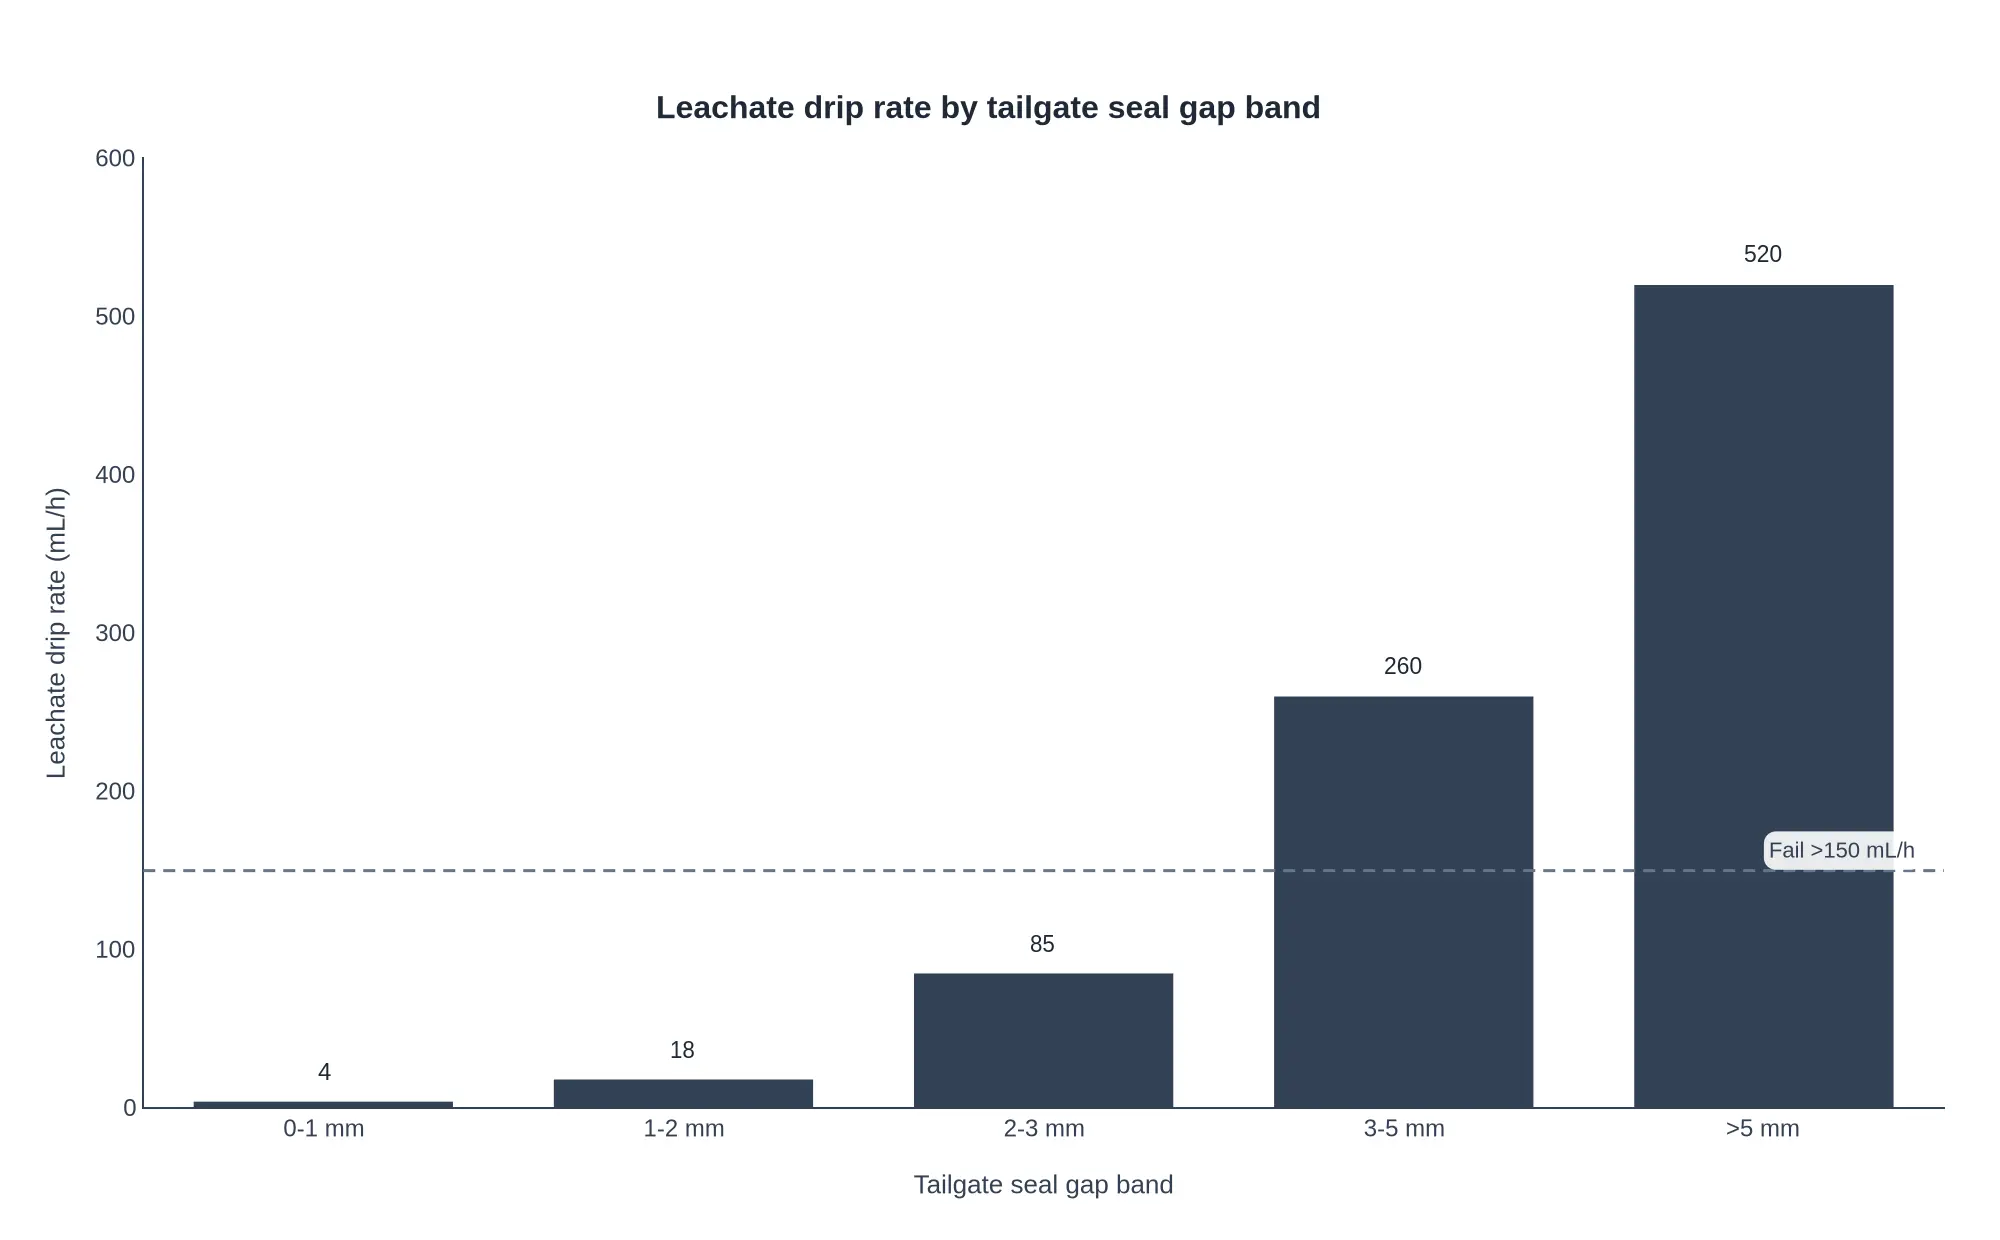
The relationship is not linear. Below about 2 mm, compressive seal deflection still bridges the gap and the tailgate holds. Past 2 mm the lip stops touching the body face, and the drip rate climbs faster than the gap does:
| Seal gap band | Typical drip rate | Status |
|---|---|---|
| 0-1 mm | 4 mL/h | Pass |
| 1-2 mm | 18 mL/h | Pass |
| 2-3 mm | 85 mL/h | Watch |
| 3-5 mm | 260 mL/h | Fail |
| >5 mm | 520 mL/h | Fail |
These are representative field readings from tipper tailgates with a liquid pool sitting against a closed gate, not laboratory maxima. Route load will shift the numbers, but the shape holds: going from the 2-3 mm band to above 5 mm multiplies the drip roughly sixfold, 85 to 520 mL/h. A seal gap called out as “looks fine” is therefore a maintenance liability, and the spec belongs on the inspection sheet as a number with a feeler gauge next to it. Leachate that escapes here does not just stain the apron – it wets the hinge area and the body floor seam on every run. If you want to see where that moisture eventually shows up, read about why the body floor rusts through first.
How and Where to Measure the Tipper Tailgate Seal Gap
A seal gap measurement is only as good as the conditions you take it in. Get the setup wrong and you will chase a leak that does not exist, or sign off a tailgate that is already weeping leachate onto the transfer station slab.
Set the truck up first
Before a single blade goes in, empty the body completely – no residual load pressing on the tailgate. Latch the tailgate fully using the normal closing cycle; do not lean on it by hand. Park on level, hard ground, bring the chassis to ride height with the suspension inflated, engine off, parking brake set. On a hook-lift body, confirm the subframe is fully seated and the body is sitting square on its pads before you read anything.
Choose the right gauge
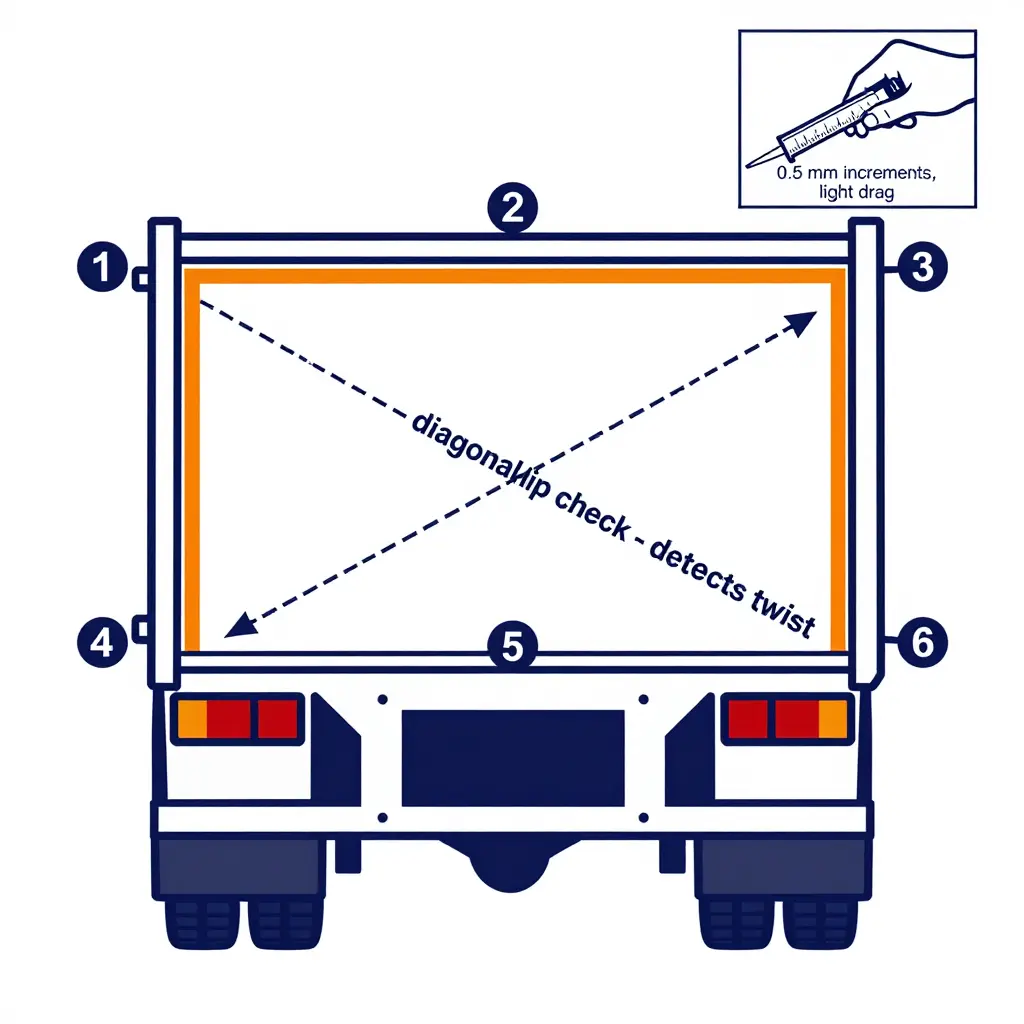
Use a feeler gauge or taper gauge set graduated in 0.5 mm increments. Clean blades, no burrs, and record the size of the leaf that enters with light drag – never force a blade, because a distorted lip will read tight and hide the real clearance.
Take six readings and one diagonal check
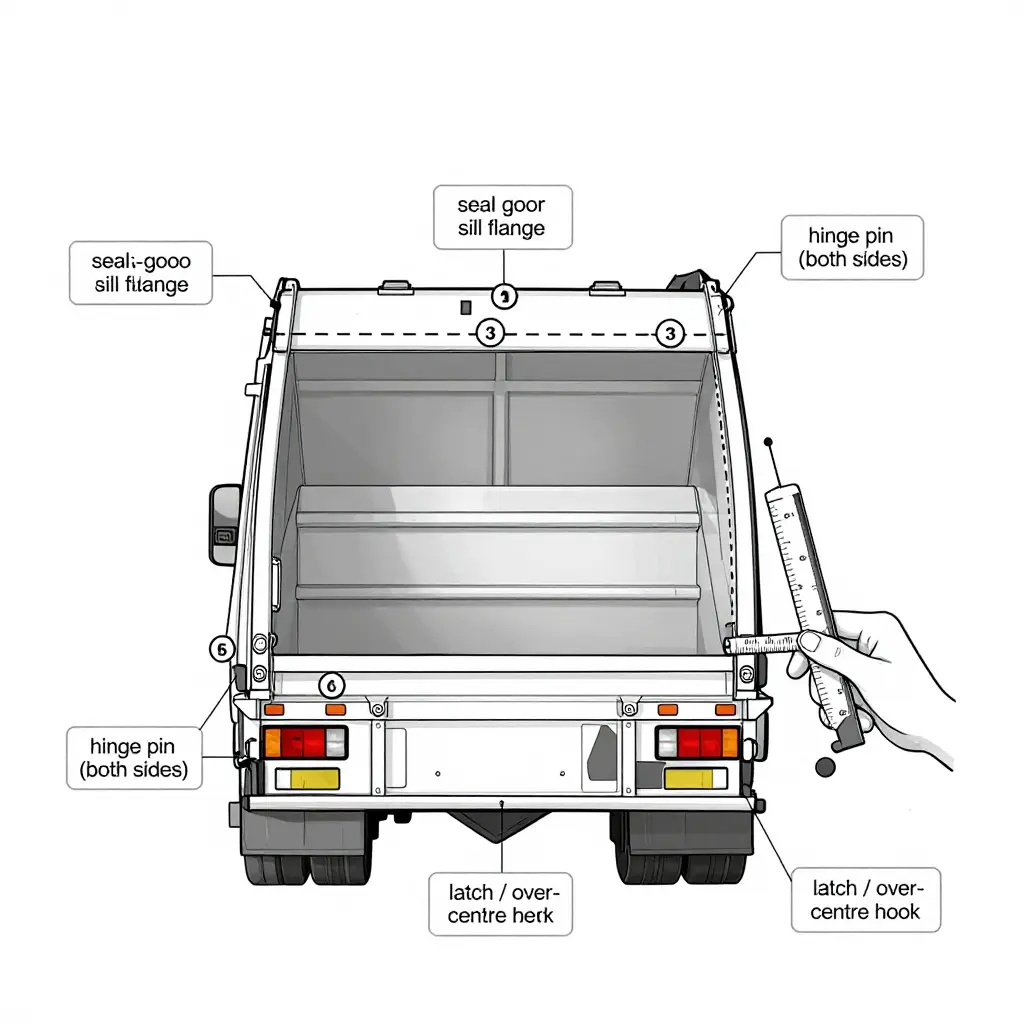
| Point | Where to probe |
|---|---|
| 1 | Top left corner of the seal |
| 2 | Top centre |
| 3 | Top right corner |
| 4 | Bottom left corner |
| 5 | Bottom centre |
| 6 | Bottom right corner |
Hold the blade perpendicular to the seal face and slide it in until it meets light resistance. Then run one diagonal check across the seal lip, corner to opposite corner, to catch twist in the tailgate or a bent hinge pin – a straight gap with a diagonal that grabs tells you the door is warped, not the rubber.
Read the variation, not the number
When the gauge enters easily at one point and will not go at another, that variation is the defect. Localised pinching at a latch, or a gap opening at the bottom corners where leachate pools, is what lets liquid escape under load. Log all six numbers per truck, per inspection, so you can see the trend rather than a single snapshot.
When to adjust and when to replace
Replace the seal, or adjust the hinges and latches, before the next run if either condition is true:
- Any single point exceeds the OEM tailgate seal wear limit for your body, or the field limits used here: 3 mm at the header, 2 mm at the sill.
- The spread between the top and bottom readings on the same side is greater than 1.5 mm.
Anything inside those limits gets cleaned, lubricated and re-checked at the next service interval. Anything outside them gets fixed before the truck leaves the yard – a $60 gauge set and ten minutes beats a wash-down bill and a wet load on the road.
Pre-run tailgate seal gap check
Use it as the apron card: six steps, in order, before the truck leaves the yard. If leachate has already been weeping down the sill, spend thirty seconds on corrosion bloom around the seal channel first – the liquid that finds a gap also finds a seam, as covered in why the body floor rusts through first.
- Isolate and secure the body. Park on level ground, apply the parking brake, and lock out the PTO and hydraulics before reaching near the tailgate; confirm the body is fully lowered and blocked so zero stored energy remains in the circuit.
- Clean the seal lip and sill. Scrape compacted debris, grit, and dried leachate off the seal lip and sill channel, then wipe both dry until you can see continuous bare rubber and bare steel with nothing bridging the gap.
- Latch the tailgate and confirm engagement. Close the tailgate and cycle both latch cylinders until the hooks seat fully over the pins; verify lock-up on both sides by hand-pulling each hook and confirming the latch indicator (where fitted) reads fully engaged.
- Take six gauge readings plus the diagonal twist check. Measure the gap in millimetres with a feeler or taper gauge at the six points on the diagram – top left, top centre, top right, bottom left, bottom centre, bottom right – and write each value down; then measure both diagonals and record the difference as the twist figure.
- Record against the wear limit and compute the spread. Set each reading beside the OEM wear limit and the field target on the inspection sheet, then subtract the smallest value from the largest to get the spread in millimetres, so any single point over limit or an over-wide spread is immediately visible.
- Decide: run as-is, adjust, or replace. Run as-is when all six readings sit inside the limit and the spread is tight, adjust the latches, strikers, or hinge shims when readings are uneven but still inside the OEM limit, and replace the seal when any point is past 5 mm at the header or 4 mm at the sill, or past the OEM wear limit if that is lower; log the decision and the next check date.
Tipper tailgate seal gap inspection record
Photocopy this sheet into the truck’s maintenance log and fill it in cold, with the body empty and the tailgate latched but not loaded. Use a feeler gauge or a steel rule with a straight edge held across the seal face, and measure perpendicular to the seal – never along a crushed lip. The limits below are the OEM figures for one body (3.0 mm nominal, 6.0 mm wear limit), and that wear limit is looser than the field targets used above; where the two disagree, the tighter number wins, because a header gap over 3 mm or a sill gap over 2 mm on a wet route is already a job. Leachate rarely announces itself as a single failed gasket; it usually seeps through the one corner where the tailgate has stopped seating flat, which is also the corner where the body floor and lower frame start to corrode (see why compactor body floors rust through first).
Tipper tailgate seal gap inspection record
| Measurement point | Nominal gap (mm) | Wear limit (mm) | Measured value (mm) | Deviation | Corrective action |
|---|---|---|---|---|---|
| Top left | 3.0 | 6.0 | 4.0 | +1.0 | Above the 3 mm field target; re-torque seal retainer and re-measure |
| Top centre | 3.0 | 6.0 | 4.5 | +1.5 | Log for trend; re-shim upper hinge if it grows at the next check |
| Top right | 3.0 | 6.0 | 5.5 | +2.5 | Over the 5 mm replace threshold; new seal and upper hinge bushings before the next run |
| Bottom left | 3.0 | 6.0 | 3.5 | +0.5 | Above the 2 mm sill target; clean seal face, re-check cold |
| Bottom centre | 3.0 | 6.0 | 3.5 | +0.5 | Above the sill target; clear the drain channel of pooled leachate and re-check |
| Bottom right | 3.0 | 6.0 | 4.0 | +1.0 | At the sill replace threshold; check lower latch pin free play and re-measure |
| Diagonal twist (TL-BR vs TR-BL) | 2.0 max spread | 3.0 | 3.5 | +1.5 | Realign tailgate on hinges before next run |
| Latch engagement (striker overlap) | 22.0 | 18.0 min | 19.0 | -3.0 | Inside the 18 mm minimum; adjust striker at next service, replace latch jaw if wear groove exceeds 2 mm |
Read the sheet as a set rather than a line-by-line pass/fail. The Deviation column is just measured minus nominal; the number that drives the repair decision is the spread between points on the same seal face – here 3.5 mm at bottom left and bottom centre against 5.5 mm at top right, a 2.0 mm step – because a tight-to-loose transition is exactly where leachate finds a path. An evenly high gap is a shim and seal job. A gap that steps across the seal line, or a diagonal twist past 3.0 mm with latch overlap down to 19 mm against a 22 mm nominal, means the tailgate is no longer seating flat; correct the hinge, latch and seal before the truck leaves the yard.
Why the Seal Gap Keeps Opening: Four Causes
A tailgate seal rarely fails on its own. Something in the hinge, the latch, the sill flange or the seal groove has moved the sealing face out of contact; the rubber is the messenger, not the cause. The six-point pattern tells you which of the four it is in about ten minutes, and it saves you from fitting a second new seal to a gate that was never going to hold it.
1. Hinge Pin and Bushing Wear: The Gate Drops and Rotates Out of Square
On a tipper tailgate hinge, the pin and bushing carry the weight of the gate plus the shock of every load, slam and pothole. Leachate washes the grease out, grit gets in, and the pin wears oval while the bushing wall thins. The gate does not just drop – it drops and rotates, so the top edge pulls into the seal and the bottom edge swings away from it.
That shows up as a wedge, not a uniform gap: points 1, 2 and 3 at the top read near-zero while points 4, 5 and 6 open up. One hinge usually wears faster than the other, and the pattern tells you which: the side where the bottom corner opens widest is the worn one. Grab the gate half open and rock it vertically – more than 1.5 mm of play means the pin is finished. Our breakdown of rear loader hinge pin and bushing wear covers the wear limits and the reamer-and-oversize-pin repair.
2. Latch or Over-Centre Preload Loss: An Even Gap With a Loose Gate
The latch does two jobs: it pulls the gate in, and it holds it over-centre so the seal stays in compression. Worn latch pins, stretched linkage, collapsed rubber buffers and a striker that has crept on its bolts all do the same thing – the gate sits against the seal without being preloaded into it.
This is the signature that fools people, because the gap looks the same everywhere. All six points read much the same, each a little past the pass limit but short of the replace threshold, nothing is obviously skewed, and yet the truck leaves a trail across the transfer station floor. Check latch preload with a pry bar between gate and body: if you can lever more than 2-3 mm of movement, the over-centre geometry has been lost. The gate will also rattle and thump on rough pavement, which is usually what the driver reports first.
3. Distorted or Rusted Sill Flanges: No Flat Face Left to Seal Against
The sill flange is the only truly flat face the seal has to land on, and it lives in the worst real estate on the truck: wet, salted, coated in leachate. Once the plate thins and the flange starts to rot, or a dragged bin or a hard reverse into the dock kerb bends it, the flat face becomes a wave. It often bows between the hinges and sags at the corners.
The pattern is bottom-heavy and asymmetric: points 4 and 6 wide, point 2 still tight, and the reading changes sides depending on which flange has gone. Straight-edge the sill before you touch the seal. If the flange is rusted through, the fix is plate, not rubber – see why the body floor rusts through first for the corrosion path that starts in that same wet zone.
4. Debris or Frozen Residue in the Seal Groove
Not structural, but it belongs in the same diagnosis because it produces identical symptoms. Compacted fines, cured leachate and frozen residue hold the seal off its seat and hold the gate off the latch at the same time. The giveaway is inconsistency: readings change between passes, one point spikes on its own, and the gap closes in the afternoon and reopens on the cold morning run.
Reading the Six-Point Pattern
| Point | Hinge pin wear | Latch preload loss | Sill distortion | Groove debris |
|---|---|---|---|---|
| 1 Top-left | tight | even gap | tight | variable |
| 2 Top-centre | tight | even gap | tight | single spike |
| 3 Top-right | tight | even gap | tight | variable |
| 4 Bottom-left | wide | even gap | wide | variable |
| 5 Bottom-centre | widest | even gap | moderate | single spike |
| 6 Bottom-right | wide | even gap | wide | variable |
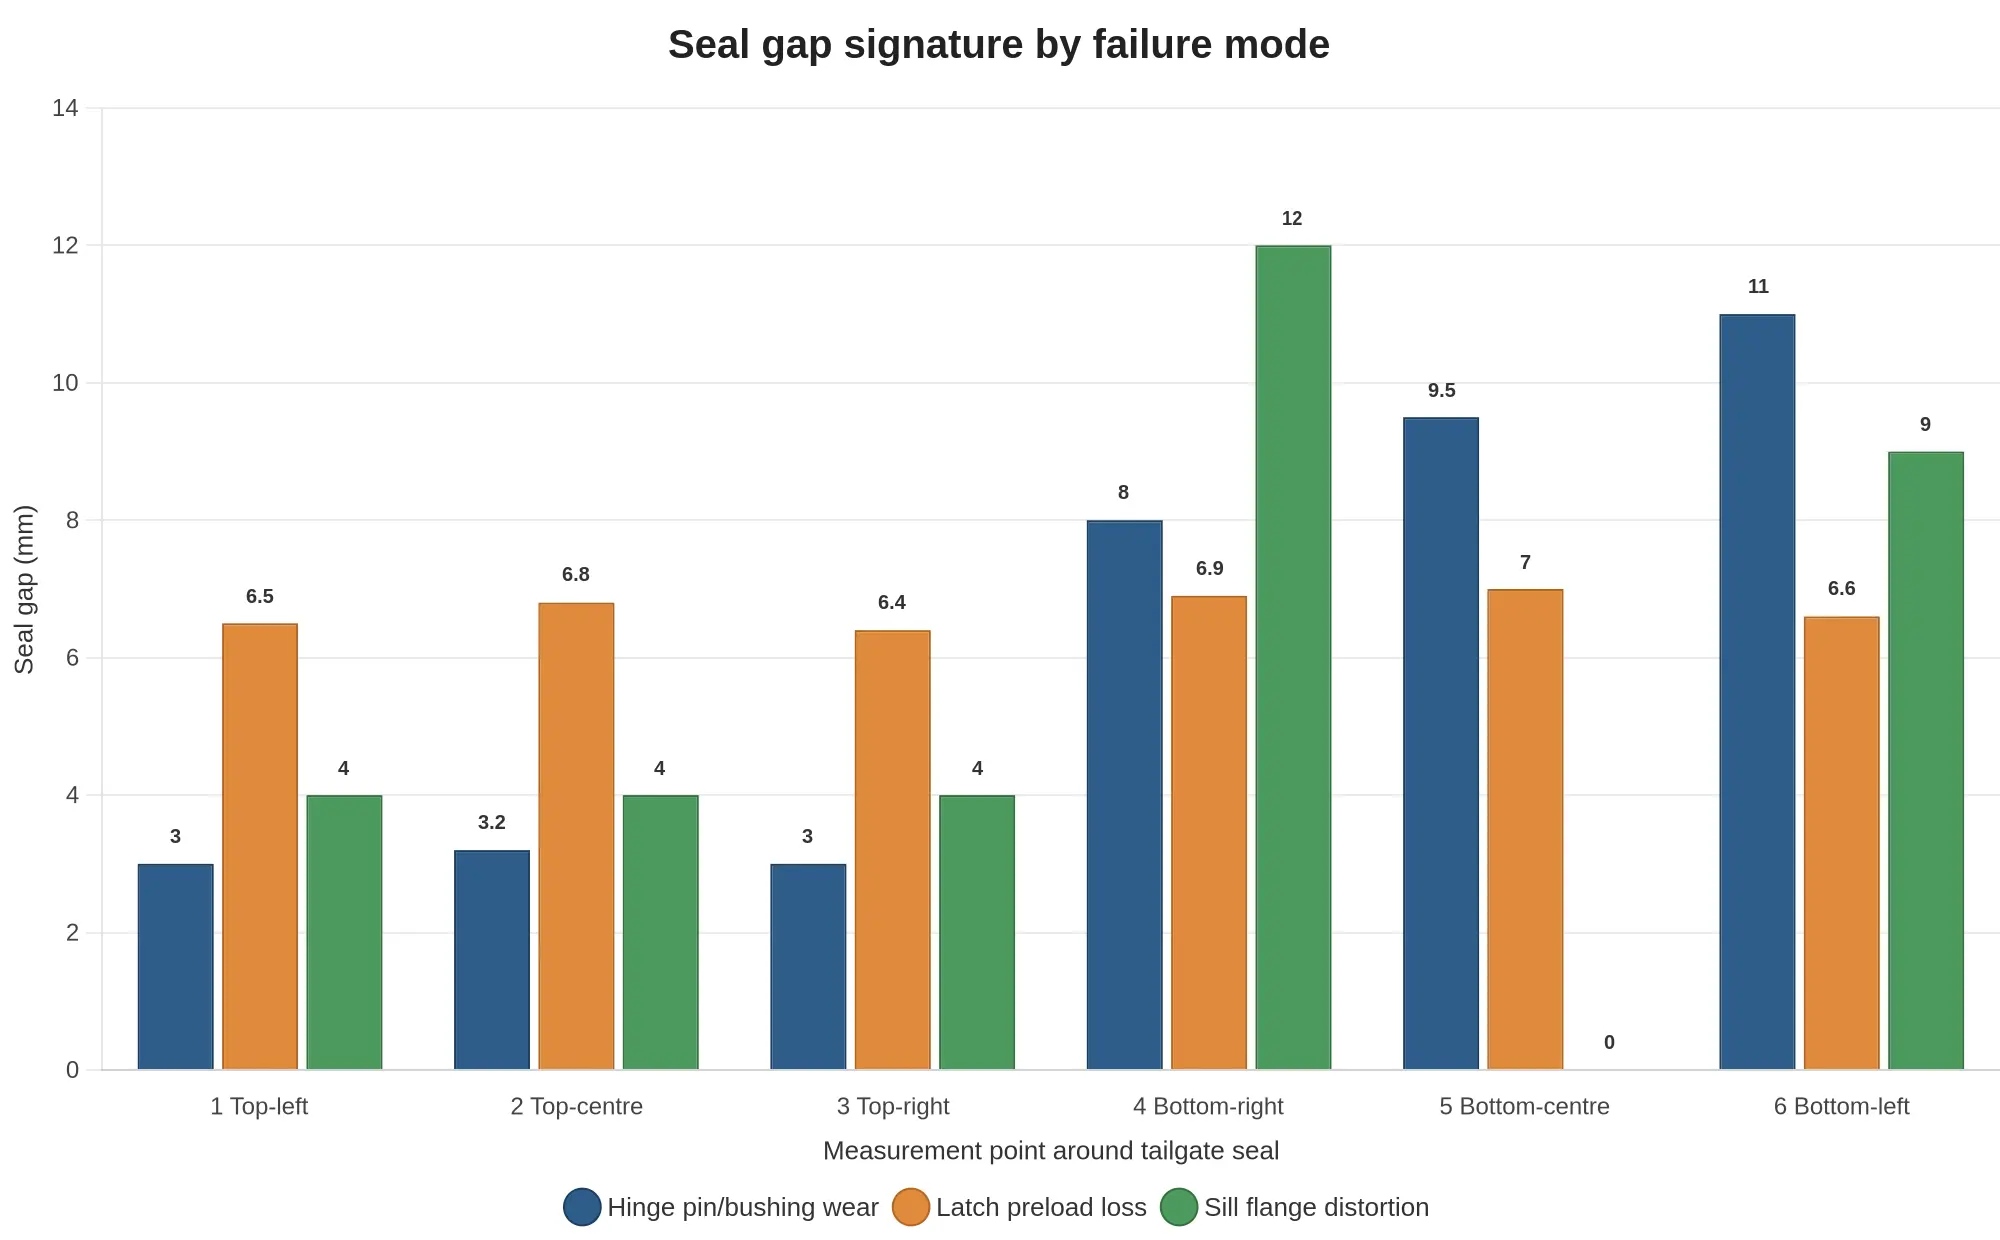
Fix the metal before the rubber. A gate that is square, preloaded and sealing against a true sill will hold a standard seal for its service life; a gate that is none of those things will drip through a brand-new one on the first wet load.
How Much of the Gap Is Rubber and How Much Is Hardware
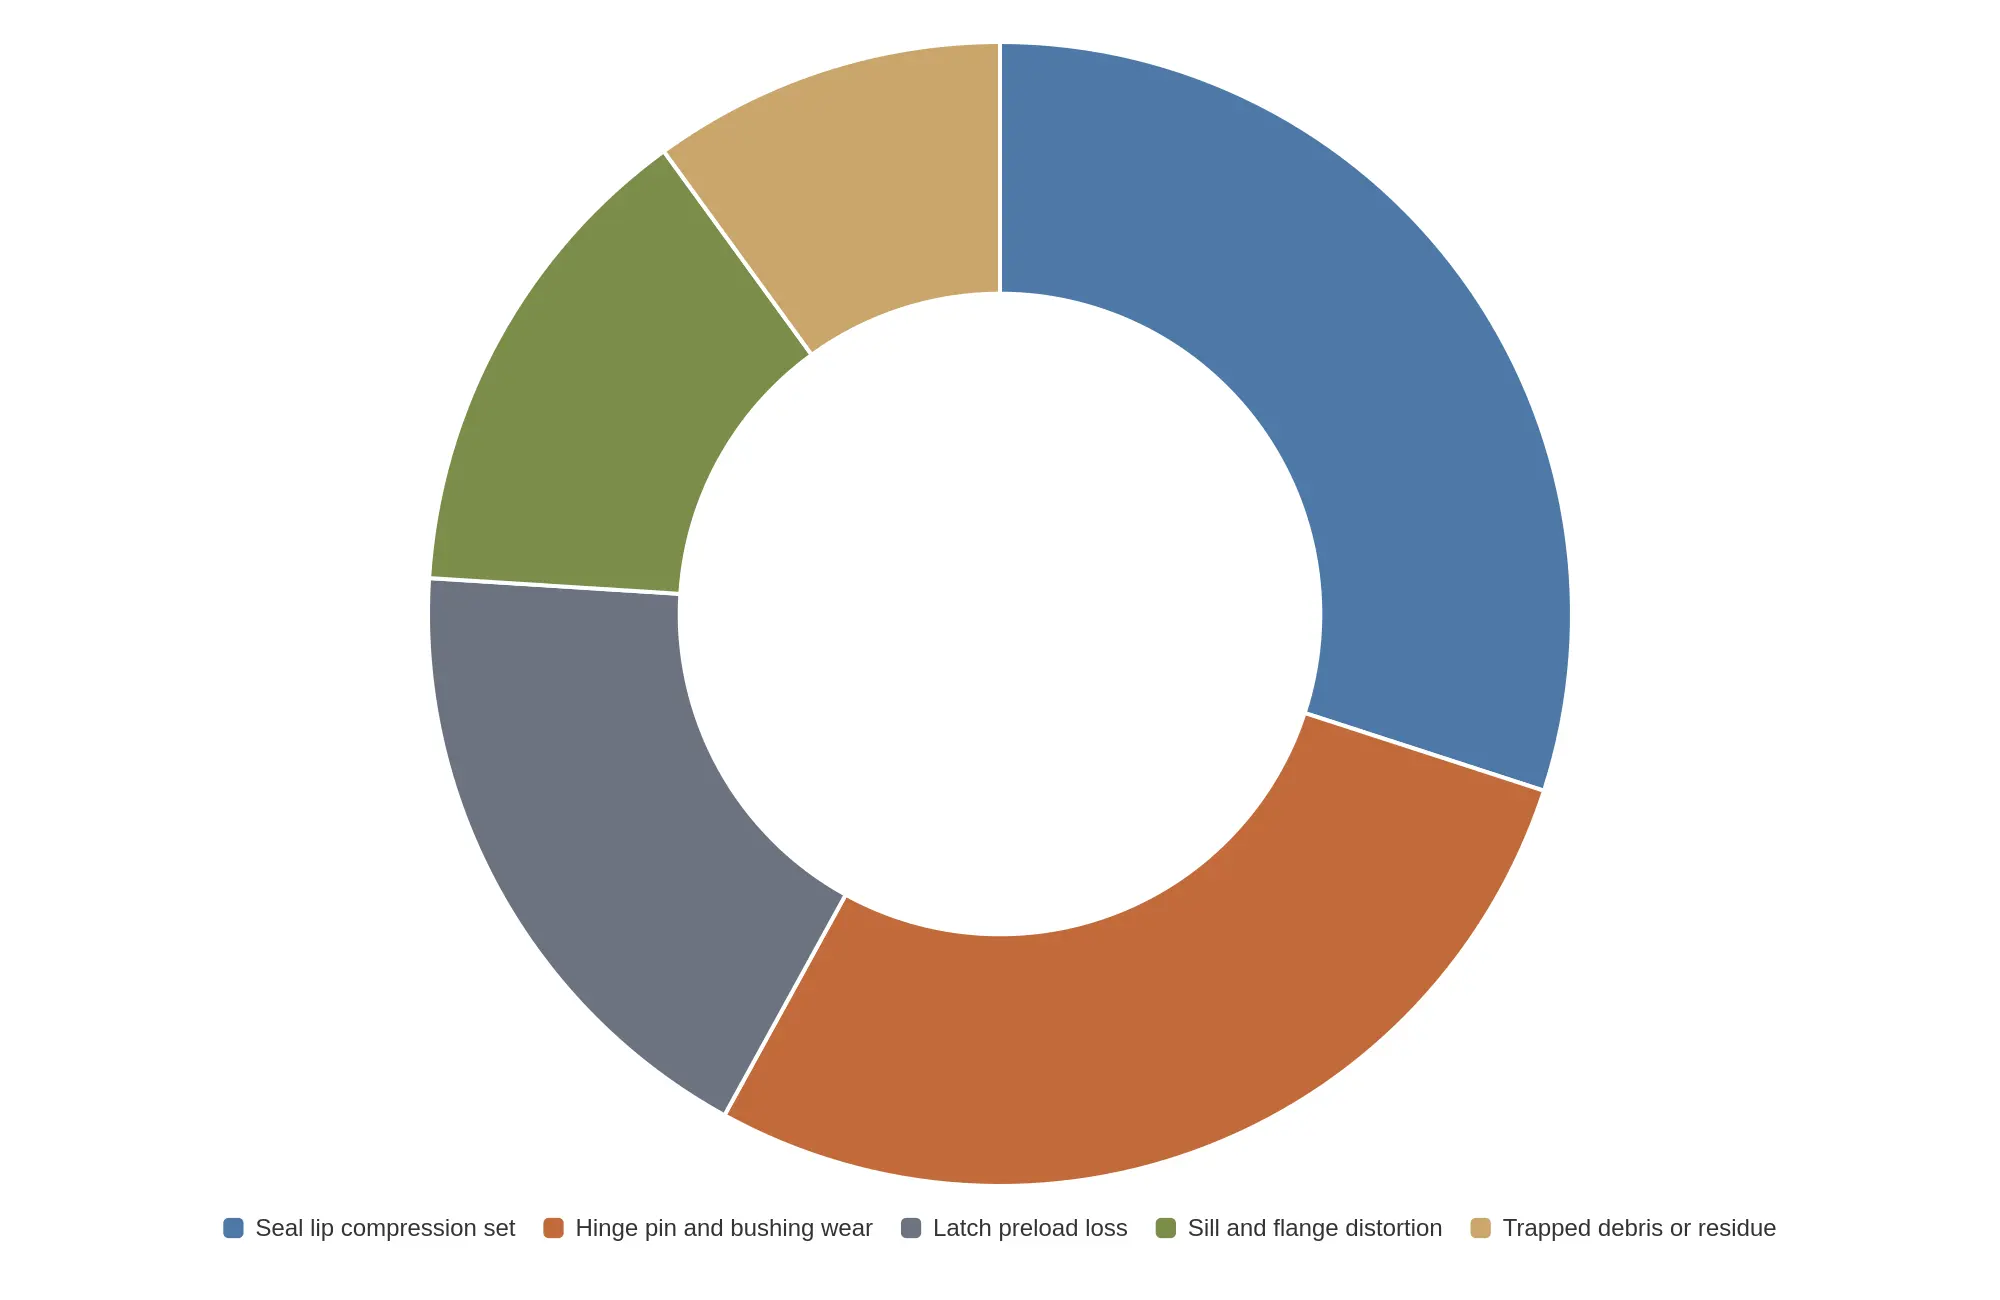
Inspect hinge pin and bushing wear first after a seal replacement: that 28% slice is the largest non-rubber contributor and will re-open the gap almost immediately.
The seal lip itself accounts for about 30% of gap growth. The other 70% sits in the hardware that decides where the tailgate lands when it closes. A new gasket pressed against worn hinge pins and a latch that no longer reaches preload gets flattened into the same gap, which is why a seal-only repair often buys one short interval before the drips return. Before you budget for rubber, measure the gap cold, then check pin and bushing play against the hinge pin wear limits for rear-loader compactor bodies so the next seal has something square and stable to sit against.
Leachate Routing and Containment: Give the Liquid a Controlled Exit
A tailgate seal is the last line of defence, not the drainage path. If leachate reaches the seal on every load, the fix sits upstream: the body needs defined drain and weep paths that carry liquid to a controlled discharge point, plus a station layout that catches whatever still arrives. Leachate control should be observable and measurable – liquid leaving at a known spot, at a known rate, so a change in volume there tells you something has moved inside the body.
Tailgate Drain and Weep Path Checks
- Confirm every drain port and weep slot is open. Probe with welding wire or a thin rod during the pre-run walk-around. Fines, grease and dried slurry blind these holes long before a seal fails, and a blinded drain forces liquid into the seal gap.
- Match drain capacity to the load, not to the drawing. If a truck drips from the seal face while the drain stays dry, the port is undersized, blinded or mounted too high. The seal is not “worn out”.
- Clear the weep paths in the seal retainer. Slots must be free from the retainer face outward; a weep path that discharges behind the seal simply wets the gasket from the wrong side.
- Verify drip rails are present, straight and unbroken. Look for torn or missing rail sections, pinholes in the weld line, and debris mats sitting on top of the rail that redirect flow sideways.
- Check containment channels on the body run full length and drain forward. Confirm no crushed sections, no packed solids, and that the discharge end actually overhangs the collection point rather than dumping on the chassis or axle.
Transfer Station Containment Practice
- Drip trays under every parked tailgate. Position so the tray sits under the seal line and the lowest drain point, and empty them at end of shift rather than letting them overflow onto the apron.
- Apron drainage to a leachate sump. Grade the standing area so wash-down and drips run to a trapped sump, not across the yard; confirm the sump has capacity, a functioning pump and a level alarm.
- Containment around the tip point. A kerbed lip or bund keeps runoff in the drained zone if a tray is knocked or a drain is blocked mid-shift.
- Immediate cleanup of runoff. Leachate on the apron is a slip hazard and an odour source within minutes. Absorbent, a squeegee and a hose-down routed to the sump are the whole kit.
- Never wash leachate to the storm drain. Direct all transfer station drainage to the sump, and keep a spill kit staged near the tip face.
- Log the drip pattern at end of shift. Note the location, volume and whether it came from the drain or the seal face; that one line tells you whether to clean a path or measure a gap.
| Checkpoint | Pre-run | End of shift |
|---|---|---|
| Tailgate drain ports | Probe and clear | Rinse, confirm flow |
| Weep slots and retainer | Visual plus probe | Clear fines |
| Drip rail and containment channel | Visual for tears and debris | Wash down |
| Drip tray under tailgate | Confirm in place | Empty and rinse |
| Apron and sump | Confirm drain path clear | Clear runoff, check level |
Clean routing pays off twice: a slow drip becomes a controlled, visible stream you can manage, and a dry drain tells you the seal is holding. It does not let you skip the seal, though. Better routing reduces the load on the joint without removing the need to keep the gap within tolerance, so measure at the six points before the next run and watch the trend rather than one reading. Fleet teams working wet loads daily should also review wet-waste loading practice that cracks hopper floors; the liquid that finds a drain path also finds every crack in the floor plate.
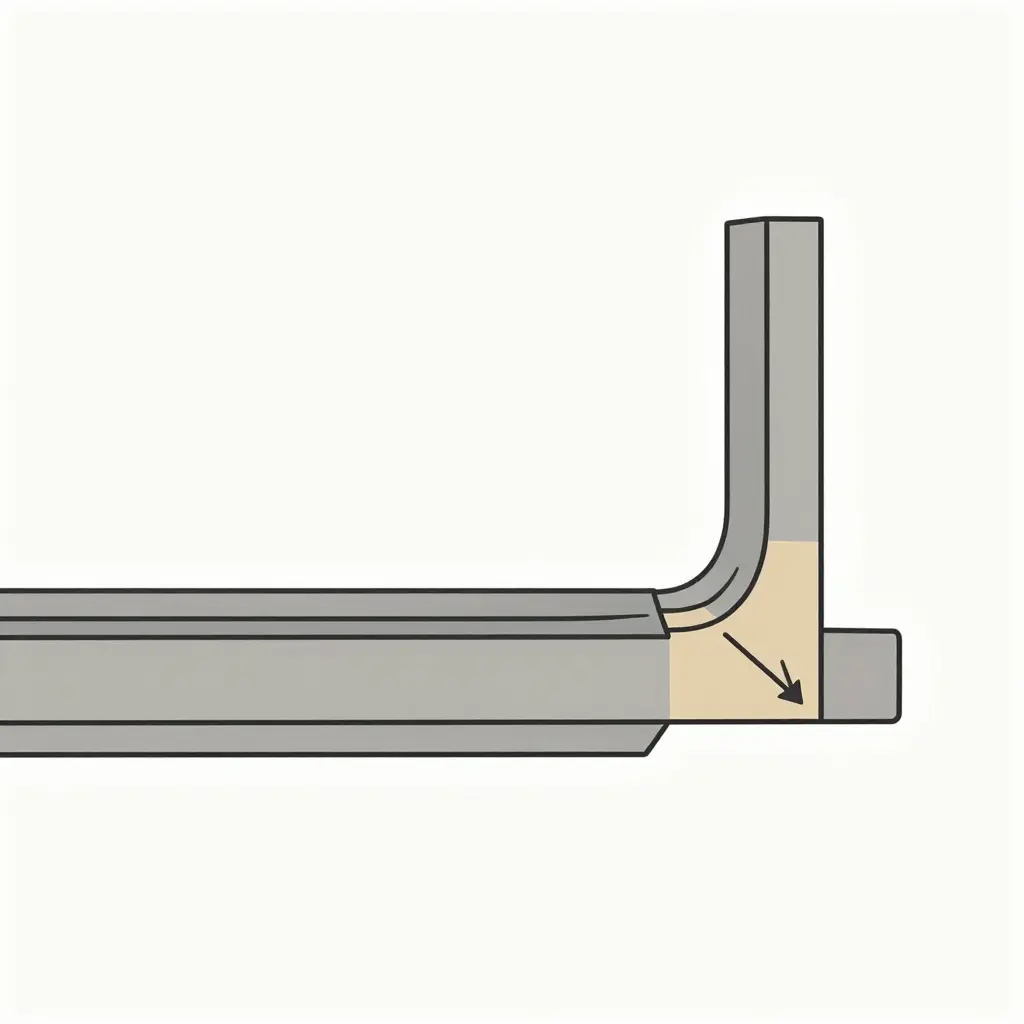
Figure: tailgate seal interface, side cross-section. Read it from the bottom up: flat body sill, tailgate frame above it, compressible lip crushed between the two. The feeler gauge slides along that horizontal joint line, and the arrow shows the only route the liquid has once the lip stops sealing, out through the wedge before it drips free at the station. Corrosion follows the same path, so if the sill is already pitted, read why the body floor rusts through first before you chase the seal itself.
From Diagnosis to Calendar: Building a Preventive Maintenance Schedule for the Tipper Tailgate
A drip at the transfer station is a wear reading, not a one-off nuisance. Once you have measured the gap and found where leachate escapes, turn that reading into a repeating schedule so the same gap never surprises you twice. That is what preventive maintenance on a tipper tailgate comes down to: intervals instead of guesswork, trends instead of opinions.
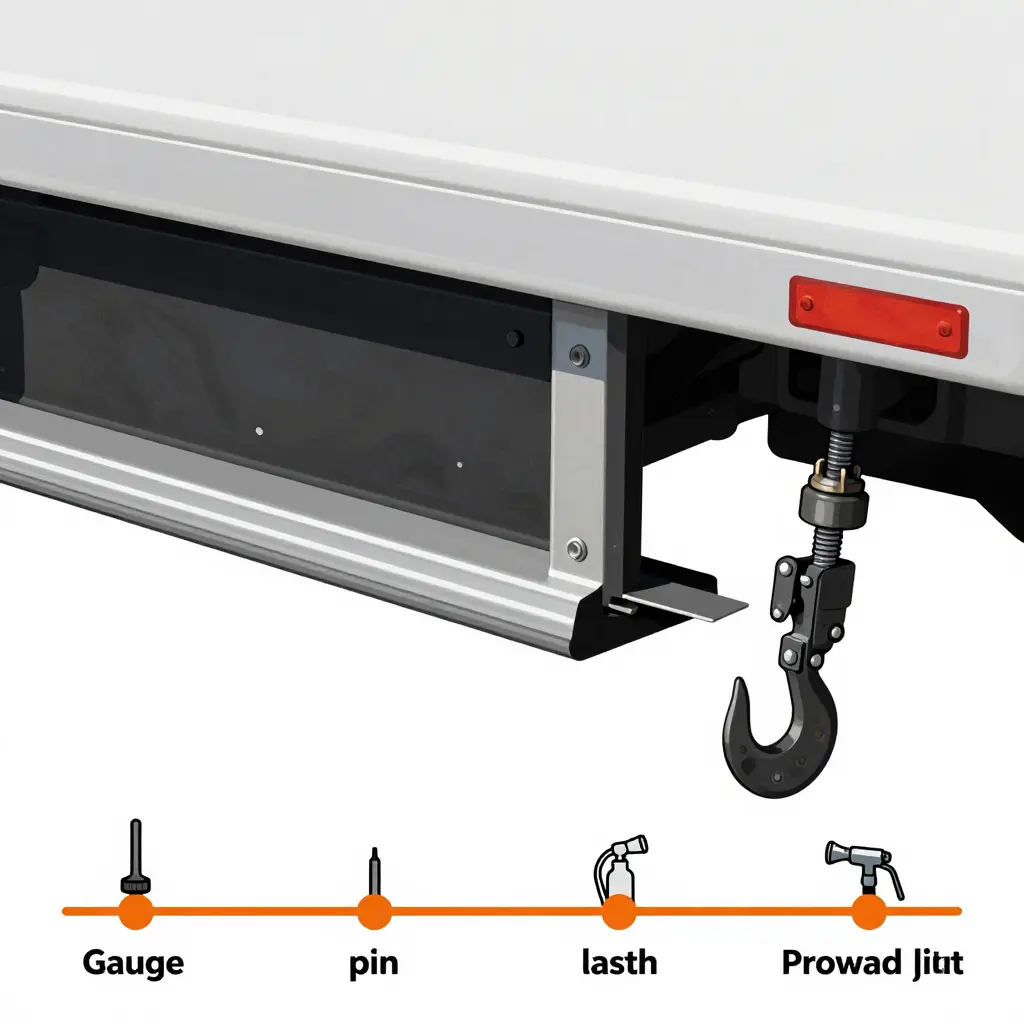
Gap measurement interval
The seal gap is the primary indicator, so measure it on a fixed cadence rather than when a puddle appears. Use the same six points as the diagnostic check, on both the header and the sill contact lines, so the numbers stay comparable between services. A visual check belongs in the daily walk-around; the gauged measurement belongs in the weekly or bi-weekly service block, depending on route moisture. Log every number in the unit file. A stable gap is healthy; a gap that has grown 1-2 mm over a few months says the hinge, latch or sill is moving.
Hinge pin and bushing play check
Hinge play is the quiet cause of a gap that keeps coming back. Check radial play at the hinge pins with the tailgate closed, then again part-open, since a worn bushing shows up differently under load. A typical fleet cadence is every 250 operating hours or monthly, whichever comes first, with a dial indicator or a pry-bar test against a reference mark. Play here loads the sill unevenly and puts stress into the rear frame, the failure pattern described in this guide to hidden frame rail cracks on used hook lift trucks – worth reading before you blame the seal.
Latch and preload adjustment
Latch engagement and preload set how hard the seal lip is squeezed against the sill. If preload is light, the lip skips and leachate weeps; if preload is heavy, the lip rolls and tears early. Inspect latch engagement, striker wear and adjustment hardware every 500 operating hours or quarterly, and re-set preload after any hinge or seal work.
Seal lip cleaning frequency
Grit, cured leachate and dried solids hold the lip off its seat. High-pressure clean the seal lip and the sill contact band weekly on dry waste routes, and after every shift or at minimum daily on wet, food-waste or sludge work. Keep the nozzle angle shallow so you do not lift the lip edge, and inspect for cuts, hardening and compression set while the surface is clean.
Trigger events for an out-of-cycle inspection
Some events reset the clock. After any tailgate seal replacement, re-measure the gap at 25-50 hours to confirm the new lip is bedding in rather than being abraded. After body repair, welding or sill plate work, inspect the hinge line and seal seat before the truck returns to route. When the waste stream changes to wetter material – compost, food waste, slurry, high-liquid commercial bins – halve every interval above and watch axle loading: overloading drives sill and hinge stress directly, as explained in this discussion of payload versus axle weight on rear load compactors.
Interval summary
- Seal gap check (visual): every pre-trip walk-around.
- Seal gap measurement (gauged, six points): weekly on dry routes; twice weekly on wet routes.
- Hinge pin and bushing play: every 250 operating hours or monthly, whichever comes first.
- Latch engagement and preload adjustment: every 500 operating hours or quarterly.
- Seal lip and sill band cleaning: daily on wet waste; weekly minimum on dry waste.
- Post-seal-replacement gap re-check: at 25-50 operating hours.
- Post-body-repair inspection: before the unit goes back into service.
- Waste-stream change to wetter material: halve all intervals and add a gap reading after the first week.
Treat these intervals as a starting framework. Follow the OEM wear limit for the specific tailgate and seal on your unit, including the stated maximum permissible gap, minimum lip compression and pin-to-bushing clearance. Where the manual is stricter than this calendar, the manual wins. Where it is silent, use the trend data in the unit file to justify tightening or relaxing a step.
FAQ: Tipper Tailgate Seal Gaps and Leachate Drips
What tipper tailgate seal gap is acceptable before the next run?
Measure with a feeler gauge at the six points and record each number. A new seal should sit at 0-2 mm on both lines. A header reading above 3 mm or a sill reading above 2 mm means the gate needs adjustment before the next run; a header above 5 mm, a sill above 4 mm, or an OEM wear limit lower than either of those means the seal is replaced before the truck leaves the yard. Judge the result against the wettest load on the route, not the average load.
Why does a new seal still drip?
A new seal drips because the tailgate is riding off-plane, not because the rubber is defective. Worn hinge bushings, uneven latch preload, and packed waste on the sealing lip all hold the new seal away from the body face. Check durometer too: a seal harder than 70 Shore A will not conform to a body face with 2 mm of distortion. Re-read the six-point gap after installation; a fresh seal that still shows 3 mm at one corner is a geometry problem.
Can the tailgate be adjusted instead of resealed?
Yes, but only when the seal is new and the variation comes from hinge or latch geometry. Shimming the hinges and resetting latch preload recovers 2-3 mm and brings the spread under 1.5 mm on that side. If a point is already past 4 mm at the sill or 5 mm at the header, or the seal is compressed-set and hard to the touch, replacement costs less than chasing shims. Adjustment is a geometry fix, never a substitute for a worn seal.
How do I tell hinge wear from seal wear using the six-point readings?
Seal wear shows a uniform increase around the frame or a local bulge next to the latches. Hinge wear shows a diagonal pattern, with the top opening on one side and the bottom opening on the other. Confirm it by measuring latched, then unlatching and jacking the tailgate: a change of more than 1 mm between the two sets means the hinge is moving. Pin-to-bushing clearance over 1.5 mm calls for new hardware, so pair the gauge readings with a close look at hinge pin and bushing wear.
Is a leachate drip a compliance or housekeeping issue at the transfer station?
Both, and the deciding factors are volume and location. Liquid escaping the tipping head or running off the body onto the apron may be a reportable release under your site permit; a few slow drips on the tip floor handled with absorbent are usually logged as housekeeping. Either way, log the time, truck number and estimated volume, then fix the seal gap before the next run. A drip that repeats on the same truck for three shifts moves from housekeeping to a maintenance non-conformance.
The Decision Rule: Six Points, One Spread, Three Outcomes
The whole routine takes about fifteen minutes with the body empty and the tailgate fully latched. Measure the six points, compare each reading against the limit, calculate the spread between the highest and lowest reading, then decide.
The six measurement points and their pass/fail limits
Measure with a feeler gauge or a straight edge plus depth gauge, gate latched, no load, chassis on level ground. Take the gap reading at the seal lip and the compression reading as seal thickness reduction at the same spot.
| # | Measurement point | Gap limit (pass) | Compression target | Adjust hinge and latch | Replace seal |
|---|---|---|---|---|---|
| 1 | Top rail, left corner | <= 3 mm | 8 to 14 mm | 3 to 5 mm gap | > 5 mm gap |
| 2 | Top rail, centre | <= 3 mm | 8 to 14 mm | 3 to 5 mm gap | > 5 mm gap |
| 3 | Top rail, right corner | <= 3 mm | 8 to 14 mm | 3 to 5 mm gap | > 5 mm gap |
| 4 | Bottom sill, left | <= 2 mm | 10 to 16 mm | 2 to 4 mm gap | > 4 mm gap |
| 5 | Bottom sill, centre | <= 2 mm | 10 to 16 mm | 2 to 4 mm gap | > 4 mm gap |
| 6 | Bottom sill, right | <= 2 mm | 10 to 16 mm | 2 to 4 mm gap | > 4 mm gap |
Spread rule: subtract the lowest gap from the highest. Four millimetres or less across all six points, with no more than 1.5 mm top-to-bottom on either side and no more than 3.0 mm of diagonal twist, is a gate that is clamped evenly. Anything wider means the gate is racked, a hinge is worn, or the seal has taken a permanent set on one side. Adjust hinge shims and latch rods, then re-measure before spending money on rubber.
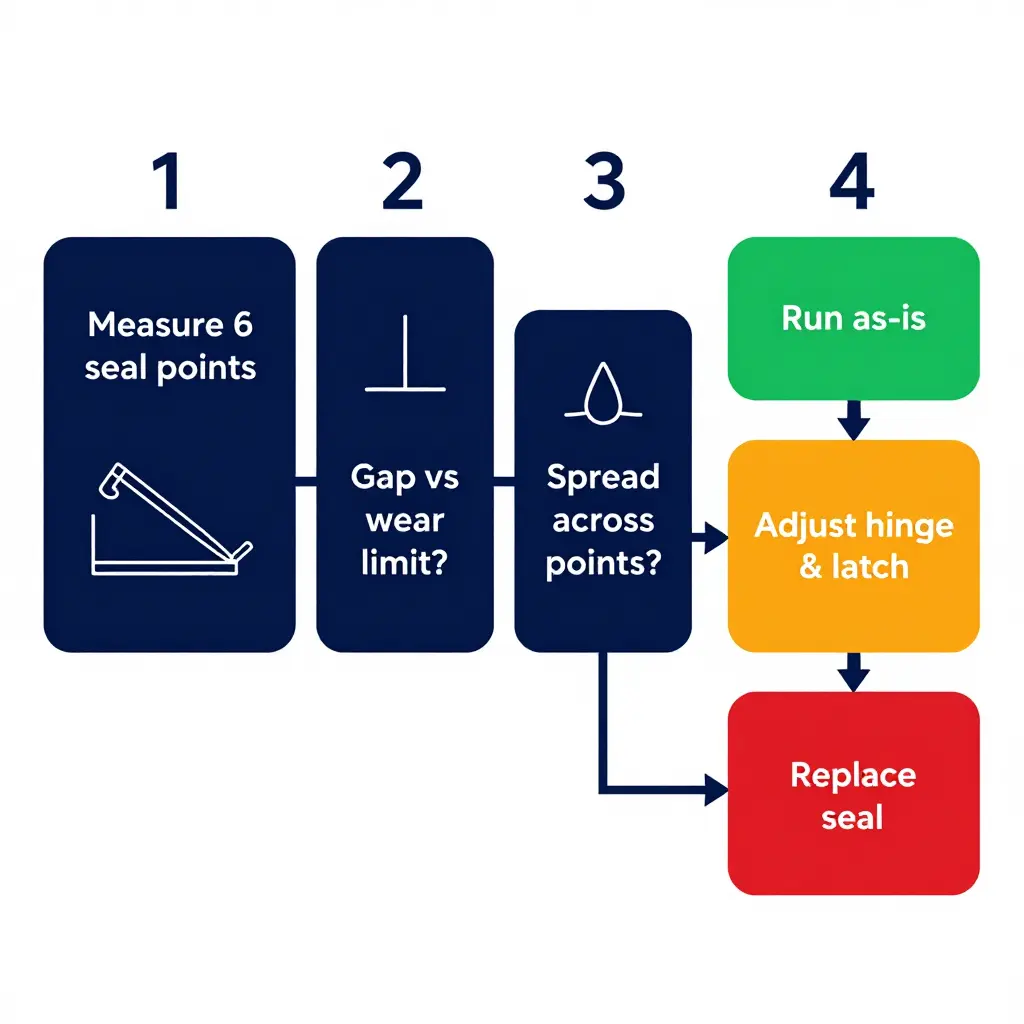
Why the gap number and the spread both matter
The gap number is the absolute leak path: a single 6 mm opening at one bottom corner will drip at the transfer station however good the other five readings look, because leachate does not need an average, it needs one hole. The spread is the diagnostic. It separates a seal that is worn out and leaking evenly from a geometry problem, where the gate no longer seats square and a new seal will be crushed on one side and leaking on the other. Read the gap for urgency, the spread for the type of repair.
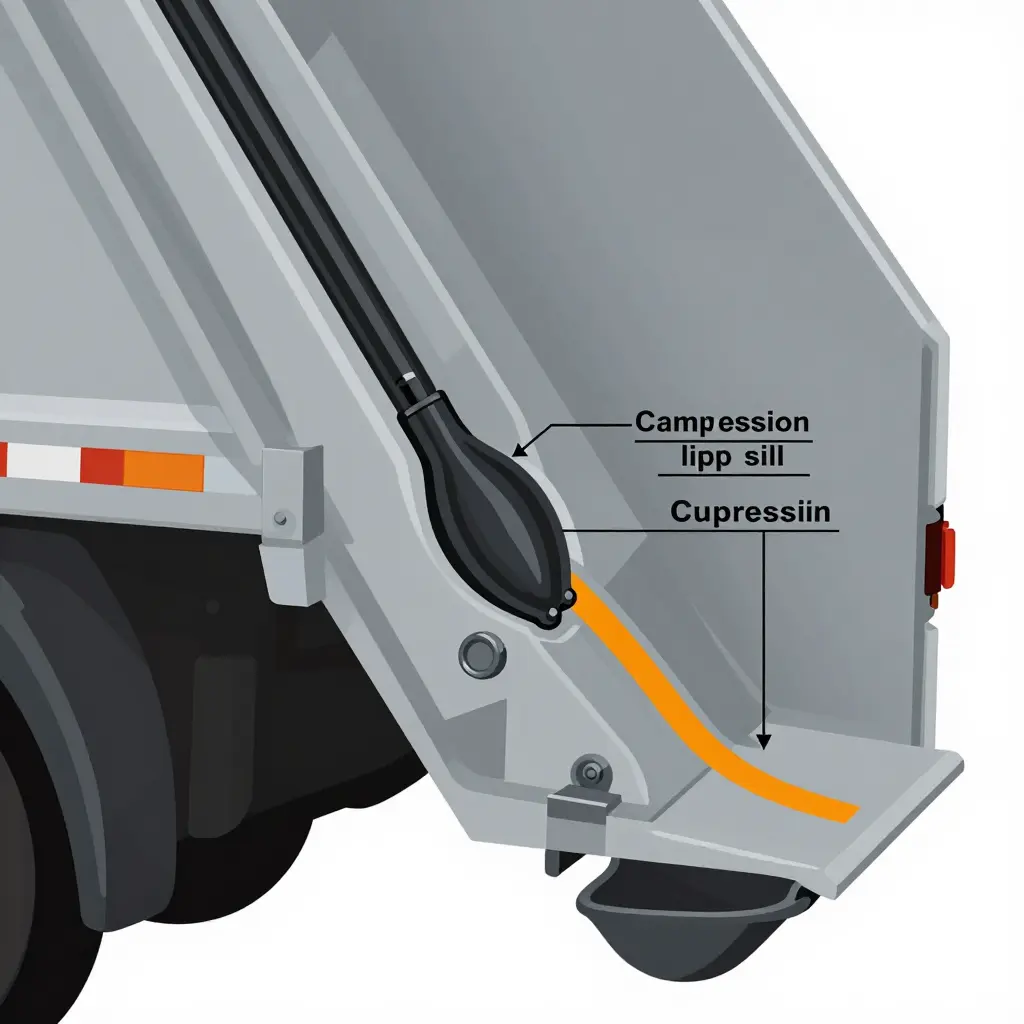
Until the work is scheduled, a leaking body is manageable rather than a shutdown event. Route a controlled drain path – a defined weep channel or drain port that carries liquid to one known collection point instead of letting it run down the sill and trail along the route – and park over a contained apron at the bay so drips are captured and pumped out on your schedule. With careful hinge pin and bushing wear inspection, that buys days of clean operation while parts arrive.
The lasting fix starts at the order stage. A tailgate specified with a defined seal compression range, a stated gap tolerance, and serviceable hinge and latch hardware – adjustable shims and replaceable bushings rather than welded-in pivots – stays measurable for its whole service life instead of becoming a sealed black box. CRRC builds tipper and hook-lift bodies to documented compression and gap tolerances, with replaceable bushings and shimmed hinges, so the numbers on the drawing can still be measured in the yard years later.