The rear loader slide gate is the hydraulically actuated panel that seals the packer body’s charge opening. It decides when compacted refuse stays in the body and when it gets ejected. On wet pickups, where liquid-heavy commercial and residential waste dominates the run, leachate drains out of the saturated load and runs into the gate tracks. That liquid is corrosive, and it carries grit, grease, and fine debris with it.
When a slide gate binds after a wet pickup, the cause is mechanical and repeatable: leachate carryover, corrosion, debris packing, and finally lost track clearance. Each stage makes the next one worse. The same sequence shows up in how wet commercial bins crack the hopper floor. What follows explains each stage and gives you a clearance measurement routine to run in the shop.
The Four Root Causes of Slide Gate Binding
A rear loader slide gate that binds after wet pickups usually has more than one thing wrong with it. Four mechanical problems do most of the damage, and they feed each other.
- Leachate carryover: Liquid that escapes the wet load coats the gate and track. The film adds drag and holds abrasive grit against the sliding surfaces.
- Corrosion of gate and track surfaces: Moisture and organic acids rust the gate edges and track walls. The metal roughens, and rust scale swells into the clearance gap.
- Debris packing in the track channel: Fine waste and grit compact into the corners of the channel and harden into a wedge that blocks the gate’s travel.
- Loss of track clearance: As corrosion and debris packing accumulate, the gap between the gate and its track drops below spec, and the gate seizes under load.
The four causes reinforce each other. Leachate feeds corrosion. Corrosion roughens the surfaces, so debris sticks and builds faster. The packed debris keeps consuming clearance until the gate binds hard. The same chain sits behind related rear-load compactor packer blade issues.
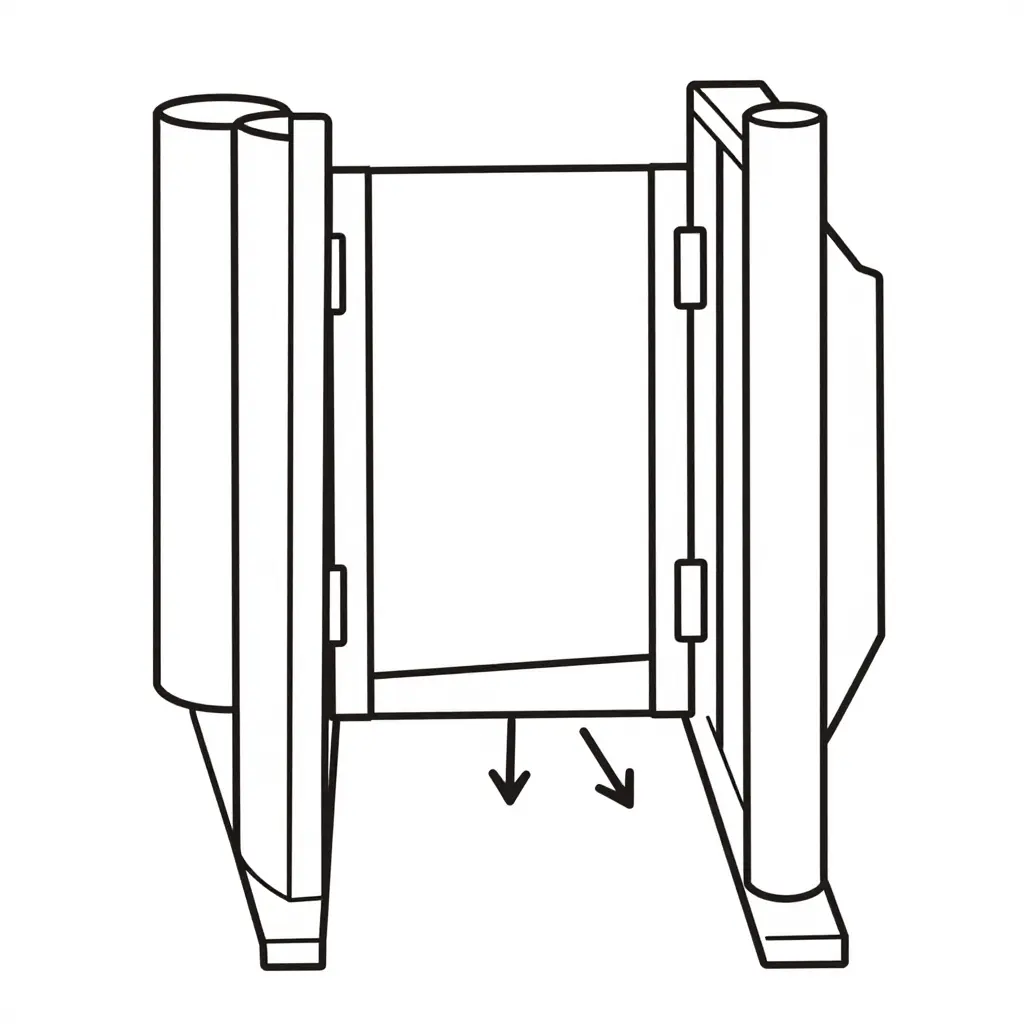
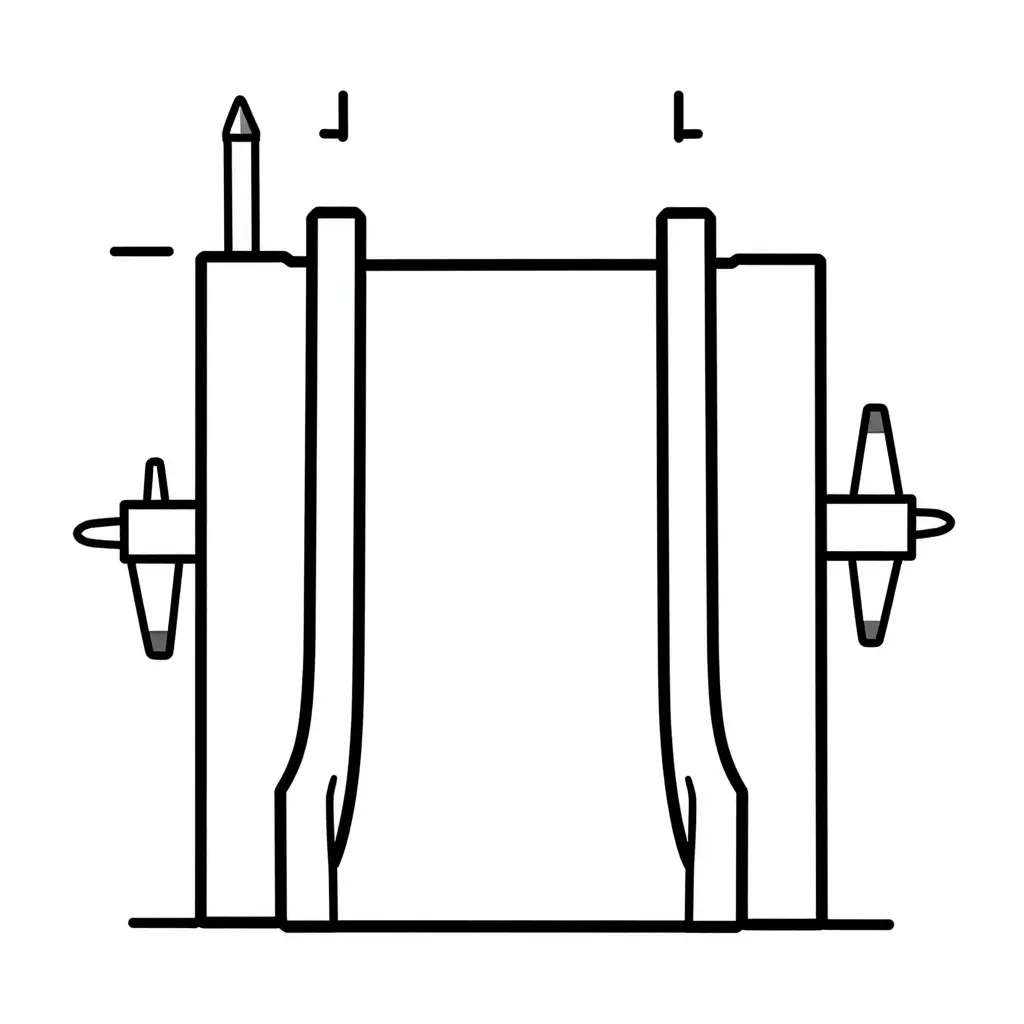
The cross-section shows the parts that matter after a wet pickup. The gate panel rides in the left and right track rails, and the clearance gap between the panel edge and each rail is the only room the gate has to move. When leachate and debris follow the flow path into the track, they pack that gap closed and the clearance is gone. Keep the diagram in front of you while you run the feeler gauge on your own unit, and you can see exactly where the gate is being pinched.
Leachate Carryover and Corrosion Mechanics
Every compaction stroke against a wet load pushes leachate forward. A rear loader working saturated waste can move 20 to 40 gallons of liquid past the packer seal in one full sweep. Some of that fluid migrates rearward into the slide gate track and pools against the gate’s lower guide surfaces.
Trapped leachate is acidic and salty. It carries organic acids at pH 4 to 6, plus dissolved chlorides from food waste and road salt that often exceed 1,000 mg/L. Mild steel in the track corrodes fast under that exposure: an unprotected surface can lose 0.5 to 1.5 mm of thickness in a year. The same metal loss shows up wherever wet waste sits against steel, as in this analysis of why the compactor body floor rusts through first.
Rust adds a second failure of its own. Scale expands to roughly two to six times the volume of the metal it came from, packing the track, raising friction, and eating the clearance the gate needs. Every wet pickup makes the binding worse.
Slide Gate Binding: Symptom-to-Cause Diagnostic Table
The table below maps symptoms to the root causes described above. Measure against the OEM track-clearance spec for your specific slide gate and packer body, and it helps to know how leachate attacks the packer body before you blame a component.
| Symptom | Likely Root Cause | Immediate Check | Corrective Action |
|---|---|---|---|
| Gate binds only after wet routes | Leachate carryover swells fines in the track and flash-rusts rail faces | Inspect track for damp fines and a rust bloom after the first wet cycle | Pressure-wash the track, apply a dry-film lube, then re-verify clearance at three points |
| Gate sticks intermittently | Uneven track clearance or partial debris pack at one rail | Measure clearance on both rails at full-open, mid-travel, and closed positions | Re-shim or replace wear strips to OEM spec and clear packed fines from the gap |
| Visible rust scale in the track | Chronic leachate exposure has broken down the protective coating | Probe rail faces for pitting and scale depth with a pick | Strip scale, treat pits, and recoat with a corrosion-resistant finish |
| Gate drags on one side | Bent rail, worn wear strip, or misaligned track | Compare left/right clearance and check rail straightness with a straightedge | Straighten or replace the rail, renew wear strips, and realign the track |
| Gate jammed with compacted debris | Wet fines compacted and hardened inside the clearance gap | Probe the gap between gate edge and rail for a hardened pack | Excavate the debris, set clearance to spec, and add a wiper/seal to shed material |
| Gate slow or weak from the first cycle of the shift | Cold hydraulic oil viscosity or low relief pressure | Check system pressure and oil temperature on the initial stroke | Set relief to spec and confirm oil grade matches ambient temperature |
Recurring binding is a clearance and corrosion signal, not a one-off jam. Log the clearance every time you free the gate. The trend tells you whether the next service needs shims, new wear strips, or a resurfaced track.
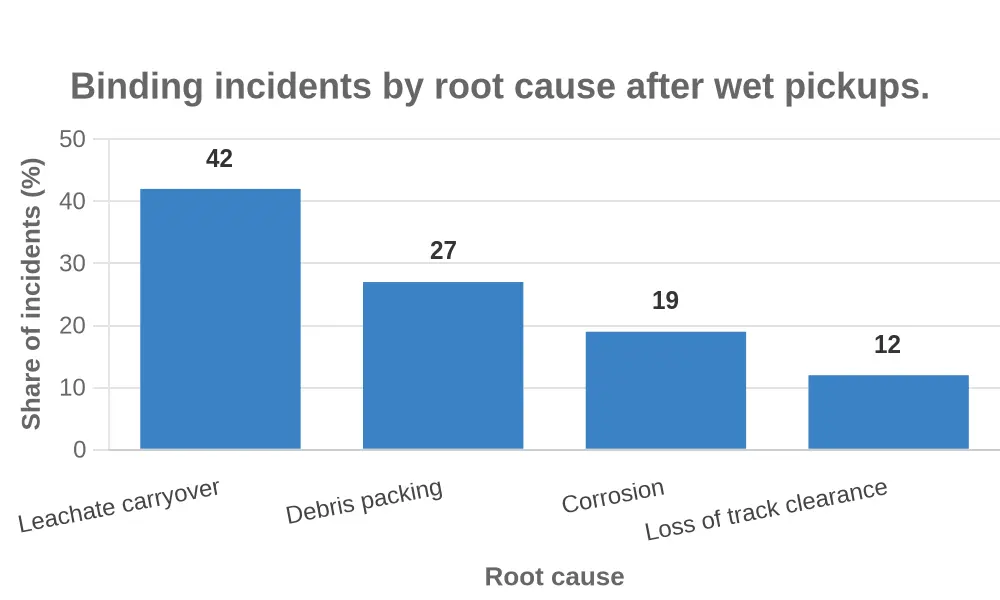
Binding incidents by root cause after wet pickups
A binding gate after a wet pickup is easy to notice and harder to explain. The four causes above are not equally common, and they tend to rank roughly as the chart shows. Use that ranking to set your diagnostic order instead of starting with the least likely cause.
What the distribution tells you
- Leachate carryover (42%). This is the dominant cause. Liquid that gets past the packer blade and into the slide gate track coats the gate’s sliding surfaces with a sticky film. On humid mornings, or after a route that handled wet commercial bins, check this first.
- Debris packing (27%). Fine organic grit, glass shards, and compacted residue wedge into the track gap until clearance is effectively zero. It is mechanical and progressive, worse after every compaction cycle.
- Corrosion (19%). The slow, structural one. Rust on the gate rails and rollers raises friction and changes running dimensions over months, not days, so it responds to scheduled maintenance rather than reactive repair.
- Loss of track clearance (12%). The least frequent and the most spec-driven. Once the gate-to-track gap drifts outside the manufacturer’s tolerance, the bind is geometric, and cleaning will not fix it.
Prioritizing your checks
Work the list from the top. Check leachate drainage and gate wash-down first, then clear and inspect the track for packed debris, then look at corrosion on the rails and rollers. Only after ruling out those three should you break out the feeler gauges. Clearance is the step crews skip most often, and it is what separates a frictional bind from a dimensional one – and decides whether the fix is a cleaning routine or a rail replacement.
If your gate binding traces back to chronic wet-bin overloads cracking the hopper floor at the same time, it is worth reviewing why wet commercial bins crack the hopper floor and the plate thickness to specify for the duty cycle.
Diagram: Slide Gate Track Clearance Measurement Points
Reading the Diagram
The illustration shows a rear-loader slide gate panel seated in its guide track, viewed straight-on with the body structure and hardware removed. That interface decides whether the gate slides freely or fights you on every cycle. The caliper symbols mark six measurement points: front, middle, and rear on both the left and right track walls.
Six points, not one, because a slide gate almost never wears evenly. Wet pickups dump liquid across the hopper, and it runs down the track differently depending on how the truck sits, how the load shifts, and which side the operator favors. A single spot can read perfectly “in spec” while a pinched corner elsewhere is what is actually holding up the panel.
The Six Points, Explained
Record all six numbers before you judge anything. Here is what each position tells you:
| Measurement Point | Track Position | What a Tight Reading Here Suggests |
|---|---|---|
| Front – Left | Leading edge of panel, left wall | Galled or packed track at entry; debris pushed ahead of the gate |
| Front – Right | Leading edge of panel, right wall | Same as above on the opposing side; compare to find side-to-side bias |
| Middle – Left | Mid-travel, left wall | Worn or bowed track channel; uneven wear over the full stroke |
| Middle – Right | Mid-travel, right wall | Corrosion blisters or rust scale narrowing the channel |
| Rear – Left | Trailing edge of panel, left wall | Pinched captive end; can indicate a bent or twisted panel |
| Rear – Right | Trailing edge of panel, right wall | Same as above; large front-to-rear delta points to racking |
How to Take Consistent Readings
The point of the diagram is repeatability: two technicians on two shifts should get the same numbers. Keep the gate clean and fully dry, wipe down the track walls, and remove loose scale before you put a feeler gauge in the gap. Measure straight across from the track wall to the panel edge at each of the six labeled positions, with the gate in the seated position shown. Write every figure down as you go.
A few habits that keep the numbers comparable:
- Use one gauge for all six points. Mixing tools adds error you cannot see in the readings.
- Take each reading twice. If the two numbers disagree, the panel may be rocking. Note it.
- Watch the spread, not just the absolute value. The gap between your tightest and loosest point usually matters most.
- Log the readings by date and truck. Trends turn a one-time repair into a preventive schedule.
The same forces that pinch the track also wear the components around it. These common rear-load compactor packer blade issues turn up on the same neglected trucks and share the wet-pickup root cause.
With all six clearances on paper, compare them against the manufacturer’s specification, find the outliers, and decide whether the job is clearing debris packing, removing corrosion, or replacing a worn track section. The diagram keeps you measuring the same six places the same way every time.
Interpreting Track Clearance Readings
With all six readings logged, the pattern matters more than any single number. A consistent track clearance across both rails and the full travel tells you the slide gate is square and the runners are sound. A side-to-side difference, where one rail reads lower than its opposite, points to a bent track, uneven loading, or asymmetric bushing wear that makes the gate cock and bind.
Reduced total clearance means active trouble: scale on the rails or leachate-borne debris packing the channel and narrowing the gap the gate needs to slide. That failure mode sits behind many packer blade and gate binding failures.
Wet pickups speed all of it up. Each cycle washes acidic leachate and abrasive grit through the track, and clearance loss on wet routes often runs at double the rate seen on dry ones.
Recommended Slide Gate Track Clearance Specifications
With the six readings in hand, use these acceptance criteria to make the pass or fail call. Measure with the gate fully closed, the packer body level on flat ground, and the tracks clean and dry. Read clearance as a feeler-gauge gap between the gate wear pad (or gate edge) and the track rail face.
| Component / Measurement Point | Nominal Clearance | Maximum Wear Limit | Action if Exceeded |
|---|---|---|---|
| Gate-to-track clearance – left side, front position | 0.045 in (1.15 mm) | 0.090 in (2.30 mm) | Adjust or shim wear pads; re-torque track bolts |
| Gate-to-track clearance – left side, middle position | 0.045 in (1.15 mm) | 0.090 in (2.30 mm) | Install new wear pads; clear packed debris from rail |
| Gate-to-track clearance – left side, rear position | 0.045 in (1.15 mm) | 0.090 in (2.30 mm) | Replace worn rail section; weld-repair track face |
| Gate-to-track clearance – right side, front position | 0.045 in (1.15 mm) | 0.090 in (2.30 mm) | Adjust or shim wear pads; re-torque track bolts |
| Gate-to-track clearance – right side, middle position | 0.045 in (1.15 mm) | 0.090 in (2.30 mm) | Install new wear pads; clear packed debris from rail |
| Gate-to-track clearance – right side, rear position | 0.045 in (1.15 mm) | 0.090 in (2.30 mm) | Replace worn rail section; weld-repair track face |
| Total side-to-side tolerance (left + right combined) | 0.090 in (2.30 mm) total | 0.150 in (3.81 mm) total | Straighten or replace bent track; realign gate; verify body square |
Clearance loose enough to let the gate skew or cock sideways usually comes with other damage. The same wet-pickup forces that pack the rails also load the compactor blade and hopper floor, so inspect those wear surfaces while you are under the body. For a deeper look at the damage this cycle causes, see this breakdown of rear-load compactor packer blade issues.
Note: The values above are illustrative figures for a typical rear-loader slide gate. Actual nominal clearance, wear limits, and repair actions vary by manufacturer, gate design, and wear-pad material. Check the OEM service manual for the specific packer body before you adjust, shim, or condemn any track component.
Preventive Maintenance Best Practices to Stop Slide Gate Binding
A slide gate rarely seizes overnight. It binds after leachate carryover, grit, and corrosion slowly eat away the clearance the gate needs to travel. Understanding how wet waste does that damage, from cracked hopper floors to accelerated plate wear, is step one; a maintenance routine you actually run is step two. These practices keep the gate moving between major services.
- Rinse the track after wet routes. Flush the slide gate track and guide rails with clean water at the end of any shift that handled wet pickups. Let leachate and organic slurry dry and they harden into an abrasive paste that packs the channel and stalls the gate.
- Apply a suitable lubricant or dry-film coating. Wet routes strip grease fast. A moisture-resistant lubricant or a dry-film coating that resists wash-off beats heavy grease, which traps grit.
- Check track clearance at set intervals. Measure and log track clearance before it drifts out of tolerance. Catching a small change early avoids a full teardown.
- Replace worn track wear strips or liners. Swap worn strips and liners before metal-on-metal contact starts, since uneven wear is what forces the gate to cock and jam.
- Inspect the packer seal. A failing seal lets leachate weep straight onto the gate track, so verify it holds and replace it when it hardens or tears.
Set the intervals by route wetness. Trucks on heavy wet-commercial duty need shorter cycles than dry residential routes, so let the collection environment, not a fixed calendar, set your inspection frequency. Match the interval to the load and the gate stays free.
The most common questions about rear loader slide gate binding and track clearance:
Why does my slide gate bind only after wet pickups?
Wet pickups carry leachate and grit into the packer body. Liquid drains into the track channel and dries into a sticky, corrosive film that packs the slides and rails tight, so the gate drags under load only when the waste is wet. Dry loads leave less residue behind to fill the clearance.
How much track clearance is enough?
Most builders spec a total side clearance of about 0.090 in (2.30 mm) – 0.045 in (1.15 mm) per side – with a wear limit near 0.150 in (3.81 mm). Check both sides with a feeler gauge at the front, middle, and rear of the panel. Even clearance matters more than the total: one tight side will bind under load.
Can I fix binding by lubricating only?
No. Lubricant cuts friction, but it cannot restore lost clearance or dissolve packed leachate and rust. If the track is already tight, grease traps grit and speeds up wear. Measure clearance first, then lubricate.
How often should track clearance be measured?
At every PM service, or weekly on routes with heavy wet pickups. Shorten that interval if you see uneven wear or repeated binding reports. Log the readings so you can catch shrinkage before it becomes a breakdown. Related wear shows up in packer blade components.
What causes track clearance to shrink?
Wear on the slides, rollers, and track liners is the main cause, made worse by corrosion and debris packing from leachate. A bent or misaligned track section after an impact closes the gap on one side. Loose fasteners and cracked welds let the track shift, which reduces clearance further.