Garbage Truck Tipper Cost Splits Into Two Build Tiers
Tipper quotations arrive in two shapes. One is a light duty body sized for part-day collection, the other a heavy route body sized for work that runs through two shifts and keeps tipping until the yard closes. Most quotes you receive land in one of those two brackets, and the difference between them is built into the steel and the hydraulics, not into the paint.
A light duty build suits a suburban skip round, a small commercial contract, or any chassis that tips 8 to 15 times a day and is back in the yard before dark. Plate is thin, the subframe is a lighter channel section, and the hydraulic package is small, which is why these units price a quarter to a third below a heavy route equivalent.
A heavy route build is engineered for punishment: multi-shift municipal work, wet and dense refuse, 40 to 80 body tips a day, year after year. The floor and sides get thicker plate, the subframe is reinforced, and a higher-displacement pump drives a hoist cylinder rated for constant duty. That package costs 35-60% more than the light build, and on a single unit the premium is real money.
None of that premium is margin. It sits in named components, and the first thing to settle before you compare quotes is which route profile the truck will actually run.
If you are still deciding which chassis length and body volume suits your rounds, this chassis and body sizing guide for tipper trucks walks through the matching logic.
The table below separates the two builds line by line.
| Build Element | Light Duty Build | Heavy Route Build | Effect on Garbage Truck Tipper Cost |
|---|---|---|---|
| Body floor plate thickness | 4-5 mm mild steel | 6-8 mm wear plate | Up 10-15%: top body cost line |
| Side wall plate thickness | 3 mm | 4-5 mm | Up 3-6%: modest steel add |
| Subframe and frame rail section | 180 x 70 x 5 mm channel | 250 x 80 x 8 mm channel | Up 15-20%: steel plus weld hours |
| Lift cylinder stage count and bore | 2-3 stage, 150 mm bore, 180 bar | 4-5 stage, 200 mm bore, 210 bar | Up 20-25%: largest hydraulic jump |
| Hydraulic pump and PTO specification | 40 L/min gear pump, single-speed PTO | 90 L/min piston pump, matched-ratio PTO and oil cooler | Up 8-12%: pump, PTO, oil cooler |
| Tailgate hinge and seal arrangement | 2 pins, 20 mm, rubber lip seal | 4 pins, 30 mm, double EPDM seal | Up 4-7%: cheap part, costly leaks |
| Typical chassis GVW class | 10-14 t | 26-33 t | Up 20-30%: chassis, not body, cost |
| Expected body tips per day | 8-15 tips/day | 40-80 tips/day | Up 10%+ over service life: wear, not purchase |
| Indicative price band vs base light duty | Baseline, 0% | +35-60% | Net gap, concentrated in floor, cylinder, subframe |
The percentages are the typical step for each line measured against the light duty baseline for that same line. They overlap and do not add up. The 35-60% on the last row is the net spread between the two builds, not the sum of the rows above it.
Where the Price Gap Actually Sits in the Body
When two quotes for a garbage truck tipper land on your desk 30% apart, the reflex is to blame the chassis. Chassis class usually does differ, 10-14 t GVW against 26-33 t, but that is a separate line on the invoice. Most of the spread sits in the body structure, in the parts a quotation rarely itemises.
- Steel grade and plate thickness. The floor and side walls are the first place a builder trims cost. Dropping the floor from a quenched and tempered wear plate to a mild steel equivalent, or shaving 2 mm off a side wall, does not show in a photograph but shows up in the invoice. Each step up in grade and each added millimetre of plate raises the body price and extends service life through the same mechanism: abrasion and impact remove steel, so the plate has to stay thick enough to last until the next reline.
- Hopper and front bulkhead reinforcement. The hopper absorbs the drop load, and the bulkhead takes the push from packed refuse. Extra gussets, a doubler plate and a bulkhead tied properly into the sides add cost and weight; they are also what stops the front of the body cracking after two or three years of heavy routes.
- Weld detail and corrosion protection. Continuous welds on high-stress seams, seam sealing and a full internal coating cost more than stitch welding and a quick primer. They also decide how long the body survives wet, salty refuse, and where leaks eventually start. Tailgate seal gaps that let leachate drip attack those same seams from the inside, which is why they are worth inspecting while the welds are open to view.
How plate specifications get quoted, and how hydraulic numbers are written into a body quote, is covered in this guide to body steel grade and hydraulic spec choices. The practical rule that follows: a light duty build run on a heavy route wears out faster than the saving is ever worth, usually inside the first ownership cycle.

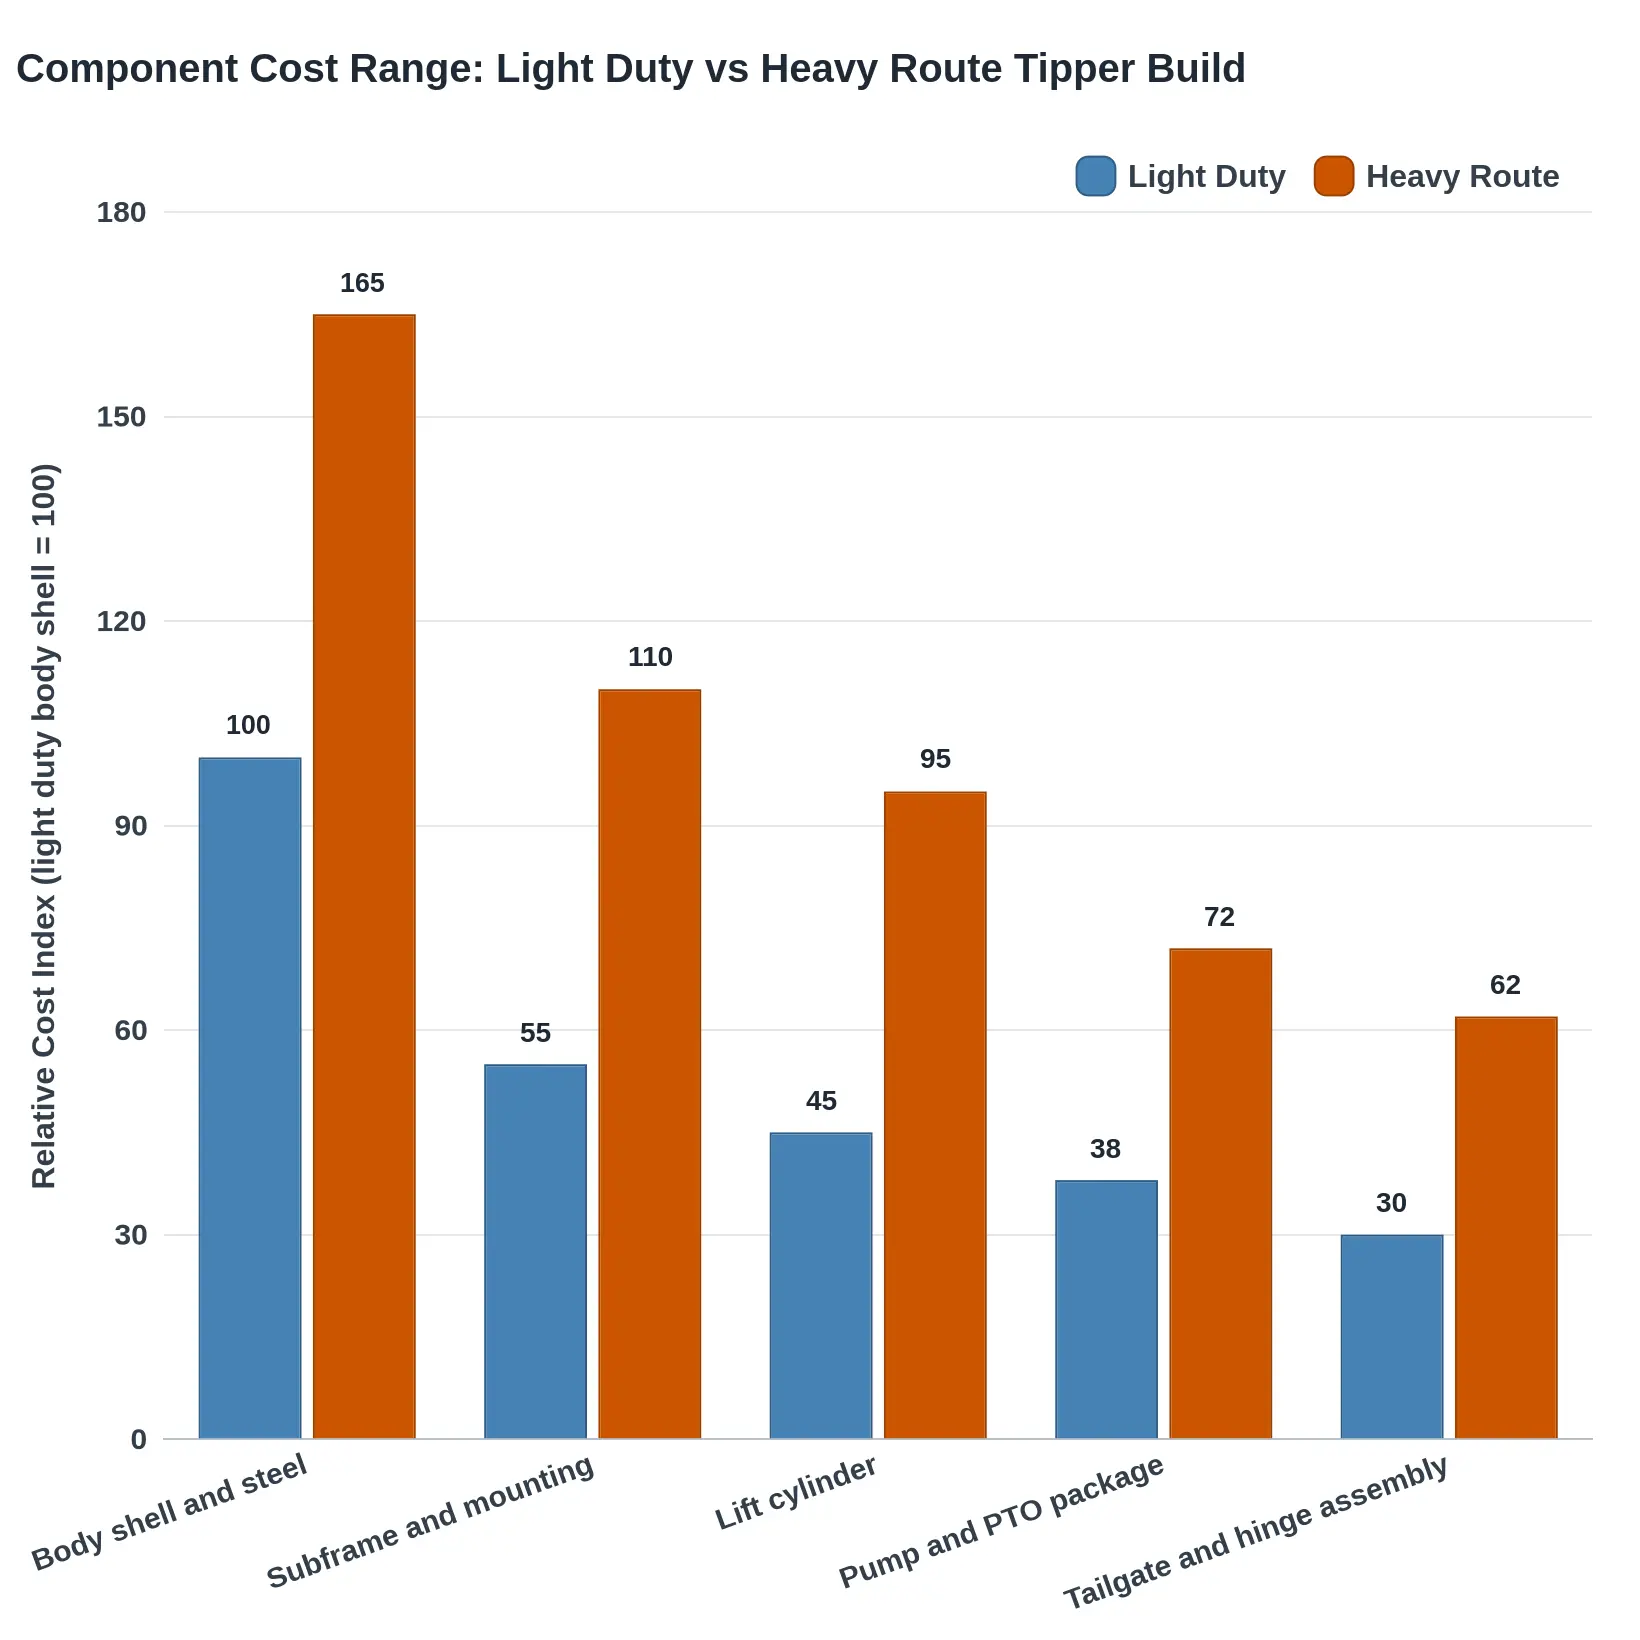
Each block’s height tracks its share of the build: the body shell dominates, the subframe follows, then the lift cylinder and hydraulic package, the PTO and pump, the tailgate and hinge assembly, and last the chassis interface hardware. That order is also the order in which the light duty and heavy route prices separate. The thick end of the stack is where steel grade and plate thickness are decided; at the thin end, the same hardware often looks identical on both builds.
Hydraulics, PTO and Mounting: The Second Half of the Gap
The body and hoist get the attention, but the hydraulic package is where a light duty quote quietly turns into a heavy route quote. Bore and stage count set the force available at the hinge, and a small-bore two-stage cylinder struggles with a wet, packed municipal body. Step up to a multi-stage garbage truck tipper hydraulic cylinder with a larger bore and the pump has to move more oil to fill it, which pulls displacement, reservoir size and price up together.
The PTO is the second lever. A light build tolerates a modest ratio and a small pump. Heavy route duty means matching the PTO ratio to engine rpm so the pump runs in its efficient band, plus enough cooler capacity to hold oil temperature down through a shift of continuous tipping. Get heat management wrong and seals, hoses and valve bodies start failing within a season.
Mounting is the least visible line on any quote and the most underestimated. A heavy build needs more crossmembers, larger U-bolts and a reinforced subframe to spread load along the rails instead of point-loading them. Skipping that work is a false saving, so check the body-to-chassis mounting points before you sign anything.
Undersizing the hydraulic package to protect the purchase price moves the cost into downtime and rebuilds instead. A cylinder that lifts slowly, a PTO that overheats, a subframe that flexes: each one shows up later as cracked welds and stalled lifts, the body lift problems that keep a truck parked for days. Price the hydraulics and mounting for the duty cycle, not for the invoice.
Specification Items to Confirm Before Accepting a Garbage Truck Tipper Quote
- Floor plate thickness and steel grade. Demand the mill certificate naming the thickness in millimetres and the grade (for example 5 mm NM400 floor, 4 mm S355 sides), not a vague “heavy duty” claim.
- Cylinder bore and stroke. Get bore, stroke, rod diameter and rated working pressure in writing for every hoist stage, so the tipper body quote can be checked against the load it has to lift.
- Pump displacement and PTO. Specify pump type, displacement in cc/rev, flow at the stated engine rpm and maximum pressure, then the PTO ratio, torque rating, gear type, hot-shift or cold-shift engagement and the PTO hours the supplier expects per day. This is where much of the price difference actually sits.
- Subframe crossmember spacing. Ask for spacing in millimetres, section size, longitudinal rail dimensions, and the number and position of chassis mounting points.
- Tailgate seal type. Name the seal material, profile, compression and fixings, and require a leachate gutter and drain detail so wet loads do not run down the body sides.
- Paint and anti-corrosion system. List primer type and dry film thickness in microns, topcoat system, surface prep standard, and whether the body interior gets an additional epoxy coat.
- Body-to-chassis mounting hardware. State U-bolt and fastener grades, torque values, anti-vibration pad material, and whether any welding to the chassis rails is permitted.
- Tipping angle and lift time. Record maximum tip angle in degrees, lift time to full extension at rated payload, and the lower or power-down configuration.
- Body volume and tare allowance. Give struck and heaped capacity in cubic metres plus bare body tare weight, so net payload is explicit rather than implied.
- Operating envelope and safety devices. Confirm maximum rated load, hoist lock or prop specification, pressure relief setting, and any tilt or overload alarm supplied.
- Warranty on the hydraulic package. Write down warranty length in months and hours for cylinder, pump, PTO and valves, what voids it, and the parts response time.
- Documentation handover. Require a parts book, hydraulic schematic, weld and steel certificates, and inspection records with delivery.
Turning the Price Gap Into Cost per Tonne Handled
Start with the arithmetic, not the sticker. Annual tonnage is tonnage per cycle multiplied by cycles per shift, shifts per day and working days in the year. Lifetime cycles is cycles per shift times working days times service life in years, and lifetime tonnage is annual tonnage times that service life. Then run the same total for each build: purchase price, plus every rebuild, reline or hydraulic repair you expect inside the life, plus the downtime each one costs. Divide by lifetime tonnes and put the two numbers side by side. The tonnage side of the sum moves fast, which is why how compaction ratio sets body volume matters as much as the price sheet.
That comparison is where the threshold appears. Below a certain number of daily cycles, the heavier truck never earns back its extra steel and larger hydraulics, because the reline or rebuild arrives before the tonnage has been worked through. In that band the light duty build returns the lower total cost of ownership, and the premium sits in a truck that idles. Above it, the same premium and the same rebuild are spread across far more tonnes each year, and the heavy route build wins on cost per tonne. Where the line falls depends on your tonnage per cycle and what a rebuild costs you, but it sits well above the 8 to 15 tips a day a light build is designed for and inside the 40 to 80 a heavy build is built to take.
Rule for choosing: count cycles per shift and projected lifetime cycles first. If lifetime tonnage comfortably swallows the build premium plus at least one rebuild or reline, buy the heavy route build. If it does not, take the light duty truck and keep the difference.
FAQ
Can a light duty tipper be upgraded later instead of buying a heavy duty build?
Only partly, and rarely cheaply. You can bolt on extra ribs, fit a thicker floor plate or swap in a larger cylinder, but the base structure and the chassis rating stay what they were, so you add weight without adding rated capacity. The rework usually costs more than the original difference in price, and the result is still a light duty body.
Which single component drives most of the price gap?
No single component does. Floor plate and subframe together carry the largest share of the step-up: moving from a 4 mm to a 6 mm floor plate and from mild steel to a wear-resistant grade lifts the body price more than any hydraulic line, and the subframe adds steel weight and weld hours on top of that. The hoist cylinder is the biggest single line after the body, and it pulls the pump, reservoir and cooler along with it.
Does a heavier build reduce fuel economy?
Yes, but less than most owners expect. The extra plate and subframe weight costs most on stop-start collection work, where it has to be accelerated again at every pickup, and the penalty is usually a few percent rather than double digits. Route length matters far more than plate thickness.
How is plate thickness verified on delivery?
Use a calibrated ultrasonic thickness gauge and take readings at several points on the floor, staying clear of ribs, welds and folded edges, then repeat mid-panel on the sides. Compare those readings against the mill certificates and the spec sheet before you sign, and spot-check the tailgate skin and hoist mounting plates, which are often thinner than quoted. Inspect the chassis rails at the same time, since hidden frame rail cracks under the subframe are easy to miss on a fresh delivery.
What documentation should a manufacturer supply with the hydraulic package?
Ask for cylinder spec sheets listing bore, stroke, rod diameter and rated pressure, plus pump displacement and the PTO ratio it was matched to. The valve block schematic with its relief setting, hose pressure ratings, an assembly drawing showing mount points and torque values, and a pressure test report for the assembled circuit should all come with the unit. Without those documents you cannot verify that the circuit was built for the pressure it runs at.